Showing posts with label appetizer. Show all posts

Tuesday, October 11, 2022

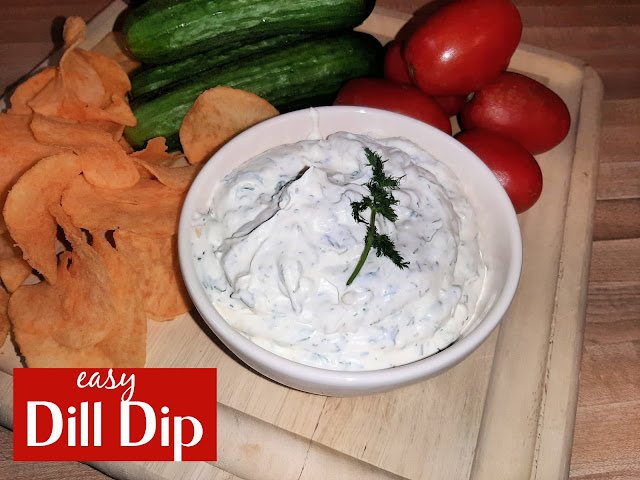
The EASIEST Dill Dip

Goooood Evening!  It is me again, a new recipe, an easy versatile recipe that I thought you guys might like.  We got some fresh amazing dill at the farmer's market a few weeks ago and my husband had asked for pickles AND dill dip.  I couldn't think of two things I like better with dill so I got the pickles done and set off to make my own homemade dill dip.  Homemade is just best, don't you agree?  I like controlling what is in our food, real food.  Just reading the ingredients on any product in the store gives me anxiety.  What is that?  Is that a fancy name for bugs?  Is that sawdust?  Yeah, I just prefer homemade whenever possible.  I mean I am a food blogger and recipe developer.....kind of a requirement that I love cooking!  Honestly, like anyone else, sometimes I don't love cooking and baking.  Sometimes I want to take 3 days off from making dinner and I do.  Anyone else go through short periods of time like this?

Well, along with the dill, I found delicious tomatoes, and baby cucumbers for dipping in said dip and so I got started.  Pretty easy.  Kind of all of the usual suspects of dill dip but I just did the measuring for you!  As with any recipe of mine, always, ALWAYS adjust it to your tastes.  Not big on garlic, add less.  No salt?  Add zero.  And so forth.  Here we go folks!  

Side Note: If you eat salmon, make extra, you might enjoy this shmeared on top or thin out with some milk and use as salad dressing, you are welcome!

  • 1 cup mayonnaise
  • 1 cup sour cream
  • 2 TBSP fresh dill
  • 1 tsp dried dill weed
  • 1 TBSP onion flakes
  • 1 tsp parsley (same amount dried or fresh)
  • 1 tsp garlic powder
  • 1/2 tsp salt
Combine all ingredients in a bowl with a lid.  Make sure all spices and herbs are completely mixed in.  Cover and refrigerate for at least 1 hour but up to 12 hours if you like!  The flavor will grow stronger the longer it chills!!


ENJOY!


Monday, June 20, 2022

Easy Slow Cookier Lil' Smokies

Summertime, summertime, sum-sum-summertime!  All the summer things happening!  Outdoor concerts, BBQ's, gatherings, swimming, and the list goes on.  I momentarily thought I was 10 again and ALMOST hit up a slip and slide.  One of my childhood favorite activities.  We didn't have the money to buy the REAL deal, but we had even better....  Let me set the scene.  My dad would buy a roll of plastic at the local lumberyard each fall to cover the very OLD windows on our 7-bedroom house with an amazing 6 ft. clawfoot bathtub, a kitchen for 12 that was about 6X7 and the best wrap around porch this side of the Mississippi!  He would take what was left, and sometimes add more, and lay it out in our long backyard.  He would run the sprinkler, the kind that fans out, and we would slip, and slide half a city block I swear.  We had the MEGA TONKA version of the Slip N' Slide, and it was awesome!  We always found ways to have fun.  We swam from sunup until sundown, had to be home when the streetlights went off and our bikes in the yard.  Those were the good old days, weren't they?  Neighbors on a walk, stopping by for iced tea on the porch, poured straight out of a Tupperware pitcher, you know the ones. God has certainly blessed me in my life, so I shall be grateful for NOW as well.  

Anyway, this morning as I am typing this up, it will be over 100 today and what better time to get some good use out of that slow cooker it took me years to make friends with?!  Perfect to cook things low and slow, AND to avoid heating up the house with the oven on, right?  This recipe is so easy and probably 98% of you know it, make it, or have at least eaten it once.  But you know what?  There are very beginner or kid home chefs out there (and other countries) who might need something easy to start with or even someone who has perhaps forgotten how good these are!  I have a little mid-size slow cooker because I am not about to dirty my regular size one for such a small amount of food.  I mean big batch, sure, this size no way!

Here we go, Lil' smokies, every football party across America serves them!  WITH a toothpick! THREE ingredients!

  • 1 cup of your favorite BBQ sauce (I only like Cookies which is probably, maybe a Nebraska thing only)
  • 1 cup grape jelly
  • 2-14oz pkgs Lil' Smokies of your choice

I like to mix the sauce separate.  Put the little smokies in your slow cooker (or simmer for an hour on low in a regular pot or in the oven at 300).  Mix up your jelly and BBQ sauce well and pour it over the top.  Mix to combine or let it slowly warm and drip down after heating and don't stir at all!  After 1 hour in the slow cooker, stir well.  Let go another hour or 2 before serving.  Make sure to put out toothpicks next to the paper plates for serving!

NOTE: I don't like my Lil' Smokies to saucy, but feel free to add more jelly and BBQ sauce to yours!  They WILL give off some juice of their own so if it feels like not enough sauce, it is!


Wednesday, December 22, 2021

Easy Cheese Ball

 Happy ALMOST Christmas friends!  Can you believe it has snuck up on us already?  I am so ready.  Ready to celebrate the birth of my Lord and Savior, ready for family, ready to enjoy simple things and great food.

Speaking off......

Last weekend we had Christmas at my dad's house.  One of my sisters brought these cheeseballs from a little grocery store in Tilden, NE.  WOOHOOO for Tilden!  I was tempted to call them, give them my best sappy story to get the recipe, but that is no fun.  I wanted to try and recreate it myself!

Here is what I came up with!

1, 8oz block of cream cheese

2 cups shredded cheddar cheese, DIVIDED

1/2-1 tsp all purpose seasoning (I used adobe)

Salt and pepper to taste

In a medium bowl, add in all ingredients (only 1 cup of the cheese for this part).  Start with 1/2 tsp of seasoning, you can always add more.  Use a hand mixer as it allows you to break down the shredded cheddar into smaller bits, making a more cohesive mixture.  Use remaining 1 cup of shredded cheddar, and sprinkle on a sheet of plastic wrap.  Add your dip mixture to the top, wrap it around, twist the ends and refrigerate for 1 hour at least.  This can be done the day before easily!  Take out of the fridge 15 minutes before serving!

Serve with club crackers, or any cracker.  Maybe even some crostini!


ENJOY!


Monday, October 18, 2021

Ugly Guacamole

 Friends!  I am so glad to have you back here again!  I see a few new friends, and might I ask that if you are here already that you hit that "Follow" button.  You can get emails when I post a new recipe, nothing else.  Thank you kindly!

So now that you have dared click on this recipe, let's talk.  I love guac.  I mean, I just have to get that off my chest, guacamole is divine.  I am honestly not sure I have ever tasted any I didn't like EXCEPT when it was literally all cilantro with a small side of guac.  That is the next subject. I taste soap, it seems there are 2 camps where guac is concerned.  Soap tasters, and non soap tasters.  However, I do like a little cilantro.  I don't love it in guacamole.  There is just this whole thing.  But the most pressing issue is the look of this guacamole.  I mean, can we agree it looks like monster puke?  I mean, maybe that is what I should call it.  I know you know that I keep it real and it isn't like I can hide its lack of beauty!  As a food blogger, it is sometimes so hard to share your favorite recipes, especially when they look less than magazine worthy.  Guess what, today I don't care.  Halloween season is the perfect time to share a really ugly recipe.  I don't know, I just wanted to share it.....


So here is what you will need, super simple, like SUPER simple.  

2 medium avocados

1 tsp garlic powder

1/2 lime for juice (use the other half to garnish if you like or use both halves)

2 Tbsp salsa

pinch of salt and pepper

Cut your avocados in half, remove seeds and inside into a bowl.  Using a fork, combine all ingredients, mushy, mushy, mushy!  I enjoy it a bit chunky, if you like it complelely smooth, consider using a food processor.  If you aren't serving right away, place one of the avocado seeds in the finished product, cover in an air tight container and enjoy it fresh when you are ready!

ENJOY!


Tuesday, February 2, 2021

Cheese Stuffed Bread Sticks

 (This recipe makes 8 bread sticks)


Good Evening friends!

I just returned from a long weekend taking care of my dad with 2 of my sisters.  Boy was that an experience.  I have come away with 2 important messages...\

1. GOD BLESS NURSES

2. THANK YOU GOD FOR NURSES

oops there are 3,

3. NURSES DON'T GET PAID NEAR ENOUGH!

We did however do lots of laughing,  reminiscing, and walking down memory lane.  He went straight to  him and my mom's first date and the "best set of legs he had ever seen".  He is right...I mean it is what it is.  It was a good weekend and all is well.  He has been out of the rehab facility for 5 months just living his best life.  He refers to his meds as his "chicken feed". he wants to be called "Sweetface" and expects 3 meals a day.  Seriously dad?  HA!  Gonna take a hard pass on a career in nursing!

A few nights before I left I wanted to make a nice dinner.  I made steaks and wanted to use up some things in the fridge for sides.  Always shop your fridge and freezer, use things up, don't through your money/food away.  I had a roll of refrigerated pizza dough that needed used.  It must have snuck to the back of my fridge and honestly I had no idea if it was even still good.  I know that has HAD to have happened to  you too!  Right?  Please?  Somebody?  I had 8 rogue string cheeses that were spying on the new cheese and honestly, who can't make something amazing out of pizza dough and mozzarella cheese sticks?


These are easy and I contemplated not even sharing the recipe with the video, but I am.  There are always beginners out there and easy recipes are a good thing!


You will need:

1 roll of refrigerator pizza dough

8 mozzarella string cheese sticks

4T melted butter

1 tsp garlic powder

Italian Seasoning

Preheat oven to the temperature recommended on the package of crust.  Roll out slightly and cut into 8 pieces.  Cover the ends of the cheese and then "smoosh" the dough around to seal and cover the entire stick!  Lay on a parchment lined baking sheet or spray with cooking spray.  Do this until each bread stick is made.  Melt butter and add in garlic powder.  Add more or less if you prefer.  Brush over  breadsticks and then sprinkle each with Italian seasoning.  Bake in the oven until golden brown which will be the time that the pizza dough package recommends.  Serve right away with marinara, ranch or no dipping sauce at all!  OHHHHH dunk these in tomato soup even!  Serve with any soup!


These can be many things but the most important thing they are is DEELISH!


ENJOY!


Wednesday, January 30, 2019

Supreme Pizza Dip

You guys.  It is SO COLD outside right now!  It is actually -12 but feels -28 with windchill! Whaaat?  Why do I live here?! 


We all know weather that can freeze your face in one position in like 4 seconds means staying in and blogging!  I feel like I am getting my groove back!  Welcome to all of my new subscribers here AND on  YouTube!  i am grateful for each of you and can't wait to share more of everything with you!


Soooo.....the Super Bowl is this weekend.  I knew I would be keeping this post short because my precious Eagles will not be playing in it this year.  I don't want to talk about it, I don't want to accept it, but I DO want Super Bowl food.  I  mean, I might as well take away something positive from the season right?  I am.  The food.

This dip is hands down, the best hot dip of life.  There are so many ways to make it your own and I hope that you do!  If you make it tag me on Facebook or Instagram with #imachefwannabe.

Here we go.  I hope your favorite team wins.  I love you even though your favorite team is not mine.  I am not bitter, but boy am I ticked! HA!

You will need:
8 oz cream cheese
1/4 cup sour cream
1/3 cup grated Parmesan cheese
1 cup pizza sauce
1 1/2 cups shredded mozzarella cheese
1/2 lb  browned Italian sausage
1/2 cup mushrooms chopped
1/4 cup green bell pepper finely chopped
Pepperoni
Red Pepper Flakes Optional
Garlic and Parmesan Pretzel Crisps, crostini, bread sticks (options for dipping)

Preheat your oven to 350 degrees.  Combine cream cheese, sour cream and parm.  Spread into the bottom of a deep dish pie pan or something similar.  After you spread it evenly, add on pizza sauce.  Next comes the mozz cheese!  Let it rain!  Add on the rest of your toppings, and bake for 25-30 minutes.  Your life is about to change!

Now, I did not add a measurement of pepperoni, but just use how much you want!  These toppings can be changed to anything you want or love on your pizza!  There is going to be no bad combination!  (unless you are a pineapple on pizza person)  Sorry I just can't accept it, eat it or feel comfortable with it! HA!

ENJOY this for the big game, or anytime.  You guys, it is SO good!

ENJOY!!


Monday, September 17, 2018

Ricotta Cheese Stuffed Tomatoes

Happy End of Summer!  It is basically fall in my opinion.  I mean I finally broke out all my pumpkin decor the other day and with a complete "bite me summer" attitude I raised the pumpkin decor with pride and joy!


As we all know, the end of the summer means end of gardens.  Boo!  But those last few tomatoes, the last few of this and that all needs used up.  Waste not, want not, right?!  This recipe is perfect for those little tomatoes you don't want to bother canning.  Use these for a party, for a side dish, or little snacks for anything!

It is an easy recipe, and I did include a video.  Please don't forget to hit subscribe on my YouTube Channel here


Enjoy this easy recipe ad if you feel so inclined, make your own ricotta cheese using my recipe here!

This recipe will actually make 12-16 individual tomatoes.

Tomatoes
1/3 cup Ricotta Cheese
2 T. grated Parmesan Cheese
1/2 tsp Italian Seasoning
1/4 tsp Garlic Powder
1/8 tsp salt
up to 1tsp milk

Combine all ingredients except milk.  Add just enough milk to make filling the tomatoes easy.  Set aside.

Prepare your tomatoes by cutting a whole out of the middle.  Do not let it go clear to the bottom or your filling will run out.  If you want to use a clean finger or thumb an widen the area to be filled with cheese feel free.

Feel free to sprinkle some basil, red paper flakes, or salt on top before serving!


ENJOY


Tuesday, July 3, 2018

Fire Crackers!

Happy almost 4th of July my fellow Americans!  I hope you are celebrating safely, responsibly and abundantly!


I wanted to make sure and get this recipe out to you before the holiday.  The day before.....WINNING!  These are one of our favorites, right alongside a cold beer, or any cold drink but, let's face it, a cold beer, spicy crackers.....yes please.  There are lots of times I need a quick snack for company, or a get together and these are always a quick and easy crowd pleaser

You can adjust the heat to your taste.  They are called "fire crackers" for a reason though!  You are going to think a sparkler went off in your mouth, which will require the cold beer to or drink to put out the flames.  I have you covered, the fire, the water.  I am basically the whole package.


Here we go, make sure to adjust the heat to what you like but the recipe is written as I made it for us!  I use a Cajun spice.  Any one of your choice will work!

PS.  Don't make just one batch, double it up while you have everything out!

9-12 oz bag of oyster crackers
1/4 cup vegetable or canola oil
5 T melted butter
1 packet dry ranch seasoning mix
1/2 tsp red pepper flakes
1/4 tsp garlic powder
1/2 tsp Cajun seasoning
1/2 tsp parsley flakes

Preheat your oven to 275 degrees F.  You will need a large cookie sheet.  In a large bowl, melt your butter completely.  Add in oil, followed by all of your seasonings.  Mix to combine.  Add in oyster crackers and carefully stir them until they are all completely covered in the seasoning mixture!
Pour on to a cookie sheet and spread out into a single layer.  Bake for 15-25 minutes.  Stir at about 10 minutes and then let it go until they have absorbed the butter/oil/seasoning mixture.  When they are done, remove, stir again, and let sit for 10 minutes.  Pour into a bowl and snack away!  Keep in a Ziploc for freshness!

ENJOY and HAPPY BIRTHDAY AMERICA!


Tuesday, February 16, 2016

Taco Chicken Fingers

 Happy winter evening!  I want to discuss something with you......  happy accidents.  Yes, yes, they do happen from time to time.  Ironically 1 week after I made this recipe for the second time, I was in an UNhappy car accident with my daughter in law.  Four hours in the ER was not my idea of a good time.  I digress....


I was over at my son and daughter in laws house watching my littles when this accident happened.  The happy one, that is.  I was told there was chicken in the fridge that needed used, I found some chips and decided to make chicken fingers.  They were fabulous.  I used minimal ingredients, and they were awesome dipped in some queso.  My littles are all about dipping!  The next time I made this, I tossed in a packet of taco seasoning, just to see how it would taste.  Holy taco chicken batman.  Delish!  If you don't groove on the store bought packets feel free to use your own homemade.

This is so kid friendly, get them in the kitchen with you!  It is fun, good, and if you make it into nugget shaped pieces you could use it for an appetizer or just make nuggets for eating!

2 cups corn chips, crushed into crumbs (should have 2 cups after crushed)
1 packet taco seasoning
3 lbs boneless skinless chicken breasts cut into strips or use tenderloins
1 stick of butter, melted (1/2 cup)

Preheat your oven to 400 degrees F.  In one bowl combine corn chip crumbs and taco seasoning, in the other melt 1 stick of butter.


Line baking sheet with foil.  Dip the chicken strips in the butter, and then coat in the crumbs.  Make sure to press crumbs into the chicken well!  Place on your baking sheet until all of the chicken is coated!


Bake for 20-25 minutes until chicken is completely done, and the outside is crispy!  Make sure not to over cook!


I served these with salsa for dipping.  OMGOSH, delicious!

ENJOY!


Monday, January 4, 2016

Easy Fruit Dip

 HAPPY NEW YEAR friends!  Oh what a year.  WHAT a year.  It was the worst of times and it was the best of times.  For my family it was a year of extreme lows, yet extreme healing, and love.  We pray that you all found something amazing you can take with you into the new year and grow upon. We wish you a year of precious moments, prosperity, good health, and happy relationships.


This New Year's Eve we spent with our kids.  We ordered pizza, we laughed, we told stories, we played with the grand babies, and just enjoyed family time.  We made lots of dips and snacks and just ate our way into the new year!!  It was a blast!  I am blessed to have a son and daughter in law who welcome us into their home every single chance they get, and we love them dearly.

Last night we made 3 Layer Chili Dip, and Fiesta Taco Dip last night as well as my fruit dip.  
I hope that you enjoyed your time, either with family, friends or alone, as I sometimes like to spend my New Year's Eve.  This dip will hit just the spot, especially with apples and strawberries, the only fruit I will lay my lips on!  Oh wait, AND pineapple, why didn't I pick up pineapple!!?!

I know many people have an aversion to cool whip if you do, feel free to just use 1/2 cup heavy cream, and whip it about half way before adding the rest of the ingredients!

12 oz cream cheese (at room temperature)
1, 8 oz. container of cool whip
3/4 cup brown sugar
2 tsp vanilla extract

Combine all ingredients in a bowl, using a hand mixer for about 3-4 minutes.  You want your dip to be light, fluffy and smooth!  Transfer into a serving dish, bring on the fruit, and dip, dip, dip!

ENJOY!!

Monday, December 7, 2015

Chicken Cordon Bleu Biscuits

Tis the season for quick recipes, am I right?  Christmas parties, school programs, office parties, shopping, baking, ack!  Who is done shopping?  I am NOT.  I am usually done before Thanksgiving, but this year has been far to full of "life" surprises to get done yet so I am still working on it.  I am doing craft shows up until the weekend before Christmas and frankly, I am to exhausted for huge meals this month!


These little biscuits were suggested to me by my husband.  I think he anticipated them to be for a snack or appetizer, and while they can certainly fulfill those titles, they could also be a great lunch or dinner.  They turned out a bit bigger than I anticipated which was NOT a bad thing.  These are easy to do, with easy ingredients and I bet the kids would enjoy helping.

You are welcome to use canned chicken, or chunks of chicken, I poached and shredded mine.  Ham, you can use the packaged thin sliced variety or have the deli counter slice it thin, just above shredded.  I used a block of Swiss but if you want to use shredded, it will work perfectly.  Make sure to use the BIG OL' biscuits, with the bits of butter and flaky.  This recipe is for 16 of these bundles of love!   Now, on with the show!

2 containers of large biscuits (16)
8 ounce block of Swiss cheese cut into small squares to fit inside
1 lb thin sliced ham (16 pieces)
2 lg chicken breasts poached and shredded
3 T. melted butter
1/4 cup grated Parmesan cheese
salt

Preheat your oven to the temperature on the biscuit container.  Prep all ingredients.  Take one biscuit and using a rolling pin or your hand make it thinner, and bigger.  We need to make these big enough!  Now wrap a piece of chicken and cheese in a piece of ham and lay it on one half of the biscuit.


Now grab the center and seal it over the ham to the other side. Then seal all the way around using a fork to ensure a good seal!


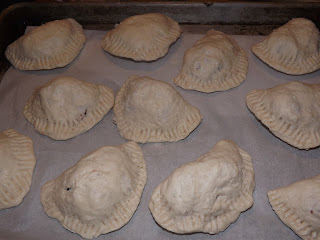
Repeat with all of your biscuits.  Here is what they will look like or should look like before baking.


Bake for the time recommended on the biscuit containers.  When they are done, immediately brush with melted butter, Parmesan cheese and sprinkle with a pinch of salt!

ENJOY!


Wednesday, September 9, 2015

Tomato and Mozzarella Bruschetta

Tis the season.  The season for fresh veggies, straight from the garden, straight from the farmer's market, straight from a friendly neighbor or co-worker!  I have waited for this this very time of year, ALL year for this reason!


This very simple bruschetta, which you probably will notice isn't a traditional bruschetta, it is a version I have been making my family for years.  We love this stuff and while I adore traditional bruschetta, this one, will probably blow you right outta your socks.

As far as the tomatoes, I used cherry tomatoes, it is what I picked up at the farmers market but please feel free to use slices of tomato.  I just think the cherry or grape that you halve are easier to eat.  For the cheese, there is no reason you can't use the shredded variety, but come on, take a look at this photo, do you see the thick winter coat of mozzarella on top?  Nothing can beat that.  I don't care for my mozz to be browned on this particular dish but just a personal preference, feel free to let yours go until browned on top.

Get a nice loaf of French bread or a baguette.  Either one gets the job done.  I used a large loaf, as I was serving these as a side dish.  If you are using them for an appetizer, use a smaller loaf to accommodate your needs. 

Here is what you will need to pick up:
10 oz. cherry or grape tomatoes
1 loaf of French bread or a baguette
8 oz. ball of fresh mozzarella
olive oil
Italian seasoning
salt
pepper

Cut your bread in slices the thickness that you choose.  (I made 8 of these but you could easily get 10 if you are doing the large slices like I did with this amount of tomatoes).  Preheat your oven to 400.  Lay your bread out on a baking sheet  Now, drizzle each piece with a little olive oil, flip it and do it again.  Do this with each piece.  Sprinkle on some dried Italian seasoning, just go with your gut on this one, a little bit of salt and pepper, do NOT forget that part and place in the oven for 5-7 minutes, until golden and crusty!  While that is happening, half your tomatoes and put them in  bowl.  Add a SMALL drizzle of olive oil, salt, and some Italian seasoning.  This is all to taste friends.  Mix to combine and let sit while bread finishes.


Get your mozzarella sliced if using fresh and just feel the excitement in the air.  My mouth is literally watering while I type.  When the bread is done, top each one with the tomato mixture until it is all used.  Lay a piece of mozz on the top and put back in the oven until the cheese is melted and/or browned to your desired taste.


This is so good.  Just so simple and so good.  I hope you enjoy it as much as we do!


Wednesday, April 15, 2015

Simple Ham Salad

Ok, we need to talk.  Remember when I said, I often make things I don't personally care for, because I just like to make all kinds of things?  This is one.  This was my husbands reason for 2 hams at Easter, I should have known he had a plan.  Ham this, ham that, ham fried, ham ground, ham anything, ham everything!  It's ok, he loves it.  And maybe you will too!  I mean after all, it does take ground ham lovers to make the world go 'round, right?


That being said, I actually enjoy the flavor here.  I just don't care for the consistency.  I used my meat grinder attachment on my mixer, but you could certainly use a food processor and just get it to the consistency that you like.  Maybe you like it a bit more chunky or maybe even (omg I am gonna say this) more mushy. 

How many people write a blog on a recipe they don't care for?  You just remember that, if you ever think for a second I am not honest!  My husband just ate the last of this last night, (thank you Lord) and yet, there were more recipes he wanted to try with this ham.  You will be getting that one later, and I actually liked it!

Anyway, this is just simple, and easy and a good use up for leftover ham if you are into that "make everything leftover into a salad" sort of thing.  God bless her, my mom fits into this category as well.  Any leftover meat became a sandwich spread.  I feel so ill right now.  She did it with goose once. 

If you haven't lost your lunch at this point, from this positive, happy, exciting blog post, we will get on with the VERY SIMPLE recipe that is my husbands favorite ham salad!  Eat it on crackers, as a sandwich, the world is your sandwich friends, make it how you like it!

3 cups ham, ground, chopped fine, etc
1/2 cup mayo (no miracle whip)
2 T. sweet pickle relish

Combine all ingredients.  If you prefer more relish add more, if you prefer less add less.  Maybe start with 1 T. and go from there.  Serve on toasted bread as a sandwich or with crackers as a dip.  You choose!!!


ENJOY!


Monday, January 26, 2015

3 Layer Chili Dip

Who is gearing up for the SUPER BOWL?  Not me, and as far as I can tell it will be a long time before my Eagles are in the running again.  Unhappy camper, can you tell? 


I know so many of you are planning big parties, lots of friends, family, food and drink, (please do NOT forget the drinks).  Do you ask everyone to bring something or do you do all the food prep yourself? This is a really easy dip that my son made a couple of months ago when we went over to watch an Eagles game.  He said someone he knew in Georgia  (where he was stationed) had made it and he loved it so he had made it ever since.  I am sure it isn't a new recipe, it is to easy and good for it to have not been around the block a few times!! 

It is delicious, it literally takes 5 minutes to put together and 25 minutes in the oven to to warm up.  I like to serve it with Frito Scoops, but tortillas are awesome as well.  Do what makes you happy!!

GOOD LUCK to your team!! 

You will need:
2, 8oz. blocks of cream cheese
2 cans of chili with no beans
2 cups grated cheddar cheese

In a square or round baking dish or pie dish, spread out the cream cheese in an even layer.  Easy enough, right


Next, pour in both cans of chili and spread evenly as well.  I somehow, did NOT photograph this step.  I am sure you can handle it though! HA!  Then add the grated cheddar on top and this is what you will pop in the oven at 350 degrees F for 25-30 minutes until it is bubbly!
 

Serve up with your favorite chips.  Grab a cold one and enjoy the game!  I...will be shopping!

ENJOY!!

Monday, December 29, 2014

Pizza Crescents

Well, hello again!  I hope this finds you all recovering from a wonderful holiday, with tons of food, fun, family, friends, and joy!  It was the Christmas of my dreams this year.  After almost 7 years I got to spend Christmas with my son and his family.  The best gift I received was to be able to watch them open gifts and share happiness and love.  What better way to celebrate the birth of my Savior!  Bliss, it was pure bliss.

After taking the week off from blogging, I wanted to jump back in with something perfect for your New Years parties or just if you are at home alone.  These are so easy, one of my sisters made them for our family Christmas a few weeks ago and I thought, I had to share them, they were so easy yet so good.  I did add a couple of extra steps, because, that is just how I roll.  It is the only thing I thought could make them better!  She had eaten them at a work party and had no idea what they were called, so I am calling them simply "Pizza Crescents".


These really couldn't be easier to make.  Just pick up a few ingredients and get to assembling.  They are addictive, you might want to double the recipe, because honestly, I think they would freeze like a dream for lunches, school, or adults, or snacks.  So just keep that in mind.  Bake them off as per the instructions, let cool and bag them up maybe 2 in a bag, my son would have loved these in his school lunch!!

This recipe yields 16 pizza crescents:

2 rolls of  refrigerator crescent rolls (8 per roll)
sliced pepperoni (I used 3 per roll so you will need 48 slices)
8 mozzarella string cheese sticks
3 tbsp. butter, melted
Italian seasoning

Preheat your oven to the recommended temperature on your crescent rolls.  Line a baking sheet with parchment or spray with nonstick cooking spray.  Cut all of your string cheese in half, and get your pepperoni ready to go.  Unroll the crescent dough and work with one at a time.  Lay the pepperoni at the wide end, and lay the cheese on top, and roll that baby up, nice and easy!


This is kind of a "rinse and repeat" situation.  Get them all filled and rolled and line them up on your tray.  Now, sprinkle with a little Italian seasoning on top.  You will bake them for the recommended time on the package.  I found that using the longest recommended time works best.  If it says 11-13 minutes, go with 13. 

 
While they are baking, melt your butter.  When they come out of the oven, immediately brush on a little melted butter and then sprinkle on some more Italian seasoning.  Let cool just a couple of minutes and dip in!  Make sure to serve with some pizza sauce or marinara sauce. DO NOT be tempted to add the sauce into the pizza roll.  I mean you can, but it is a hot mess friends.  Ask me how I know.  If you add enough for it to make a difference, that is!

Enjoy these as an appetizer, light lunch, kids lunch, or anytime.  I mean let's be honest with each other, there is never a BAD time for pizza!!

ENJOY!


Wednesday, October 22, 2014

Clam Dip

Retro?  I don't know about that.  Maybe, maybe not.  This is the word my husband used to describe this dip.  He said, "it is kind of like green goddess dressing used to be.  You could get it at all the supper clubs or everyone made it".  I agreed, simply because I had nothing to come back with. 


It is so different for him growing up all over the world, ending up on near the South Jersey shore, where his parents were from and met.  Then there is me who grew up in a town of 2,000 people, no stop lights, not even ONE, many streets didn't even have stop signs!  Seafood was not the specialty of the region and I don't think I tried my first seafood until I was probably 28 or so.  In our supper clubs, we had, salad yes, clam dip, no.  Now if you want to discuss beef tongue, I can be an active participant! (heaving)

Anyway my husband asked me to make him some clam dip.  We actually did it together since I won't do anything but touch a clam, cook a clam and serve a clam, so I needed taste testing, and I needed a pro!  It is so funny how he reacts when I hit something right on, that triggers his memories and his tummy.  Cute, cute, cute, cute, etc........

Expect another clam recipe soon, we did a couple with clams this day.  I wish I could find affordable fresh clams, and I can get "fresh" clam, but for the low, low price of my right arm.  We used canned, if you wish and have access to affordable fresh, by all means DO IT!!!

Here we go!

1/4 cup Hellman's
16 oz. sour cream
2 tsp. parsley
2 6.5 oz. cans of minced clams (drain juice but save it)
1 1/2 tsp. garlic powder
1 tsp. Worcestershire
1/4 tsp. lemon juice
Approx. 1 T. clam juice

This couldn't be easier  Ready?  Mix all ingredients together, leaving the clam JUICE for the very last addition.  You may not need the entire tablespoon, it simply depends on the consistency you want from your dip.  Place in an airtight container and refrigerate at least 3 hours, over night is best by far!

You can reserve a few clams to put on top.  With everything mixed in, it is hard to tell exactly what it is.  Make sure people know the goodness inside and sprinkle a few on top!

Enjoy this throw back from my husbands childhood.  He loved it, and it made his heart happy.  THAT my friends, is a win, win situation!

ENJOY!

Saturday, September 6, 2014

Turkey Stuffed Mini Pepper Poppers

Peppers, peppers, peppers.  I seem to have an overabundance.  Let me explain why that is an issue.  I have a love/hate relationship with peppers.  I love them raw.  I love the flavor, the crunch, and the freshness of them.  However, once they hit the heat, they get soft, maybe even a tiny bit slimy, and I just am in a weird place with them, once that has happened.  Stuffed peppers, YUM, except I only eat the middle out of the pepper.  Now, if they are chopped up, we have a whole new situation.  I mean, who is really THAT picky?!  Isn't it like being a person who only like corn ON the cob and not off?  Ridiculousness. 
 

That all being said, and explained, I love these.  I had intended to use jalapeno's with these, however, when the little sweet bells presented themselves, I knew for the crowd I was cooking for, they would be the best choice.  I wanted a hearty filling, one that could be used for a side dish, a light lunch with a salad, or even an appetizer.  A few of them were so small, I admittedly just popped them down the hatch, full throttle.   I am positive these would do great on your bbq grill too!

You will need:

1lbs sweet mini bell peppers (14-16)
1/2 lb.. ground turkey
1 tsp. salt
1/4 tsp. black pepper
1/2 tsp. onion powder
4 oz. cream cheese
3/4 cup grated cheddar cheese

Preheat your oven to 375 degrees F.  Cut the very tops off of your peppers and using an ice tea spoon or small dessert spoon, clean out the seeds and veins as best you can.  Set on a baking sheet.  Combine remaining ingredients in a bowl and spoon into a piping bag, or Ziploc bag with the corner snipped off or use the ice tea spoon to get these filled.  I used a piping bag, it was so quick, clean and easy.  Bake for 25-30 minutes, or until the turkey is cooked all the way through.  Let these sit about 5 minutes before eating. 

MMMMMM....mmmmmmmmmmmmm........GOOD!


Tuesday, July 15, 2014

Taco Pinwheels

Summertime, Summertime, Sum-Sum-Summertime..........

This has been one of the busiest summers of my life.  Even when my son was little, and I was working full time, my summers weren't this busy.  Lots of  time with grandchildren, recipe writing, and raising my parents, (teehee) and enjoying the beautiful weather!  I hope that you all are experiencing the same kind of fun summer! 
Let's talk, menu planning.  Do you plan your menus?  Do you grocery shop and plan your menu so that you use everything up that you buy?  I always get razzed about scraping things out with a rubber spatula, creating random recipes, etc to use things up.  I paid for them, I am USING them.  Am I right or am I right?  When my son was little, he and my husband could always plan on something with baked potatoes the night after taco night, to use up the cheese and sour cream.  After a roasted chicken night, they could plan on chicken salad sandwiches, or soup, or pot pie, to use up the chicken and veggies.  If I don't do things like this, things get pushed to the back of the fridge, go bad, get old, and ultimately have to be thrown out.  No, that doesn't happen very often with me anymore.  Who can afford to throw food away you paid for?
Taco Pinwheel Video
Anyway, instead of the usual baked potatoes after "walking taco" night, I decided to try something new.  I had one sheet of puff pastry that needed used, along with meat, cheese and taco sauce, and so I went for it.  Taco pinwheels.  I mean why not?  Enjoy these for a snack, a light lunch, an appetizer.....  Your family will love the change up from your regular "taco leftover" fare!

1 sheet of puff pastry
1/2 cup taco sauce
1/2 cup browned hamburger (seasoned with taco seasoning)
1/2-3/4 cup shredded cheddar

Preheat your oven to 375 degrees F.  Lightly flour your work surface and lay out your pastry sheet.  Using a rolling pin, just roll over it in each direction a time or two, just to make sure the seams are secure and you get a wee bit of size out of it.  Now, spread 1/2 cup of taco sauce over the entire sheet of pastry, sprinkle on your taco seasoned ground beef, and then let the cheese rain down!  Carefull roll it up into a log.  You can chill this for 30 minutes before slicing into "cookies" or  you can just go for it, like I did!  Place on a parchment or nonstick spray coated cookie sheet and bake 15-17 minutes.  Let cool for 5 minutes before removing from the pan. 

Now, sit and enjoy the glorious treat you have made!  I bet nobody else brought "taco cookies" to the party, did they?

ENJOY!

Monday, May 12, 2014

Crab Cakes

Hello friends!  I am sorry for my absence but as most of you know I got a Mother's Day surprise to beat all sunrises!  My kids showed up with their new twins who we haven't yet met, to surprise me!  It was awesome!  So I took 3 days to spend quality time with my children and grandchildren and now am back and refreshed and ready to get back in the kitchen!


It is funny I made these last week, actually only 2 days before my son came to see me, as his crab cakes are the B-E-S-T!  However, I think mine are awesome so you are getting mine and maybe one day I will share HIS! 

It seems crab cakes we order out,  are often all breading and no crab.  Ick.  When I order a crab cake, there better be identifiable seafood IN it and it shouldn't just appear to be Stove Top Stuffing fried into a patty!  You know what I mean?  I like flavor dimension, I like color and I like a nice sweet crab flavor.  You can make this with imitation or real crab meat.  The choice is up to you, your taste and/or budget.  We had cocktail sauce and some horseradish mayo we used for dipping!  Try these and let me know what you think.  I think you will be one happy crabby cake eater!

12 oz.. crab meat (imitation or real)
1/4 cup Hellman's Mayo
1/2 tsp. Old Bay Seasoning
1 tsp. parsley, minced
1/2 tsp. Dijon mustard
2 oz.. diced pimentos
1/2 tsp. celery seed
2 tbsp. melted butter
2 eggs
1 1/4 cups bread crumbs (plus 1 extra cup)

Combine all ingredients in a bowl large enough to accommodate the mixture.  Place your 1 extra cup of breadcrumbs into a bowl to dust both sides of your crab cake before frying.  Preheat a nonstick skillet with 1 tbsp olive oil and 1 tbsp. butter melted in it.  Take a handful of the mixture, make into a ball and slightly flatten it, carefully lay in bread crumbs, and then flip and coat the other side and then place in pan.  Fry on MEDIUM HEAT for about 2-4 minutes per side depending on the size.  I got about 10 crab cakes from this mixture.  When they are done, drain on a paper towel to absorb excess oil and serve with your favorite sauce!  You may need to add more oil and butter halfway through frying!

Enjoy the crabby goodness!


PS make these really small for party appetizers!