Wednesday, October 31, 2012

Sour Cream Apple Pie Deluxe!

This blog is special to me, because the woman who I got this recipe from, is special to me.   You know, you always hear skeptical people who aren't familiar with the Internet say things like, "You can't trust anyone you meet", or other equally as ridiculous statements.  I understand the fear of something you don't know, but I have time and time again learned, this could not be more untrue. 


Shortly after I started "FoodThoughtsOfaChefWannabe", I met M.j.  She was kind, she was helpful, and immediately, I knew she was a great woman.  I have always had a good nose for good people.  (so to speak).  We had a few long email conversations, about life, about family and about food.   She always has golden words of wisdom, and she is the most positive person I have ever "met".  Yes, I don't care that we have never met each other face to face, we have "met" on a far more important level than being in the same room. I would guess we HAVE actually chatted over coffee a time or two, emailing back and forth with a hot cuppa joe beside our keyboards!  Although one day I know, we WILL get to meet face to face!  She has been adopted as my "foodie mom". 

M.j is the author of the blog, I Like To Bake and Cook.  In her "about" section you will be greeted with this  "Hello!  I am a modern Grammy who likes to bake and cook for everyone"  I love it!  She is so endearing with her stories of her family.  She says she never learned to cook from anyone in particular, and she didn't really teach her children to cook.  She does get regular phone calls on how to prepare certain dishes, and her son is working hard on mastering her braciole!  Both of her children spend time in the kitchen, one cooking and one who prefers baking!  I think it is so awesome how our children are influenced as adults by what they saw us prepare, or what we fed them as children!   M,j.'s family does have one dish they can't be without at Thanksgiving, it is Cappalletti's!  She has made 1200 at once, but is going to need to gather some strength and manpower to beat her own mothers record of 2000!  Speaking of which, M.j, is a devoted daughter who spends as much time as possible with her mother.  She has told me stories and shared her visits, and I love hearing of their lives and their relationship.  She also has 5 grandchildren she can't get enough of.  They have all helped her cook in her kitchen and enjoy her food.  Nothing compares to good food, made with experienced hands and a loving heart!  You will read about all of these important people including her beloved, Mr. Vitelli, who is the love of her life!

Recently, M.j,with the help of her grandchildren, realized her dream of writing a cookbook! She so generously sent the cookbook before I could purchase it and I immediately started deciding what to cook first! You won't believe how amazing these recipes all sound! It warmed me from the inside out to read recipes, I knew had been handed down, nourished families, and were eaten together at the dinner table over conversations about life, school, boys, girls, etc. When I got to the Sour Cream Apple Pie Deluxe recipe, I knew it was THE ONE I had to make!

If you are interested in purchasing one of M.j.'s cookbooks, you can click on here.  She is running a Christmas special!  Get yours now!  At the very least join her over at her blog and/or on Facebook.

This recipe is originally made on a cookie sheet, however I did it in a deep dish pie pan.  I used my own homemade dough recipe but feel free to purchase it already made.  This is almost like a cheesecake.  It is creamy, with sweet bites of apple, and a crumb topping you will keep picking at until there is none left on the pie.  Wait.  I said that almost as if it happened to me.  Ok, it COULD have happened to me, but I mustered some self control.  In fact, I think I spent all the self control I had been saving up! 


Sour Cream Apple Pie Deluxe
(minor adjustments made since I did it in a pie pan)

Pie Crust (homemade or bought, just one crust)
Filling:
3/4 cup sugar
2 T flour
1/8 tsp salt
1 pint (2 cups) sour cream
1 tsp vanilla
2 cups apples, peeled and finely chopped
1 well beaten egg
 
Crumb Topping (don't put it on the pie until it says so)
2/3 cup flour
2/3 cup sugar
2 tsp cinnamon
1/2 cup butter softened
Combine ingredients (can use a pastry cutter or fork and set aside)
 
Preheat oven to 425 degrees. Spray pie pan with cooking spray. I always do as a precaution. Lay pie crust into the plate as you would any other pie. Fold excess under at the top edge. Mix all other ingredients together. Pour into pie shell and bake for 15 minutes, then lower the temperature to 350 and bake 30 minutes longer. Remove from oven and top with crumb topping and bake at 350 another 15 minutes. Upon taking it out of the oven, put immediately into the refrigerator until cold!

This pie is an official Simmerman staple now.  I hope you try it, and I hope you love it as much as we did!  Make sure to get your cookbook for more where it came from!

Your "blessed with special friends" chefwannabe


Monday, October 29, 2012

Chocolate Amaretti Trifle

Tonight's post is brought to you by......my new camera!

You guys have no idea how excited I am.  OK a few of you MIGHT.  My husband gave me an early anniversary gift, a new camera!  I was using a cheapo digital, which was OK and sometimes you just have to work with what you have for as long as you need too.  I did.  But now, I am obsessed with my food photos.  I think you will notice a difference.  I hope you do!


I have had this recipe on the shelf for a bit.  I wanted to wait for the new camera so this could be my first blog with it.  These freeze perfectly, and can be made in advance and then allowed to thaw while you are eating dinner!  I made them in the jars for easy storing.  I am always freaky about fridge smells and worrying if their are any, they might get into other food.  Besides, lids just make for less chances of spills or anything else.  That being said, I would guess you could easily keep these frozen for a month.  Take them out and let come to room temp for a couple of hours or put in the fridge to thaw overnight.  Perfect for those with kids or adults into pre-portioned meals and desserts and they look so sweet in these jars.  Take one to work with a spoon tied with a ribbon around the neck or a note wishing someone you love a great day!

Now, you will need a pan of brownies.  However you like em', just do it. I will link a delicious brownie recipe from a fellow blogger, and trust me when I tell you, if she makes it, it HAS to be amazeballs.  At the same time, if you want to make a pan of brownies from a box, go forth and do it with pride! 


You can use any small cups, custard dishes, ramekins, sundae glasses, wine glasses, etc.  You can also make this as one big trifle.  This will make 6 individual trifles.

You will need:

1 pan of brownies (try Danielle's over at (Hugs & Cookies XOXO)
1- 7oz container of marshmallow fluff
1- 8oz container of cool whip
2 cups of crushed up Amaretti Cookies or you can purchase them! (Don't completely make them into dust!  You want some chunks for crunch and texture!)

In a bowl combine your cool whip and marshmallow fluff with a hand mixer.  Mix until smooth and creamy. 

Set this aside.  Make sure your jars are clean and completely dry.  You will only need half of your pan of brownies for individual trifles.  You can use them all if you are making one large trifle.  I find it easiest to do them all at once.  Cookies in all the bottoms, cream, etc....  This way you can adjust as needed as opposed to getting to the last one and not having enough. 


Layer:
Cookies
Cream
Brownies (make this the thickest layer)
Cream
Cookies

The truth is you can layer them however you like.  This is just how I did it and how I felt it looked best!  Since you will have extra brownies, you might want to start with a small layer of brownies first and then the cookies, making your middle brownie layer a bit smaller.

I didn't over fill these, as it would defeat the purpose of putting lids on for storage or freezing!
 
I hope you enjoy them, they are delicious little sweet treats! 
 
Love to you all!  Thank you for being part of Chefwannabe!

Your "38 and still love having my own" chefwannabe


Friday, October 26, 2012

Crispy Chicken Rolls

I have a complete love hate relationship with phyllo dough.  If you saw the video I made on YouTube, it was a haul video of what we buy at Trader Joe's.  Oh wait, you never saw it, because I looked a hot mess and decided that puppy was staying locked up on my own computer!  I will make a video that I will actually post one of these days.  Hair and makeup included.  Go ahead, look up to heaven and say, "Thank you GOD".  Anyway phyllo dough was in that video, they had it on sale far cheaper than my regular grocery store!


Anyway, I find phyllo dough enjoyable to eat, but I hate to work with it.  I always keep it covered with a damp cloth, so that isn't the problem.  The real issue is, I am like a bull in a china shop with it.  I try to be careful but, pffttt, I rip at least one sheet every time. 

In my quest for some new "picky's" around here, and my obsession with sweet chili sauce.  I tried it and now, everything must have it on it or in it.  I did add it to my chili, and holy crapola people, AH-MAZING.  Clearly I have been living a sheltered, sad life until now. 

Anyway, I also, for probably 10 years have been using tons of ground chicken and turkey.  I substitute it a lot, and my hubs and I love grilled turkey or chicken burgers!  If you think you don't like it try it.  And you MUST season it, just like any chicken or turkey.  It doesn't have a TON of flavor on its own so you have to add it!!

These are a perfect appetizer, or party fare.  Dip them in sweet chili sauce, cause you dang well KNOW I did.  Unagi sauce, soy sauce, hot mustard, or whatever you want!

You will need:
9 sheets of Phyllo Dough
1 stick of butter, melted (1/2 cup)
1 lb ground chicken
1/4 cup sweet chili sauce
1 clove of completely pasted garlic.  No chunks of raw garlic that won't have time to cook!
1 tbsp green onion, minced
1 tsp chili powder
2 tbsp soy sauce

OK, first things first.  Preheat your oven to 425 degrees.   In a large bowl combine, ground chicken, sweet chili sauce, garlic, green onion, chili powder and soy sauce.  Your mixture will be VERY wet, that is just how you want it!  Set aside.  Now, when you open your phyllo dough, keep a damp cloth over the opened unused portions, they will dry out in a second!  Take one on large cutting board or your counter, lay it out, and GENTLY brush it with melted butter, working quickly, add another piece on top and repeat with butter.  Do this until you have use 3 sheets of phyllo.  Now, on the long end closest to you, take 1/3 of the chicken mixture and spread it out along the whole length of the dough.  It will be a thin line of chicken mixture but that is fine!  Now gently start to roll it up.  Work one end to the other until it is rolled into a log.  Cut in half, and then each half in half.  You will get 4 rolls from each log!  Repeat 2 more times.  You should get 3 logs, each with 3 layers of phyllo.  Got me?  Now gently place them seam side down on a parchment lined cookie sheet.  Gently brush the tops with butter.  Bake 13 minutes!

Serve these with any dipping sauce or choice of dipping sauces you love!  You might even want to double the recipe!  This will give you 12 rolls total!

My husband wants me to do this with tofu as well.  Hmmm....


Your "how did I marry someone who loves tofu and seaweed"Chefwannabe


Wednesday, October 24, 2012

Homestyle Beef and Noodles

Good Evening everyone!  I hope that the day brought you happiness and all things good!  I was just telling all of you on Facebook how I was listening to the song of nature.  I still am while I type this blog up.  (I am a little behind).   It reminded me of how cluttered life can be.  With sounds, with nonsense, with negativity and with chaos.   I threw it all away today!  It kinda of feels refreshing!

Anyway, as I try and relate that first random paragraph to the dish I am sharing with you.  I think about how cluttered our food lives can be.  How over the top thing can get.  Sometimes we just feel like getting back to basics.  You may notice that is kind of how I roll with food.  Oh, of course I love my share of fancy food, but real families, real lives, and real budgets don't always allow for buying fancy ingredients or going to fancy places to eat your luxuries in food. 


When my husband and I were first together and I would cook things like mashed potatoes and gravy or roast or fried chicken he always say it was "farm food".  Ironically I grew up in a tiny town, but not a farm.  It just was homecookin' in my world.  This homestyle beef and noodles is just that.  Good ol' home cookin'!  You know I love all things that involve the word "noodle".  It is my greatest culinary weakness.  But this is a one pot dish that will warm you from the inside out.  It is creamy, hearty and so good, you will be glad this recipe will feed an army.  Leftovers are just as fabulous.  (although you may want to add a splash of stock when you reheat the next day to get more of the gravy feel).  Like I mentioned this recipe will feed an army and you may want to half it.  OR you may want to put some in the freezer for a later meal.   I also took some help from the store tihs time.  Normally I would make homemade noodles, they are easy peasy and no problem at all.  BUT, some of you may or may not know about my recent pasta roller/kitchenaid mishap.........*grrrr*.  So I did use the homestyle pasta from the freezer section of the grocery store because I think dried egg noodles are great, but not my first choice for this dish!  If you decide to use egg noodles it is still going to be fabulous, because let's face it, I wouldn't share bad food with all of you!  Just a personal preference for this particular dish.  Btw, your store will likely have a store brand of these noodles which are exactly the same, so save yourself some moola if you buy them! 


So let us get down to the nitty gritty of it all (is that a farm term?) 

You will need:
1 tsp olive oil
1 T butter
2-3  lbs of beef, cubed (any amount between there, I used 2.5)
8 cups beef stock, divided (2 standard size boxes, leave 1 cup set aside)
2 cups water
3 pkgs of frozen noodles or 2 large bags of egg noodles. 
4 T cornstarch
1 T black pepper

In a LARGE pot, add in olive oil and butter.  When it is melted, add in cubed beef.  Salt and pepper.  Toss for 3-5 minutes in the pan until cooked through, or very close to cooked through. (if you like rare beef, cook less).  Remove from pot unto a plate.


Add in 7 cups of stock, 2 cups water, 1 T of pepper and salt to taste.  You want your broth seasoned well before the pasta goes in, so it will flavor the pasta well! While you are waiting for it to come to a boil, add cornstarch to your reserved cup of stock.  Mix thoroughly.  Set aside.  When stock boils, add in noodles.  Let cook 3 minutes short of time directed on the package.  At this time add beef back in, and let it cook the last 3 minutes with the lid on and turn down to low heat.  When it is done, take your cornstarch/beef stock mixture, you may need to stir it again and add into the pot stirring slowly, it will start to thicken into a gravy almost immediately.  When all combined, turn the heat off, put the lid on and let is sit 5 minutes.  Then serve! 

Cooking the meat first leaves you great flavor to help flavor your stock!  If you want a stronger beef flavor, through in a couple of beef bouillon cubes.  I did just that myself.  Sometimes I do and sometimes I don't.  I don't feel like I got the BEST quality stock, so I wanted to bump it up just a hair.  This can be added anytime, just make sure the cubes or granules are dissolved.  I don't typically use bouillon because of the salt factor.  I figured in a pot of food this big, a couple would not kill anyone and they really made just the right amount of difference.  I would just watch the amount of salt you add, because there is so much in the bouillon. 

I hope on some chilly, rainy, snowy, or windy night....  No wait, on ANY night.  You feed your family this belly warming dish!

This is the official end of my "break".  I should have had this typed up for you 2 days ago, but, I got lazy!  Back to work my friends, enjoy your evening and thanks so much for being part of FoodThoughtsOfaChefWannabe!
 
Your "use a fork, not a spoon..."chefwannabe


Monday, October 22, 2012

Amaretti Cookies!

Have you ever eaten Amaretti Cookies?  If not, get to the store, probably your local Italian market, but sometimes in regular grocery stores, and get some!  They are little crunchy bites of almond HEAVEN!


I have the hardest time finding them here in Omaha.  I find them on occasion but that just isn't gonna cut it.  I need them when I need them.  I use them for crusts, to crumble over ice cream, or just alone.  They are the only ALMOND flavored thing I love.  I never was a huge almond flavor fan until these.  This is one cookie I had  to learn to make and I did.  I found every single recipe I looked up was the same.  I decided it was ok that I didn't change it or write my own, or concoct a special formula. 

I mention it in the recipe but don't go spend money on superfine sugar if you have a food processor.  Just process your sugar for 30 seconds and wa-la, superfine sugar!  The almond paste is hard for some to find but I always get it near the pie filling section of your grocery store.  When you open the can, you will need 5 minutes alone with it.  To huff, and smell, and dream of a better world, where umm....like, I don't know, where maybe unicorns poop almond paste?  I dont' really know where I was going with that, but the point it, you WILL need a moment of special ME time with this can of almond paste.

I also made my cookies a WEE bit bigger and as you can see.  They turned out fine.  Oh wait, I mean THIS pan turned out fine.  Just keep reading.......

Find this near the pie filling!!

8 ounce can of Almond Paste
1 cup superfine sugar
2 lg egg whites

This can be done all in the food processor or all with an electric mixer.  I used the food processor because we know, I use it at all possible moments!
First get your oven preheated to 375 degrees (190 C).  Prepare a pastry bag.  Cut the tip off so you have approximately a 1/2 inch opening.  This isn't rocket science and if you are a bit bigger or smaller, no sweat, just roll with it my friends!  Get your cookie sheets lined with parchment paper, ESPECIALLY for this one.  I swear by parchment paper and I am sure it is the reason for my successful baking in recent years.  It has turned my life AROUND!  You really need it for this recipe though! 

Put your sugar in first.  There is a reason for this.  The original recipe calls for SUPERFINE sugar.  This can be accomplished just by processing your regular sugar for 30 seconds in the food processor.  You can purchase superfine sugar as well, but I don't get all into special things when I can make it at home just by this easy method!  Then add in the entire can of Almond paste, you know after you get done huffing the most amazing smell EVER!  Process about 10 seconds, until almond paste is broken up and combine with the sugar.  Next add in your egg whites in 2 additions.  After the second addition process dough until smooth!!

Now fill up your pastry bag.  I just buy the disposable ones.  Drop batter from the pastry bag into 1 1/2 mounds about 1 inch apart.  If you get little spiky tips, use a damp paper towel to smooth them out!  You can sprinkle a little extra sugar on top!

Bake for 15 minutes or until cookies are golden brown, and have formed a few little cracks.  Mine barely cracked at all.  Makes no difference, they were AMAZEBALLS!  Seriously incredible.  Just keep an eye on them so you don't burn them.  Why you ask, do I remind you of this??  Yea, because I blackened one entire pan!  Happens to all of us I think, or maybe not, maybe just me and if that is the case, I OWN that burned pan of cookies people, I OWN IT!!

For me the longer these sit out and dry and cool, the CRUNCHIER they are.  And I feel like that is exactly how it should be.  The neighbor should be knocking on your door asking you to STOP CRUNCHING COOKIES, because they crunch so loud!

Happy Amaretti Cookie Baking guys!

Your "now, HOW do I make a candle this strong"chefwannabe


Friday, October 19, 2012

Mini Minced Beef Pies

My husband spent a handful of his growing up years in England.  He talks so fondly of the people, the country, AND the food.  I like to try and recreate certain things for him, and myself (let's be real) that bring back good memories.  So I interrogate him about his travels and food experiences outside of the US.  I love hearing about his childhood which was so vastly different than my own.  I love making food that sparks memories of places he has been and lived. 


I am sure little pies are far from anything he may have eaten in England, but I tried my own take on minced beef pies.  He says they aren't TO far off from what he got at the local "chippy" .  Now if I could find a place to get him REAL English Sharp Cheddar cheese, I would be his hero for LIFE!  I did find some at Whole Foods and he liked it but it just wasn't QUITE right. 

I like things in "mini".  I like having individual portions, for portion control and because they are fun.  I swear it has nothing to do with being a germaphobe and someone else touching my food.  Anyway, let us get started.  You can buy pie crust or you can make my pie crust.  There is a link in the list of ingredients to my FABULOUS crust.  Just trust me on this kids, it rocks!

You will need:
1lb ground beef
1 carrot grated
1 small potato diced TINY
1 tbsp flour
1 cup beef stock
Pie Crust (1) Store bought or my FABULOUS recipe (makes 2 crusts, but just need 1)
Parchment Paper
1 egg (for egg wash)
salt and pepper to taste

Brown ground beef completely.  When it is done, if there is to much grease, drain it and add in flour, and carrots.  Mix completely until the flour is soaked up by the beef.  Add in stock and the TINY diced potato.  Stir until stock begins to thicken.  You may find you need a bit more stock, if so just add in as much as you like for a gravy.  Now cover your pot with a lid, turn off the heat and let it sit, until it is completely cooled.

Note: When I say dice the potato tiny, you could grate it (large grate) as well.  It should be tiny enough that the pieces cook through from the residual heat in the pot while it sits covered.  K?  K.

Cut strips of parchment paper long enough to go in the muffin tin and come out the other side, like this.  Spray your muffin tin with non stick spray and lay the parchment pieces in.  You will use it to remove the mini pies when they are done baking!


Roll out your pie crust.  Roll it a bit thinner than you would a regular sized pie crust.  I used a cup with a top diameter of almost 5 inches for this.  You want enough to be able to pinch your top lattice work to the crust, or to pinch the edges if you choose to put another piece on top for a solid top crust. You may not need one that big!  Cut out 12 circles and get them into the pan.  Make sure to press the sides and bottom edges on in to the corners!  Add in filling.  I used a small cookie scoop but just make sure it is divided between them all.  Take your leftover dough and do the lattice on top or if you have enough dough, or an extra crust, feel free to cut an entire top crust out.  Pinch the edges and brush entire mini pie with an egg wash.

Bake at 375 for approximately 30 minutes. 

You can easily make these with chicken, exchange the meat and stock.  They are delicious little meat pies using ground beef, for a budget friendly meal!

Your kids will love their own mini pie, and so will you!

Your "likes to have my OWN" chefwannabe
 

Wednesday, October 17, 2012

UNstuffed Cabbage Soup

I love stuffed cabbage. I love soup.  So how about UNstuffing the cabbage and making it into a soup?  I thought it was a great idea.  And when I tasted it, I decided it was genius.  I know, I think most of my ideas are genius but, the name of this soup came from my husband.  He thinks he possibly has a future in naming my recipes permanently.   He might, but he can't know this.


We are working hard on "our"  *meaning my husband* vegetable issues.  He hates them but he has to eat them sometimes.  He keeps telling me I can't MAKE him like vegetables anymore than he can MAKE me offer to slurp down a raw oyster.  He has a point.  Hell WILL freeze over before an ANY oyster, specifically a RAW oyster ever touches these lips.  It.  Will.  Not.  Happen.  And I am perfectly fine with that.  Our taste buds are always changing and I am very good at trying things I never have liked before to see if I like them now.  But raw seafood is an entirely different animal my friends.  As I stated before.  It.  Will.  Not.  Happen.  EVER.   I take that back, I told him if he let me put makeup on him, and a wig, paint his nails and dress him like a woman, all on video for you all, I would touch my tongue to a raw oyster.  His reply?  It.  Will.  Not.  Happen.  There ya go.

As far as I can tell it appears, I won.  I got hubs to eat my soup, and he told me it was some of the best soup he had ever eaten.  It is odd, it seems of all veggies to not like, the one he doesn't mind is cabbage.  I just find it interesting.  I am not out to change him and if you don't like something you don't like it, but I DO always appreciate when he tries things and I usually appreciate that he makes me try things too. 

Anyway, I had warned you how much I loved soup and this little soup stretch will eventually pass when I have exhausted making all things into a soup if at all possible!

In our quest to eat healthier, I think that you will enjoy this completely guilt free soup, by the bowlful!  OK so you might want a little crusty bread but, I won't tell, if you won't tell!

Oh wait, I need to refill my coffee.......brb

OK back. 

You will need:
1 lb ground chicken
2 tsp garlic powder
1 tbsp onion powder
1 small can of diced tomatoes or 1 cup fresh diced tomatoes (do not drain)
5 cups chicken stock
26 ounces crushed tomatoes (this is the size my Pomi's come in, choose something close)
1 cup instant rice
1- 10oz bag of shredded cabbage or half of a large head, shredded
salt and pepper to taste

In a large pot, brown your ground chicken.  While it is browning it, add in garlic powder, and onion powder.  When it is completely browned add in tomatoes and chicken stock.  Let simmer for 15 minutes.  Add in instant rice and cabbage.  Turn your burner off and cover for 5 minutes.  Remove lid and stir to completely combine all the ingredients.  Keep warm on low while eating! 

This soup is so light yet filling with the rice.  It is perfect for a light lunch or a starter for multi course dinner.  If you are dieting (oh I hate that word) or just making lifestyle changes, this soup is a great one to add to your quick, easy, and healthy repertoire!  I made this post and it has lasted us 2 days already!  We will finish it up tonight!  Great for work lunches too.  Filling but not so heavy you are going to need to hide at your desk napping!

Enjoy this light and delicious soup my friends!

Your "never enough soup" chefwannabe


Monday, October 15, 2012

Witches Fingers!

Oh, I DO love this time of year!!  I love the changing leaves, I love the chilly temperatures and I love Halloween!

 
When I was a child, we had a costume box.  My siblings (if any read) will remember, in fact it is either still there or someone inherited it.  It had dance costumes, little bo peep, numerous clown costumes, old cheerleader uniforms and a few other odds and ends to different costumes.  I guess 10 kids, with probably 10-12 costumes a piece warranted keeping anything possible that might resemble a piece of a future costume! Oh yea, we had little red riding hood too!

I remember dressing up for school, we would have a pumpkin decorating contest because Mr. Murray the P.E. teacher had a farm and would bring the entire school pumpkins!  Then we would walk downtown to the Halloween parade with our class and walk in the parade.  I can remember being a clown numerous times, I guess it was easiest for my mom!  I was a referee once and wore my dads uniform stuffed with pillows.  I was a punk rocker, and oh yea, did I mention a clown?  Oh I was little bo peep once too.  After the parade we would go home, or go to a friends house and wait for dinner and then trick or treating.  I am realizing a few places, my former home in New Jersey has trick or treat on a weekend before Halloween.  I just don't get that.  Part of the fun was being up to late, and bouncing off the walls with excitment waiting until we could break into the bags full of candy!   I can remember being on emotional overload while trick or treating.  Excited to be trick or treating and terrified when someone in a mask would approach me.  I STILL hate that, it just FREAKS me out and I am not responsible for the damage or bodily harm that it causes me to inflict!  We always watched the Charlie Brown Halloween specials and once my dad let me watch some of Amityville Horror.  My mom almost killed him.  I thought I was so lucky because MY dad let me watch some of it.  Probably it was 10 minutes before my mom busted him but it was 10 minutes my friends weren't allowed to watch! HA! 

When Cody was little, we would make some dinner and call it something gross.  Spaghetti and meatballs was brains and eyeballs on Halloween, and all that kind of stuff.  We would make cookies or treats, and these witches fingers were part of our Halloween "thing". 

So here is the very easy and fun recipe for....

WITCHES FIINGGERRSSSSSS!! Mwwaaaahahahaha!
1 cup sugar
1 egg
1 cup butter (softened)
2 tsps vanilla extract
2 2/3 cup flour
1/2 tsp salt
green food coloring
sliced almonds

Cream together, sugar, egg and butter, add in flour, salt, and vanilla.  When it is completely combined add in green food coloring.  Add as much or as little as it takes for you to achieve the witchy color of green you like!  Refrigerate for 45 minutes.  When dough is nice and firm, start molding fingers!  I used a cookie scoop so I could get the same amount each time.  Make the fingers skinnier than you think you should because they will spread a bit.  Using a skewer or toothpick, make the lines of the finger, and the knuckle.  Carefully press a sliced almond in at the end for the fingernail!  Remember these are old haggety witch fingers, they can be crooked and gnarly!  In fact they SHOULD be!


Place on a cookie sheet lined with parchment paper.  In a preheated 325 oven, bake for 15-20 minutes.  I baked mine 15 because I like to UNDERcook them a bit so they stay soft. 

I added a glaze to mine as well.  I just don't like a dry sugar type cookie no matter how tasty it is!  I just used 2 tbsp milk, 1/2 cup powdered sugar, and 1/2 tsp of vanilla.  I added green food coloring so it was the same color or close to the same.  I wanted to make sure you could still see the finger detail of the cookies!  I drizzled the cookies with the green drizzle.  You can barely even see it! 

Make sure to let the cookies cool ON the pan before drizzling and then let the drizzle set!


Enjoy a SPOOKY and FUN Halloween!

Your "yes, I even got married on Halloween" chefwannabe


Thursday, October 11, 2012

Pork Scallopini w/Garlic and Parmesan Pasta

Family favorite time!  This actually is a recipe I thought I blogged LONG ago.  I realized I never had and it was what we had for Sunday supper last night!  I love sharing our family favorites with you guys.  It makes me feel like I am spreading the love for my family to you and yours!  Sunday supper is a big deal in our family as most of you already know.  I believe strongly in starting the week out with a big family meal, it grounds us, reminds of what is really important in our lives and gives us a chance to talk about the week.  We reminisce, laugh, visit, eat great food and spend time with the people we love.  Friends OR family alike.   I encourage everyone to eat around the table with their children and families.  I don't care WHAT you eat, just do it with your kids!   I don't care if kids live with one parent or 2, grandparents, aunts and uncles, or foster parents,  I believe it teaches them to care about others, cope, problem solve and know they have someone they can trust to talk about anything to.  I get busy parents, long hours at work and just wanting some down time.  But guess what.....it is a labor of love!


Anyway, off  of my soapbox.  Scallopini can be made with chicken, pork or veal most commonly.  I like it best with pork.  Scallopini just means it is thin, pounded very thin with a meat mallet.  I used a pork tenderloin for this.  I almost always do.  You know those big huge ones that go on sale somewhere pretty often?  I cut them into 3 or 4 pieces and Ziploc those babies into the freezer.  Anyway I cut about 1 inch slices and then pounded them out.  I used about a 3 lb piece.  It made about 8 pieces.  It also has a gorgeous wine sauce that gets spooned over the top!

Here is what you will need for the Pork Scallopini 
Pork loin or boneless chops,  pound thin. 
1 cup flour
1 tbsp garlic powder
1 tsp dried basil
1 tsp salt
pinch of pepper

Mix these dry ingredients up to use as your dredge.  Preheat oven to 300 degrees.  Heat a skillet up with 1 tbsp of olive oil and 1 tbsp of butter.  Dip each piece of pork into the flour mixture, one side and then the other, pressing down to get as much stuck to the pork as possible.  Fry 2-3 minutes on each side.  Put on a baking sheet in the oven to keep warm.  Do this until all pork is fried!  DO NOT burn any of it because you will use the drippings and "stuff" left in the pan for your pan sauce!

Sauce:
2 cups white wine
1/2 cup chicken stock
1 tbsp fresh parsley (dried is fine if you don't have fresh or leave it out if you don't care for it)
1 tbsp butter

While pan is still hot from frying your pork, deglaze with white wine.  Using a wooden paddle spoon or something with a flat edge, scrape up the bits off the bottom while it is bubbling.  Add in chicken stock and let simmer uncovered until reduced by half and shut off the heat  Add in butter and parsley before serving.  There won't be alot, this isn't a gravy, it is just meant to get a spoonful drizzled over the meat.  If you feel you want more, it is easy to just increase your ingredients!

Parmesan Pasta:
1 lb any long pasta.  Spaghetti, fettuchini, linguine, angel hair, whatever you choose!
4 tbsp butter
1 tbsp olive oil
1 tbsp fresh minced garlic
1 cup grated Parmesan cheese

Cook pasta according to package directions.  While it is draining, in the empty pot, add butter and olive oil, and garlic.  Put it back on your warm burner and turn on low.  Stir until butter is melted and the "bite" has cooked out of the garlic.  Add your pasta back in and toss it with the the mixture.  Add in cheese and toss again.  Serve with your scallopini!

I hope you enjoy this as much as we do!!

Your "miss having my kids and granddaughter for Sunday supper" chefwannabe


Monday, October 8, 2012

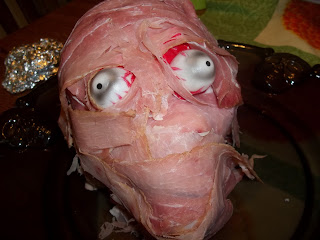
Grossest Halloween Meat and Cheese Party Platter EVER!

Mwwaaahahahhahahahhahahahhahha!

This has to be one of, if not THE most fun thing I have done with food.  I have no clue where I saw this, but it was probably 2 or 3 years ago and I have wanted to recreate it since.  I finally did it.

 
Halloween admittedly was never one of my favorite holidays.  I mean it is fun, scary movies, kids in the cutest costumes ever, all that stuff is great but was never like, "OMG, I can't WAIT for Halloween", until............

My husband and I were engaged and not wanting anything big, we went to get our marriage license and the next open date to get married by the Mayor (who was also a minister) was Halloween.  I was going to try and bargain for a different date but when my husband gives me the "COOOOOOLLLLLL" and looks as excited as a little boy getting his first puppy I just agreed.  I flip flop over whether I am mortified my anniversary is on Halloween or I think it is cool.  My mother will never recover from me wearing a charcoal gray (BLACK) suit to get married or that I had Frankenstein and the bride of Frankenstein on my wedding cake. 

That being said, we vowed every year we would hold a Halloween party, a tradition that would go on and on and on.  We have had 1.  LOL  We are celebrating 10 years of marriage this Halloween and we have had 1.  (heavy, not surprising, sigh)  Seems when I plan things they don't generally get executed (HA, good Halloween word).  It will happen, I swear it WILL happen!

So I know many of you will be attending Halloween parties.  This platter will be a HIT for kids and adults alike.  It is delicious but yet, so gross it takes a minute to actually peel the "skin"/meat from the skull and put it on a piece of crostini!  You will and you will "eewwwwww" over it the whole time!

I have a couple of things to discuss.  Someone help me solve this mystery.  Is there a reason ham isn't pink anymore?  Seriously?  I don't get it.  I used prosciutto for the top and ham underneath because the prosciutto was pinker and more real looking.  Prosciutto admittedly is pricey which is why I did it this way.  It is a variety of meat, but more economical than 1 or 2 pounds of prosciutto.   The best ham to use is the very inexpensive boiled ham at your deli counter, it is the pinkest!  Remember we are looking for something that looks real here! You know that meat that is pressed and really thin sliced in a package, I think Carl Buddig is one brand, those would work REALLY well because they are so thin.  Make sure you ask for your meat VERY thinly sliced, it is key.  If you get large pieces of meat, cut them into a size suitable for your bread and cheese bites!

As far as cheese, pick what you like.  I go to fresh mozz for everything because I love it but use any cheese you like as long as it is in little enough pieces to fit on your slices of crostini!

You could add cherry tomatoes to this, or olives, anything you want!

Here is what you need for my Meaty Skull Platter!

2 eyeballs (I got a bag of them at the Dollar Tree)
1 plastic skull (also Dollar Tree)  Get whatever size will fit your needs
1 large platter (also Dollar Tree)
1 lb ham or prosciutto (I did 1/2lb of each)
1 skinny baguette
1 ball of fresh mozzarella
Saran wrap or Press and Seal

Take your skull, and wash it.  I did it just because even though it will be covered I just had to wash it first.  Cover it with your saran wrap/press and seal, making sure to leave room to push in where all the indention's in the skull are.  This is just a protective barrier between the plastic and food.


Now for the bread:
Slice into THIN slices.  Lay out on a cookie sheet, drizzle with olive oil, salt, and a little dried Italian seasoning and broil just until the tops are golden brown.  I ALWAYS burn the bread, don't be me. 
Remove and let cool. 


Cheese:
Slice into pieces about the size of your crostini. It makes no difference what shape they are, you just need enough to alternate with the bread in a "collar" around the skull.  This also helps keep his head and the bottom meat stay in place.

Back to the skull.  Whatever meat you choose, if you use 2 meats, pick the pinkest one to go on the OUTSIDE of the skull.  Start layering your meat to cover the skull.  When you get one layer down, put the eyeballs in the sockets or on top of the sockets and use the meat to keep them in place.  Mine had blood on the bottom so they had a flat part I could layer a piece of ham right over!  Do this until all of your meat is used.  Remember you choose the size skull and amount of meat you need according to how many you need to serve.  Mine served 6-8 very well.  (as an appetizer)  If you are using this for a party where the food IS the meal, do a bigger skull and maybe 2.  Maybe one should get a little veil and one get a bow tie?


You will need to press the meat down to get it to kind of stick to the other meat.  At the bottom it will hang off the skull until you get the bread and cheese around it.  Just alternate a ring of cheese and crostini all the way around.

When you are done, don't be startled if he looks at you kind of like this.....


Next time I would probably not cover his teeth up, or I would add some lips for fun!  He is creepy for sure and in the most perfect way for a party!  Just keep a fork on the platter so everyone can "peel" off a piece of meat!!

Enjoy this GROSS yet FABULOUS party platter!!

Your "making deli meat into skin" chefwannabe
 
PS.  I think he needs a name....it is only fair, right?

Sunday, October 7, 2012

SouthWest Seasoned Pork Loin

Well......what to say, what to say.  It is just a spiced pork loin.  But I loved the spice so much, and thought of several things to do with the pork I thought I should share.  I think sometimes we forget that the the best tasting things are many times the simplest things.  I am simple.  Wait, that doesn't sound right.  I like simple things.  From life to food, simple is how I roll!  Ok this is starting out a little random.  Let me try again.


I made this pork loin, and I roasted it in the oven,  but it would be awesome in the crockpot and shredded for any southwest or Mexican dish you enjoy shredded pork on.  The flavor is awesome and, well, that is the part I mostly decided to share with you.  This is an official crock pot doable recipe.  Oh. Em. Gee.  I did it.  Perhaps that is why this blog is so hard to write, the words crock and pot rarely are typed into this computer and quite frankly, it terrifies me that I have become "one of you", as in crock pot lovers! Just kidding.......I get it, I get it.  I am laughing with you.  You are laughing right?

I used a 4lb pork loin.  You could use any cut of pork you like I suppose.  Make sure it is thawed and dry it off with paper towels.  It will make the rub stick better and won't be slimy.  You get my drift, I know you do.

I would advise to do this the day before.  When the rub is on put it in a Ziploc or in a container with a lid and let it sit for at least 12 hours.

Here is the spice combination I used:
1 tbsp chili powder
1 tbsp cumin
1 tbsp garlic powder
1 tbsp onion salt
1 tsp pepper
1 tsp salt
1/2 tsp cayenne (optional)

Mix in a small bowl and pat unto your meat all the way around and the top and bottom.  Put in a Ziploc or container with a lid and let marinate for at least 12 hours. (OK, OK, overnight is fine)


Put in the crock pot on low for 8 hours.  Shred and use in taco's, quesadilla's, anything!

I put mine in the oven at 350, covered until my internal temp was....I usually go 150 as an internal temp for pork.  It took about an hour and a half I believe.  Please don't come back and say, "It took mine 3 hours" or "it took mine 15 minutes"  because the truth is, I completely forgot how long I roasted it.


So that is it.  I ended up using the leftovers for some pork fried rice, and thin sliced on sandwiches.  Was awesome in both instances.  You could even PULL your pork!

So there it is, my easy, peasy, chili/southwestern spiced pork loin.  I am not a huge lover of the pork, so this made it extra tasty for me.  I plan on doing this with chicken soon.  I don't see any reason not to, do you?

Hope you like it!!

Your "did I really post something for a crock pot"chefwannabe

Wednesday, October 3, 2012

Old Fashioned Potato Soup

More soup!  Can you ever have enough soup?  Not in my opinion, but I DO know a few people who are less than obsessed with soup.


Potato soup has a long history in my life.  It starts something like this.  Every Christmas Eve at my house, we would have soup.  My mom would prepare 4 or 5 kinds of soup, and we would have sandwiches with DELI meat!  This was a big deal because in the little country town I grew up in, when I was a kid, we couldn't get meat from a deli.  Our grocery stores had butchers, if you wanted shaved ham, well, you had to do it yourself or go to the nearest "city" which was an hours drive away.  So all of my older siblings who lived in college towns or a city, would bring back different meats and cheeses for our special Christmas Eve soup and sandwich feast. 

Anyway, back to the soup part of this whole thing.  My mom would make of course, chicken noodle soup because it is MY favorite and I am HER favorite, oyster stew, chili, and potato soup.  I don't even want to discuss the oyster stew or the chili because it had beans in it.  We all know where I stand on chicken noodle soup so all that is left is the potato soup.  Now I am sure she learned to make potato soup maybe from my grandmother, who I never knew.  Isn't that sad, I never knew any of my grandparents.  I remember talking to my grand mom in Philly once before she passed away.  Anyway, I am sure she learned from her mom or an aunt or something.  Her potato soup, which most people looooovvvveeed, was basically hot milk, chunks of potato and melted margarine floating on top.  I ate it a few times, but mostly had my face full of chicken and noodles so hardly had time or tummy space for hot milk and potatoes.  If I recall, it did have onions in it as well.  Yea, it did.  It had onions.  So obviously she made a very soupy, thin variety of potato soup.  Oh crap, I think it might have had celery in it too.  Regardless, I think I have painted the picture with enough detail. 

As an adult, I have had so many potato soups.  Most involved cheese, or bacon, sour cream, sometimes cubed potatoes sometimes smashed up mutilated potatoes that looked like someone ran them over.  I knew I needed to invent my own recipe for potato soup.  I wanted plain old fashioned potato soup....but better.  I didn't want a ton of veggies, or it is veggie soup.  I wanted thicker than water but not as creamy as a true cream soup.  The point is, I think I got it.   Well, I know I got it.  I have made this before, but changed a few things this time and the changes are perfected it for me.  So if you are looking for "loaded" potato soup, this isn't it.  This is just plain old fashioned potato soup with lipstick on!  I did use one canned item.  Love it or don't, change it out or don't, but it shouldn't be left out in my opinion.

You will need:
1 tbsp olive oil
1 tbsp butter
2 tsp salt
2 shallots finely diced
2 tbsp flour
3 cups chicken stock (I used low sodium)
4-5 cups diced potato (small dice)
2 cups half and half
1 1/2 tsp Dry Ranch Dressing Mix
I can of cream of mushroom soup (oh YES I did)
1 green onion, chopped
1 tbsp fresh parsley, chopped

In a large pot add in olive oil, butter, shallots and salt.  Stir and let cook for 3 minutes.   Add in flour and let cook for another minute, stirring constantly.  Next add the stock and potatoes.  Cover and let simmer 10-15 minutes depending on the size of the dice on your potatoes.  Stir occasionally and then add in half and half, ranch seasoning, mushroom soup, onion and parsley.  Stir until it is smooth and simmer UNcovered for another 10-15 minutes.  Stir every few minutes so it doesn't stick or burn.  It will thicken a bit and become perfect and the smell will drive you crazy!

I hope you enjoy this potato soup.  It has a great flavor with a tiny hint of dill in the background from the ranch mix.  You get the bits of mushroom from the soup.  If you are dead set against adding it, don't.  Or change it out with another cream soup.  It just does something and I love the bits of mushroom without having to deal with mushrooms.  That made no sense.  Oh well. 

Enjoy this comforting, soul warming soup friends!

Your "no milk and margarine in this soup" chefwannabe

Tuesday, October 2, 2012

Blueberries and Cream Crunch Muffins!

Hello friends, hoping this post finds you all happy and healthy! 

I have been in the mood for muffins.  My husband has been asking for blueberry muffins.  I will admit, until a year or so ago, I was a box blueberry muffin girl, who would doctor it up and add my own "stuff" and they were awesome.  Well, a new day has come, and these muffins are INCREDIBLE.  I had some ricotta I needed to use up, and some white chocolate chips I wanted to use so I took my base muffin recipe and went to town! 


Muffins are so versatile, aren't they?  I mean, breakfast, brunch, snack, dessert, there is no craving they can't fulfill.  They can be made ahead or frozen.  I just love everything that is "muffins".  However, I noticed I have only one muffin recipe up.  So my husband asked me to make blueberries and cream muffins with a streusel top. 


So, for my adoring husband, who is the fizz in my soda........I present to you, the most amazing muffins we have ever eaten!

Ingredients:
1 1/2 cups flour
1/4 cup brown sugar
3/4 cup instant oats
1 1/2 tsp baking powder
1/2 tsp baking soda
1/2 tsp salt
2 eggs
3/4 cup ricotta cheese
1/2 cup milk
2 tbsp melted butter
3/4 cup blueberries (I used frozen, thawed them and drained them)
1 cup white chocolate chips

Preheat your oven to 400 degrees.  Mix all ingredients together.  Using a well greased muffin tin, or using liners, fill each well with batter.  This recipe will make 16-18 muffins.  I made 12 regular sized, and 14 minis.  Top each muffin with the streusel topping. (recipe below)  Bake for 15-17 minutes.  Mine took 15 exactly and the mini's took 7 minutes.  Let cool in pan and enjoy!  HINT, when you spray or line the cupcake pan, make sure to use nonstick spray for and spray the top surface so if the streusel bubbles up it will be easy to remove!

Streusel Topping:
4 tbsp brown sugar
1/2 tsp cinnamon
4 tbsp flour
4 tbsp butter

Mix first three ingredients, and then cut the butter in to the mixture.

You can melt a few white chocolate chips to drizzle over the top.  If they don't melt thin enough add a few drops of vegetable oil so it will drizzle!
Your "blueberry AND hubby lovin'"Chefwannabe

Monday, October 1, 2012

Light and Creamy Broccoli Soup

So...are ya tired of soup recipes yet?  Well, buckle up cowboys and cowgirls cause it is soup season for me!  Wait, I think I meant to SADDLE up.  Yea, saddle up.  I could live on soup, so I like to make alot of different kinds!


I am working very hard on eating more green vegetables.  Now before you go thinking, "Oh nice Chris, just drown them in cream sauce", I assure you I eat PLENTY of them fresh and raw or steamed or roasted, etc.  Anyway, everybody knows broccoli in soup should involve some kind of creamy goodness.  I did lighten it up a bit with mostly low sodium chicken stock and you can lighten it up even more using skim milk instead of half and half or cream.   I bet you don't see a single thing wrong with this soup now, do you? *wink*

In all seriousness though, if you are going to eat a cream soup, this is a darn good one that is a bit more figure friendly than probably most versions.  This is also a soup that freezes fabulously.  I mean, if you can cook it once and serve it more than once, it can't be a bad thing, right?

Here is what you will need:
3 tbsp flour
3 tbsp butter
4 cups chicken stock (use low sodium if you can)
2 crowns of broccoli cut as small as you like
3 cups of half and half (feel free to choose anything from skim milk to heavy cream)
1 cup grated Parmesan

In a large pot melt butter and add in flour.  Whisk constantly for 1-2 minutes.  Add in chicken stock starting with half of it, whisking and then the other half. 


Simmer for 2 minutes, add in broccoli and half and half.  Stir often and let simmer 15-30 minutes.  If you want it thicker simmer with the lid off and if you want it the consistency it is, simmer with the lid on. 


Just before serving, turn off your stove and add in grated parm, stir and serve!

Enjoy this lightened up version of a cream soup. Now, you get to eat MORE of it!


Your "less means more"chefwannabe