Happy ALMOST Christmas friends! Can you believe it has snuck up on us already? I am so ready. Ready to celebrate the birth of my Lord and Savior, ready for family, ready to enjoy simple things and great food.
Speaking off......
Last weekend we had Christmas at my dad's house. One of my sisters brought these cheeseballs from a little grocery store in Tilden, NE. WOOHOOO for Tilden! I was tempted to call them, give them my best sappy story to get the recipe, but that is no fun. I wanted to try and recreate it myself!
Here is what I came up with!
1, 8oz block of cream cheese
2 cups shredded cheddar cheese, DIVIDED
1/2-1 tsp all purpose seasoning (I used adobe)
Salt and pepper to taste
In a medium bowl, add in all ingredients (only 1 cup of the cheese for this part). Start with 1/2 tsp of seasoning, you can always add more. Use a hand mixer as it allows you to break down the shredded cheddar into smaller bits, making a more cohesive mixture. Use remaining 1 cup of shredded cheddar, and sprinkle on a sheet of plastic wrap. Add your dip mixture to the top, wrap it around, twist the ends and refrigerate for 1 hour at least. This can be done the day before easily! Take out of the fridge 15 minutes before serving!
Serve with club crackers, or any cracker. Maybe even some crostini!
Yep, I said it. Youi know it is our famiies favorite holiday movie and my husbands dog is named after Ralph. Yes it is true, his best little buddy is named Ralph (Ralphy)!
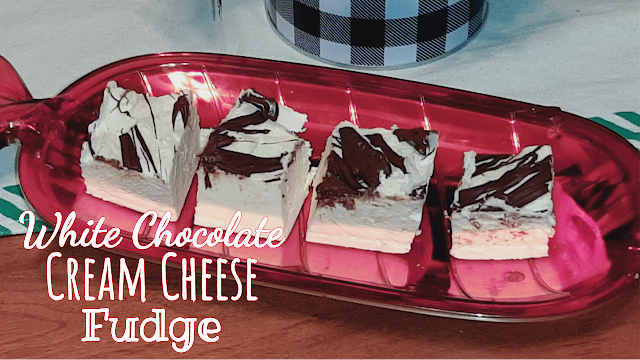
Can I tell you this recipe was a happy accident? I was look at a recipe by 12 Tomatoes. I didn't screenshot the ingredients and had closed the tab, so I took a guess at how much I needed of what. WRONG. I came up 2 bags of something short, one of this short, and blah blah blah. So, I used what I had at home, and got this amazing fudge recipe. I mean it is AHMAZING. If you love cream cheese and/or white chocolate this one's for you!
You Will Need:
2- 14oz bags of white chocolate chips
1- 8oz brick of cream cheese
1 tsp vanilla extract
1/2 cup powdered/confectioners/icing sugar
1 TBSP half and half or heavy cream
Semi-sweet chocolate OPTIONAL
Beat cream cheese for 3 minutes until light and fluffy. Melt white chocolate in 30 second increments in your microwave until all melted. Add to your cream cheese mixture. Mix to combine with your hand mixer. Add in vanilla, and powdered sugar. Again, combine ingredients. Add in half and half and mix until completely combined.
In a parchment paper lined 8x8 inch pan, pour the mixture. It is a different texture and needs spread out. You can wet the utensil you are using or use another piece of parchment on top and use your hands to smooth. Let sit for at least 4 hours, overnight is best.
OPTIONAL.....Melt 1/3d cup of semi-sweet chocolate and drizzle on tiop. Use 1 cup and spread a layer of chocolate on top.
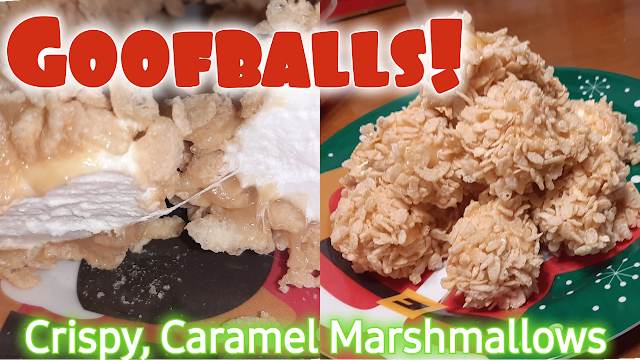
Here is a DELICIOUS treat/cookie/goodie, called Goofballs! I got this one from my sister Patty. Completely perfect for her, she IS a goofball! ENJOY!
1 box Rice Krispies
1-2 bags of LARGE marshmallows
14 oz caramels (Kraft)tf
1 cup butter
1 can sweetened condensed milk
In a medium pot place caramels, sweetened condensed milk and butter. Stir until melted, it might take a bit. I used a skewer but you can use a fork as well. Whatever works. Dip the marshmallow in the caramel, and let the excess drip off. Then, drop into the cereal. Coat completely and place on a cookie sheet. Repeat. Repeat. Repeat! These freeze great and are DELICIOUS frozen!
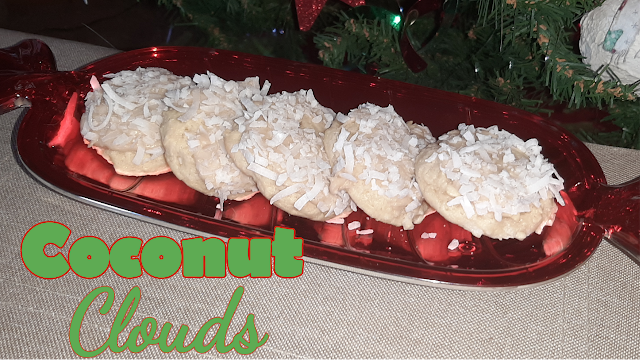
Preheat your oven to 375 degrees F. Use parchment paper, please, for the love of Christmas use parchment paper!
Cream sugars and butter together. Add eggs and beat until well combined. Add in extracts and sour cream. In a separate bowl combine, flour, baking soda, and coconut. Add into your wet mixture and mix until combined.
Using a teaspoon or cookie scoop, please cookies approx 2 inches apart. Bake for 10 minutes. Let sit on cookie sheet for 5 minutes and then remove to cooling rack.
When all cookies are baked, in a heavy saucepan, melt b. utter, let it cook until it is a dark amber color. It will be browned but not burned Remove from heat and add in extracts, milk and powdered sugar. Mix to combine. Frost each cookie on top and dip the frosting into your coconut. Place back on cooling rack to set.
This recipe is supposed to make 5 1/2 dozen cookies but I got 3 dozen!
Good morning, evening, afternoon, whenever you are reading this! I am typing it in the morning!
We had our family Thanksgiving last Saturday night. What great food, great company and a hefty helping of laughter to go with it. However, after all of that, there was PIE. Oh, was there PIE!
So I have a couple, or 4 maybe 6 sisters who can bake their hineys off! I mean seriously, straight from a bakery tasting baked goods. My sister Peg was in charge of the pies, and her pumpkin pie was amazing enough that with ALL the pumpkin pie recipes out there, I still wanted to share it. Not sure if it is just a recipe she got somewhere.
I am going to stop talking and get to sharing, there aren't many days before Thanksgiving and I want you to have a chance to make this one! I used fresh, homemade pumpkin puree. Please, feel free to use pumpkin PUREE from the store, if you choose!
You will need one pie crust if you are using a deep dish pie plate. If you have a regular one, like I do, these will make 2 pies. Blind bake your pie crust at 425 degrees for approx. 15-20 minutes. Remove and cool!
SET OVEN TEMP TO 375 degrees F, this is the temp you will need to bake the pie at.
You will need:
2 cups pumpkin puree
3 eggs
1 cup heavy whipping cream
1/4 cup milk
MIX THESE WET INGREDIENTS TOGETHER.
IN A SEPERATE BOWL MIX ALL DRY INGREDIENTS BELOW
TOGETHER!
1 1/2 cups brown sugar
1 T cornstarch
1/2 tsp salt
2 tsp cinnamon
3/4 T pumpkin pie spice
Now combine the wet ingredients into the dry and whisk until completely combined. You can also use your hand mixer or stand mixer. When completely combined, place into pie shell. I suggest you put the pie crust on a cookie sheet to catch any drips. Bake for 50 minutes, and start checking. Using a butter knife, check the pie for doneness. If it comes out fairly clean but the pie is a WEE BIT jiggly like Santa's belly, take it out, it will carry over cook and set as it cools!
Don't forget the fresh whipped cream!
ENJOY and HAPPY THANKSGIVING from our house to yours!
Good Evening! I hope you are all well, healthy, happy and all the good things! The holiday season is in full force around here. Blogging and YouTube are like retail you have to be 2 seasons ahead of the game!
December will bring you TONS of cookie and crafting videos! Don't miss it, make sure you are subscribed to my YouTube Channel HERE!
I wanted to give you a little somethin' somethin' new for Thanksgiving. It is super easy kind of "apple pie-ish" dessert. Make it ahead, use homemade pie crust or don't, but this is so easy, it takes the same amount of time to whip out 2 as it does one! If you don't need 2, freeze one for a quick dessert when you need one. We all need dessert, let's just be honest about that!
Now a crostata is basically an open faced pie. It usually has a lattice top, but who has time for all that, unless you want to? If I wanted to do all the fancy stuff I would just stick with the pie version. I mean you do you, but, I, did me this way!
Let's get to it. Life is busy and to much chatter just keeps you on my website, looking at all of my recipes, oh wait....
For the crust you can buy store bought, or here is my EASY EASY, you can't fail pie crust recipe and it is SO good! PIE CRUST RECIPE
Here is what you need:
4 cups of peeled, and sliced apples. I used MacIntosh
1/4 cup brown sugar *if you add more, nobody will know*
1 tsp cinnamon
1 TBSP cornstarch
1 egg, whisked
granulated sugar to sprinkle on the crust
Mix this all together, EXCEPT the egg, in a bowl, making sure everything is coated well. If you made a homemade crust, it will make 2 crusts. Either half the recipe or keep that one in the freezer for later use. Roll it out evenly. Place your apple mixture in the middle leaving about a 2 inch border. Now, fold the sides up over the apples. So how easy? Beat an egg and brush the crust and sprinkle some sugar on it. Bake at 400 degrees for about 30-45 minutes. When your crust is done, the crostata is done. Depends on the thickness of your crust and so....just start checking when you can smell it!
Don't forget the ice cream scoop on top! Maybe even a drizzle of caramel! Lord give me strength!
Friends! I am so glad to have you back here again! I see a few new friends, and might I ask that if you are here already that you hit that "Follow" button. You can get emails when I post a new recipe, nothing else. Thank you kindly!
So now that you have dared click on this recipe, let's talk. I love guac. I mean, I just have to get that off my chest, guacamole is divine. I am honestly not sure I have ever tasted any I didn't like EXCEPT when it was literally all cilantro with a small side of guac. That is the next subject. I taste soap, it seems there are 2 camps where guac is concerned. Soap tasters, and non soap tasters. However, I do like a little cilantro. I don't love it in guacamole. There is just this whole thing. But the most pressing issue is the look of this guacamole. I mean, can we agree it looks like monster puke? I mean, maybe that is what I should call it. I know you know that I keep it real and it isn't like I can hide its lack of beauty! As a food blogger, it is sometimes so hard to share your favorite recipes, especially when they look less than magazine worthy. Guess what, today I don't care. Halloween season is the perfect time to share a really ugly recipe. I don't know, I just wanted to share it.....
So here is what you will need, super simple, like SUPER simple.
2 medium avocados
1 tsp garlic powder
1/2 lime for juice (use the other half to garnish if you like or use both halves)
2 Tbsp salsa
pinch of salt and pepper
Cut your avocados in half, remove seeds and inside into a bowl. Using a fork, combine all ingredients, mushy, mushy, mushy! I enjoy it a bit chunky, if you like it complelely smooth, consider using a food processor. If you aren't serving right away, place one of the avocado seeds in the finished product, cover in an air tight container and enjoy it fresh when you are ready!
My friend Rachel always says that and I thought it was fitting!
I hope this finds you all doing well and getting ready for that wonderful FALL weather to get here! Does anyone NOT enjoy Fall? The older I get the more "over" summer I am. I mean you guys, I get downright mean in the summer. I clearly can't take any personal responsibility because, it is out of my control. I swear! Summer is gross. I can do ONE month of summer. Can someone arrange that, because I would sure be a happier person probabaly 3 months out of the year!
Speaking of HOT and SUMMER, I had to share this recipe. I was chatting to my sister (#1) and she was having her daughters and their families over for dinner today and she told me she was making No Bake Peanut Butter Bars! I was like...WHHHAAAAAAAT? I have not had one of those for probablly 40 years! I was so glad she reminded me. Her first teaching job, or maybe she was student teaching.....Shout out to GREELEY NEBRASKA! This was apparently a popular recipe there because she used to make it all the time and never did before that.
I split my batch for experimental reasons and I found my version was a little better and added these cinnamon and honey undertones and it was perfection, so, I mean, obviously I went with it. This recipe is super easy and can we talk about freezing them? Oh myLANTA they freeze beautifully.
Annelle: "It’s in the ‘Freezes Beautifully’ section of my cookbook, and I want to make something that freezes beautifully."
Name that movie!?
Here we go, and PLEASE make these, because they won't heat up your house, they take like 5 minutes and they are super rich, will feed tons of people and there are plenty for you to sneak during the night when you "get up for a drink"!
You will need a 9x13 pan, you can easily halve the recipe for an 8x8 or 9x9 or any other freakishly odd size pan you have. Why do they even do that to us?
Here is what you will need!
1 cup salted butter (melted)
2 cups of CINNAMON HONEY graham crackers (about 2 packs) THIS is what takes this to new levels
1 11.5 (or close) bag of semi sweet chocolate chips
2 HEAPTING tablespoons of creamy peanut butter
Get your graham crackers smooshed. Use a rolling pin, food processor, baseball bat, hammer, whatever works for you. They absolutely do not have to be "find crumbs" but just get them smooshed. Next add in your melted butter and combine until they are mixed. Next add in your powdered sugar, and vanilla and peanut butter. You are going to need a hand or stand mixer for this. I mean it is possibly to use a wooden spoon, but just don't. One arm will be twice the size of the other because of the muscle building and that is not a good look on anyone. When this is completely mixed, or pretty daggone close, press it into the bottom of the pan. I lined mine with parchment first so I could lift them out and cut them easily. Make sure to press your mixture in firmly.
Now for the topping. In a microwave safe bowl, add in your chocolate chips and 2 big ol' globs of peanut butter. Microwave 1 minute and stir. Continue microwaving for 30 second intervals and stirring until all is melted and smooth. Pour over your peanut buttery goodness and smooth it out to cover. Refrigerate for 2 hours. They can stay in far longer, but, I say at least 2 hours.
Cut and enjoy! Send them in your kids lunches, have them for afterschool snacks, eat them when you are sad, happy, mad or shocked because after all.....food is love!
Good Afternoon from sunny Nebraska! I pray this finds you all well, physically and mentally. There is so much going on in the world and I hope you are all doing well, and dealing well.
It has been awhile since I shared a new recipe with you. I have been filming my old recipes for my YouTube channel as I need them or make them. Also sprinkling in some shopping and crafting! If you don't follow me there please do, I would love to have you. Here is the link to my channel, Chefwannabe's Life
So let's get into my history with jello. It probably should come with a disclaimer that my comparisons will be gross, and well, yeah,
As a child I loved jello, PLAIN, no fruit in it. Meh. Also, it required some whipped topping. I mean...it is what it is. As an adult, I can't stand it. After seeing babies born, any jiggly jello reminds me of placenta. Ok? Ok. I said it, you know I don't mince words, gross or not. And I just can NOT eat it. In an attempt to make friends with the jello, I decided to play with it. Yes, I play with food often!
I had to try this a couple of time to get it to work perfectly. Perfect consistency, etc. Let me preface this recipe with IF your strawberries are not as sweet as you would like, you can sprinkle them with some sugar, let them macerate, and then drain off ALL liquid before adding them to the jello. This is a must, so decide what you can do with the strawberry goodness instead of sending down the drain. Here we go!
1 3.4 oz. pkg strawberry jello
2 cups strawberries cut in chunks
1 8 oz. tub whipped topping
1-2 cups mini marshmallows
Place jello powder in your bowl with 1 cup boiling water and only 1/2 cup cold water. Make sure the powder is completely dissolved and place in refrigerator. Let chill JUST UNTIL the edges are starting to set. Remove and using a hand mixer blend in cool whip and strawberries. Let some of the strawberries stay chunking and some get blended up a bit more. When you are sure it is blended well, (scrap the bottom or you will get a layer of gelatinous goo at the bottom) fold in marshmallows and place back into the refrigerator for at least 6 hours. Yes, I said it and overnight is best. The texture is perfection, PERFECTION I tell you! I can NOW EAT JELLO!
I don't know if you eat jello as a side or as a dessert. As a kid my mom had it with dinner, and my husband grew up with jello as a dessert. Jello.....DESSERT? I will take a hard pass on that one.
Hello and WELCOME to my new subscribers! It is so good to see you all, it has been a little but but I know you all understand "life". It is all going a million miles an hour and I love it, mostly!
I wanted to share my easy ganache recipe. It really is a basic that I should have shared long, long ago. It is the glorious ingredient in so many things and it is the crowning glory of so many more!
I will show you in the video, how to use my ganache 3 ways. Glazed topping, whipped frosting, and truffles!
You can double or triple this recipe depending on what you are doing and how much you need. I ALWAYS use semi sweet chocolate chips. Here we go!
2 cups semi sweet chocolate chips
1 cup heavy whipping cream
1/4 tsp vanilla extract
In a bowl, place your chips. Then, either on your stove top or in the microwave, scald your heavy cream. That means you need it to be bubbling around the outside but not boiling. Pour it carefully over the chips, make sure they are all submerged and wait 2 minutes. Let the heat of the cream work and then take a whisk and start mixing slowly. You aren't looking to incorporate air, just mix the chocolate and cream together. When it is smooth, add your vanilla. Now.....
You can immediate dip cupcakes, or donuts, eclairs, cream puffs, etc in the ganache after letting it set about 5 to 10 more minutes.
You can let it cool in the fridge, like over night. Take a hand mixer to it and whip it. You can see it changing color to a lighter brown as air incorporates and it basically transforms to the most decadent silky chocolate whipped cream you have ever been blessed enough to indulge in! Pipe it on or spread it between cake layers, frost cakes, cupcakes, eat it with a spoon. I would NEVER do that, but...I mean I have done it and highly recommend it!
Last of my choices is truffles. Let it get really solid, use a small cookie scoop or spoon, roll into balls and then roll in anything...crushed chocolate candies, nuts, coconut, cocoa, powdered sugar, maybe stick a surprise in the center!
Here is a link to my video. Make sure to subscribe, I would LOVE to have you!
Good Evening and welcome back to my website and recipe blog! Thank you for clicking the link and I hope you will follow directly so you don't miss any new recipes! Maybe even look back on some favorites! You can use the search bar to search keywords if you are on a PC or on your mobile device go to your desktop view and you will see it!
It is good to see you again! It has FINALLY stopped snowing and being -30 degrees here in Nebraska. Whoa, that is like, the kind of cold that makes your face instantly go numb and you can't even move your mouth to speak! I hope everyone is warming up, snow is melting and we are just around the bend from Spring! (My favorite time of year btw)
I wanted to share my Fluffer Nutter Cake with you tonight. I grew up eating peanut butter and honey or peanut butter fluff sandwiches! Was it a favorite of anyone else? I still indulge from time to time but BOY is it sweet!
Here we go with the recipe! I was thinking Spring when I made this, and so I added pastel star sprinkles on top, you add what you want, even crushed peanuts if you want or nothing. I needed sprinkles.
Prepare one white cake. From a box, from scratch, no judging here. Make it ahead or make it just before so you can pour the peanut butter mixture on while it is still warm if you want. I poked holes in mine, the mixture is a little thick so make BIG holes, or add a little milk to it to thin it a HAIR!
You will then need:
8oz jar of creamy peanut butter
13oz + 1/2 cup marshmallow creme/fluff
1, 8oz container of whipped topping
Combine peanut butter and 13 oz container of marshmallow creme together in a bowl and microwave until it has thinned out considerably. If it doesn't thin out as much as you want, and you want it to for sure run into the holes on your cake, add 2T of milk and mix completely. You may need to give it another 30 seconds in the microwave. Make sure it is completely mixed and then pour and spread over the top of the cake. Evenly spread it on top and lick the spatula! Seriously, it is the nature of the beast.
Now, with a hand mixer combine 1/2 marshmallow creme and container of whipped topping. Mix until combined and spread on top of the peanut butter mixture. Cover it evenly and then dress the top how you like...IF you like. Again, I would recommend licking the spatula.
Put this baby in the fridge for about 30 minutes before serving and BAM. That is what I call heaven right there!
I just returned from a long weekend taking care of my dad with 2 of my sisters. Boy was that an experience. I have come away with 2 important messages...\
1. GOD BLESS NURSES
2. THANK YOU GOD FOR NURSES
oops there are 3,
3. NURSES DON'T GET PAID NEAR ENOUGH!
We did however do lots of laughing, reminiscing, and walking down memory lane. He went straight to him and my mom's first date and the "best set of legs he had ever seen". He is right...I mean it is what it is. It was a good weekend and all is well. He has been out of the rehab facility for 5 months just living his best life. He refers to his meds as his "chicken feed". he wants to be called "Sweetface" and expects 3 meals a day. Seriously dad? HA! Gonna take a hard pass on a career in nursing!
A few nights before I left I wanted to make a nice dinner. I made steaks and wanted to use up some things in the fridge for sides. Always shop your fridge and freezer, use things up, don't through your money/food away. I had a roll of refrigerated pizza dough that needed used. It must have snuck to the back of my fridge and honestly I had no idea if it was even still good. I know that has HAD to have happened to you too! Right? Please? Somebody? I had 8 rogue string cheeses that were spying on the new cheese and honestly, who can't make something amazing out of pizza dough and mozzarella cheese sticks?
These are easy and I contemplated not even sharing the recipe with the video, but I am. There are always beginners out there and easy recipes are a good thing!
You will need:
1 roll of refrigerator pizza dough
8 mozzarella string cheese sticks
4T melted butter
1 tsp garlic powder
Italian Seasoning
Preheat oven to the temperature recommended on the package of crust. Roll out slightly and cut into 8 pieces. Cover the ends of the cheese and then "smoosh" the dough around to seal and cover the entire stick! Lay on a parchment lined baking sheet or spray with cooking spray. Do this until each bread stick is made. Melt butter and add in garlic powder. Add more or less if you prefer. Brush over breadsticks and then sprinkle each with Italian seasoning. Bake in the oven until golden brown which will be the time that the pizza dough package recommends. Serve right away with marinara, ranch or no dipping sauce at all! OHHHHH dunk these in tomato soup even! Serve with any soup!
These can be many things but the most important thing they are is DEELISH!