Showing posts with label white chocolate. Show all posts

Tuesday, December 14, 2021

White Chocolate Cream Cheese Fudge

"Oh Fudddgggeeee"

Yep, I said it.  Youi know it is our famiies favorite holiday movie and my husbands dog is named after Ralph.  Yes it is true, his best little buddy is named Ralph (Ralphy)!

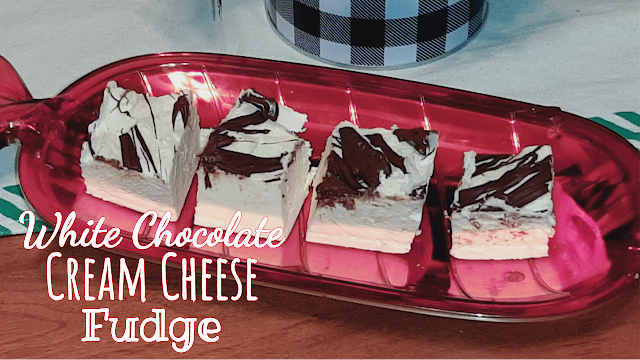
Can I tell you this recipe was a happy accident?  I was look at a recipe by 12 Tomatoes.  I didn't screenshot the ingredients and had closed the tab, so I took a guess at how much I needed of what.  WRONG.  I came up 2 bags of something short, one of this short, and blah blah blah.  So, I used what I had at home, and got this amazing fudge recipe.  I mean it is AHMAZING.  If you love cream cheese and/or white chocolate this one's for you!


You Will Need:

2- 14oz bags of white chocolate chips

1- 8oz brick of cream cheese

1 tsp vanilla extract

1/2 cup powdered/confectioners/icing sugar

1 TBSP half and half or heavy cream

Semi-sweet chocolate OPTIONAL


Beat cream cheese for 3 minutes until light and fluffy.  Melt white chocolate in 30 second increments in your microwave until all melted.   Add to your cream cheese mixture.  Mix to combine with your hand mixer. Add in vanilla, and powdered sugar.  Again, combine ingredients.  Add in half and half and mix until completely combined.

In a parchment paper lined 8x8 inch pan, pour the mixture.  It is a different texture and needs spread out.  You can wet the utensil you are using or use another piece of parchment on top and use your hands to smooth.  Let sit for at least 4 hours, overnight is best.

OPTIONAL.....Melt 1/3d cup of semi-sweet chocolate and drizzle on tiop.  Use 1 cup and spread a layer of chocolate on top.


Friday, March 22, 2019

Unicorn Crunch!

Unicorns, unicorns everywhere!  At least for me.  I love unicorns.  While I should probably not announce from the rooftops that I am 45 and obsessed with them, I am anyway!  


Been awhile, eh?  Busy time, just kind of burning both ends of the candle, and still dealing with eye issues.  Had an emergency surgery to replace 2 sutures, 2 weeks ago and fix a vitreous fluid leak.  Joy.  If you follow me on social media or YouTube you probably know the sorted details!

I wanted to make a variation of puppy chow.  No chocolate, no peanut butter.  Just something else, that is new and SPRINGY!  This is what I got.  The first time around I used plain Rice Chex.  The second time I used Vanilla Rice Chex.  If you can get the later, DO IT.  If not, still Do IT, because this is a delicious!  

  I was thinking if you changed up the sprinkles to red, white and blue you could send it home in  fun bags for birthday favors, like a Capt America birthday, black and yellow for a Batman, etc...

You can't beat a quick no bake dessert like this one.  We have all been in a position where we needed something and we needed it like, NOW!

You will need:
1/2 cup dry vanilla box cake mix
5 cups Vanilla Rice Chex Cereal (or plain)
1 1/4 cups white chocolate chips
1 tsp vegetable oil
1/2 cups sprinkles of your choice

Place cereal in a LARGE bowl.  Melt white chocolate chips at 30 second increments at a time until all melted.  I added in vegetable oil to thin my own a TINY bit.  This is optional.  Mix and pour over cereal.  Add in half of your sprinkles and stir until all of the cereal is coated.  Add in your cake mix and the rest of the sprinkles and toss again.  When all of the cake mix has been stirred in, place on a foil covered baking sheet.  Let sit for 30 minutes in a cool place.  Break up and store in a baggie or air tight container!

ENJOY and I hope it makes you feel as magical as a unicorn!


Thursday, November 30, 2017

Blueberry Cheesecake Cookies

Hello my dear friends!  How long has it been?  TOO  long!


I am glad to be back with you, after all, it IS the most wonderful time of the year!  Right?  I am ready for holiday cheer, holiday feelings, holiday food, and everything else!  I truly find it odd, how busy things have been yet, at the beginning of such a busy time, I get to make time to share some cookies with you!

If you have been following me awhile you know I have a "Just Say NO To Brown Cookie Trays" campaign.  Well, maybe not a campaign but, I feel strongly about it.  You know the ones, don't act like you have never received them!  Hard cookies, difficult to differentiate one "flavor" from another, and not even sure what is in them.  Yes, those cookie trays.  I actually came up with these cookies, because I sell Scentsy as well.  This Blueberry Cheesecake Scent Bar came out and I was like, "oh maaaaan, I need to make that edible"!  I did!  This recipe was adapted from Get In My Belly.


This recipe makes between 18-24 cookies.  I will without a doubt double it when I make it again.  This will be on my cookie trays, and I hope they will be on yours!  My grandson helped me with these today, and he also is in the YouTube video that will accompany it!

Here is what you will need:

1/4 cup softened cream cheese
1/2 cup butter
1 cup sugar
1 egg
1 tsp vanilla extract
1 1/4 cups all purpose flower
1 tsp baking soda
2 tsp cornstarch
pinch of salt
frozen or fresh blueberries

Optional:
white chocolate
vegetable oil

Preheat your oven to 350 degrees F. Using a stand or hand mixer, combine cream cheese and butter.  When it is combined add in sugar and again, mix until all ingredients are combined.  Add egg, vanilla flour, baking soda, and cornstarch.  Mix until ingredients are just combined.

Refrigerate your dough for 1 hr.  I did 30 minutes and it worked fine but if you double the batch, go for 1 hr.  You can chill it up to overnight if you like.

Place balls of dough or use a cookie scoop.  Bake for 10 minutes.  Dough will spread, but if for some reason yours does not, just give it a little smoosh with your hand.  I used frozen blueberries I had let sit out for 10 minutes, but fresh will be awesome as well!  Place 4 or 5 blueberries on the top of each cookie, slightly pressing them in.  Let sit for 15 minutes.

You can enjoy as is, or you can drizzle with some melted white chocolate.  Use about 1/2 cup of white chocolate chips, melt in 30 second increments in the microwave.  Add a cap full of vegetable oil to it to make it a bit more liquid and drizzle-able!  Drizzle and let the chocolate set before serving!

I hope you enjoy these little heavenly cookies!  I think using strawberries, raspberries, etc would be awesome as well!!

ENJOY!


Saturday, February 21, 2015

Melting Candle Confetti Cupcakes!

Good Morning friends!  Fancy meeting you here for a new recipe on a Saturday morning, eh?  I am up, not feeling well, and just cracked a window for some fresh 9 degree F air, and can hear birds singing.  I can't lay back down, or I am going to, well...toss my cookies so I am writing this recipe up for you.  Wait.... let's not call this one a recipe, let's call it a method.   I saw a similar idea on the YouTube channel Cookes Cupcakes and Cardio. It inspired me to make my own version, my way.


Don't be to disappointed that I used a cake mix again! HA!  I used a white one, added double vanilla and sprinkles for my own confetti cake, but you can use any cake flavor you like.  Keep that in mind, as I will write it up how I did this particular version. 

I also used Wilton chocolate.  White chocolate, whatever it is, and used them in the colors of my candles.  I didn't run out for candles these are just some I had on hand, otherwise you may have gotten a bigger color range but, let's be honest, they are going to get pitched anyway.  You will need colors of the chocolate that will match your candles.  I got about 18 cupcakes and did about 4 of each color.  (around there).  This all sounds so wishy washy, doesn't it?  Sorry about that, it is just that it all depends on how many cupcakes you get, or make.  Let's just get on with it, shall we?

Note: You can color white chocolate, with gel/oil based food colors.  Don't use the cheap ones, it will seize on you!  I did color the blue one of mine!  A few of mine were flavored chocolate as well.  Just FYI.

You will need:
1 white cake mix (not paid or sponsored but ya'll know I am a Pillsbury girl)
2 T. multicolored sprinkles
1 T. vanilla extract
birthday candles
colored chocolate
white chocolate chips, or chocolate melting wafers in colors coordinating with your candles.

Mix up your cupcakes, adding in sprinkles and vanilla and bake per package directions.  Let cool completely!!!


When they are completely cooled, work with one color at a time.  I tried to coordinate my cupcake papers as well, not everyone is that OCD, shall we say? 

Place your candles in the cupcakes before you do anything else.  Push them down as far as they will go for this one.  Just makes the "melt" look more realistic.


Melt your chocolate in a bowl 30 seconds at a time and if needed add a bit of vegetable oil to it, if it isn't as workable, or pourable as you want it or need it to be.  Also add your coloring if you need to.  When it is melted use a small spoon and start pouring it down the sides of the candle unto the cupcake.  Do this until you have the desired effect.  I used about 1/2 cup of melted chocolate for 3-4 cupcakes.  Let it drip down the side and pool, create layers, whatever makes it more dippy candle wax-ish to you!  It is kind of a fun look and unexpected with the chocolate on top when people expect icing. 

Let the chocolate set, in the fridge or at room temperature for about 30 minutes and enjoy!

I am still on a cupcake roll.  Don't worry it will all end after my birthday!!!

Monday, December 15, 2014

Caffe Mocha Spoons

Do you know how many times I have made these spoons?  A LOT!  I debated over if I should share them or not, they are so easy and honestly, does one really need directions?  Well, you see which voice won my inner battle, eh?


I love cookie trays, I really do.  I do not like brown cookie trays.  This is all old news, but you know the ones that are all brown cookies, dry looking, mystery crumb stuff that you feel like you shouldn't even eat?  The unidentifiable stuff, the dry, choking hazard stuff, it is just a bummer.

I like adding fun things like this to trays.  Maybe even some marshmallows, or find an old fashioned glass jar, add some cold milk and deliver it ASAP with a bunch of these spoons.  Maybe a bag of popcorn too!  How fun is THAT?

I might have stirred one of these into my Boston Cream Coffee this morning, and it might have been amazing.  I do hope you give them a try.

Oh and for the record, I saw these in a store recently, they had candy sprinkled on top.  I don't know about you but I am not about to have floaties in my drink.  DOWN WITH FLOATIES.  Ewww!

You will need:
20-24 plastic spoons (use real spoons if you want to thrift store for some)
2 cups milk chocolate chips (divided)
3/4 cup instant coffee granules

Melt 1 cup of milk chocolate chips either in a microwave, 30 seconds at a time or in a double boiler setup.  When it is completely melted, stir in the instant coffee granules.  When mixture is all combined, use a butter knife or another spoon and fill the spoons up with the mixture.  Level them off at the top or leave them a little higher, the choice is yours.  Set on a parchment paper lined cookie sheet until all are done.  Refrigerate for 1 hour. 

Now, melt the remaining milk chocolate, and dip each spoon in and give it a full turn, covering the coffee/chocolate mixture.  Let the extra chocolate drip off and place back on parchment.  Let sit until hardened.  (You can place back in the fridge).  When they are set, melt the white chocolate and using a spoon or piping bag, zig zag, polka dot, or curly que your way to completion!

While I did not show it in the photo, if you are using these as gifts, attach a tag that says to stir 6-8 ounces of hot milk.  Let the spoon sit for a few seconds and then stir.   You will enjoy a cup of chocolaty, coffee, warm goodness!


ENJOY!


Wednesday, December 10, 2014

Chocolate Peppermint Candy Cane Cookies

ACK! 15 more days until Christmas!  Are you ready?  How are you doing on the shopping?  Are you at the "OMG I have no have to pay more than the price of the gift to get it shipped in time" phase yet?  I started wrapping last night.  We discussed, if you follow me on Facebook about how I am about that kind of thing.  Yikes.  But I enjoy soft lights, Christmas music and beautifully wrapping the gifts we have chosen for those we love.  It is relaxing, and my husband always says I should start a gift wrapping business at the holidays!


I did get in the kitchen yesterday and get these wonderful treats made.  They are a favorite in our family, and I wanted to make sure to share the really special treats we love with you this year.  It is a really busy time and developing new recipes this time of year, (which actually started 2 months ago for me.  I am like retail!) I just want to enjoy the beauty of the season, the reason for the season, my family and friends and spending a lot of time developing anything new isn't in my game plan for this month, especially this year with my grandchildren now living in the same city.  They are our families Christmas miracles as they were born last Christmas Eve, 6 weeks early and yet, they have grown into beautiful, funny, healthy little monkeys who we can't imagine life without!  Though this isn't technically their first Christmas, it kind of is.

I have to share one of their Christmas photos with you!


These cookies are so good.  The chocolate flavor is rich, and though the actual cookies isn't super sweet, the addition of the white chocolate drizzle and crushed peppermint, makes it the perfect cookie.  When you see the amount of sugar you might say, "WHOA", but using the unsweetened chocolate, in addition makes the flavor so much richer.  It makes over 5 dozen cookies, don't worry, you won't consume it all at once! They are easy, the dough is beautiful, and they don't take long to bake or cool.  I think it would be fun to let the kids drizzle and sprinkle them with anything they like! 


Here is what you will need:
8 oz. cream cheese, softened
3/4 cup butter, softened
1 3/4 cup granulated sugar
1/8 tsp. salt
2 tsps. vanilla extract
2 1/2 cups flour
1/2 tsp. baking soda
4 oz. melted unsweetened chocolate (I used the already melted variety because I had it on hand)
1 cup white chocolate chips melted
crushed candy canes (how many is up to you)
You can use any other candy or decoration to sprinkle over the top as well it doesn't have to be peppermint!

In a large bowl or the bowl of your standing mixer, cream together, cream cheese, butter, sugar, salt and vanilla extract together until creamy.  Add in baking soda and mix well.  Start adding in  your flour and beat (stand or hand mixer) slowly at first, so you don't get covered in flour and add until it is all incorporated!  Now, pour in your melted unsweetened chocolate and let it mix until well combined. 

Preheat your oven to 350 degrees F.  Take a tablespoon size scoop or actual spoon and roll that amount into a ball. Next roll it into a long snake shape, you can do them as small or as big as you like, but the size I did, I got a nice size cookie, and ended up with over 5 dozen.  Shape them into a candy cane shape and place on parchment lined or non stick cooking spray, sprayed, cookie sheets.  I easily get 12 on a sheet, they don't spread a lot but they do spread a bit. 


Bake for 10 minutes.  That is the exact time that I find keeps them soft, even with the carry over cooking.  Place them on a cooling rack to cool!


Melt white chocolate in either a double boiler set up or in the microwave, 20 seconds at a time on half power.  Trust me, just trust me.  Place into a piping bag or Ziploc that you have cut the tip off of.  You can even just use a spoon or fork to drizzle.  While the white chocolate is still wet, sprinkle with your crushed peppermint candy or whatever you choose to sprinkle on them.  Let sit until the chocolate is set and enjoy!

MERRY CHRISTMAS!


Monday, November 10, 2014

White Chocolate Pumpkin Nut Muffins

Pumpkin season is in full force and I tried, so hard, not to jump in with both feet, but I did.  Well, actually I didn't.  I bought one can of pumpkin and used it for 2 recipes.  Fair enough?  You know I let nothing go to waste, and it just burns me when I write or make a recipe that calls for half of a can of pumpkin. This year, instead of getting mad, I am getting even.


I was sent a few awesome products by Yolli, a confectionery supplier. Oh my gosh...CUTEST stuff ever! I picked out these tiny, mini cardboard loaf form, called, "Mini-Backform". They come in a pack of 10 and are just about in between the size of a jumbo muffin and regular muffin, just in a loaf shape.  I simply adore the print, and it stays so vibrant after baking, which is a huge plus for me. I am grateful they sent these and wanted to use the rest of that pumpkin for some cozy deliciousness!  You can also find Yolli on Facebook as well!

This recipe will make 10 of these  mini forms, and I would guess 10 jumbo muffins as well. I can't even tell you how good these turned out, I just had to make my husband hide the rest, I keep picking at them.

So let's get our hands dirty, and make these delightful bites of pumpkin sweetness!  Get the coffee on!

You will need:
3/4 cup granulated sugar
1/4 cup brown sugar
1/3 cup butter (softened)
2 large eggs
3/4 cup pumpkin puree
1/4 tsp. salt
1/3 cup sour cream
1 tsp. baking soda
1 tsp. ground cinnamon
1 1/2 cups all purpose flour
1/2 cup sliced/slivered almonds (or nut of your choice)
3/4 cup white chocolate chips

Preheat your oven to 375 degrees F.  Line muffin tins with liners or get your little mini loaf forms put together. 

Cream together, sugars and butter.  When it is nice and creamed together, add in one egg at a time and mix until smooth.  Add in pumpkin, salt and sour cream and mix again.  When it is well incorporated add in baking soda and cinnamon, and flour and mix until the flour is just absorbed.  Don't over mix.  Next toss in the nuts and chips and fold in or give them a quick whirl in your stand mixer.  Fill your forms or liners.  This should make 1 dozen cupcakes or 10 mini loaves.  Bake for 20-25 minutes.  A toothpick inserted in the center should come out clean. 

Sit back and enjoy, because there are one of the best things I have ever tasted!

ENJOY!  You will be seeing a couple of other products from Yolli coming up in holiday blogs.  I can't get enough!!


Disclaimer:  All products were sent to me complimentary.  All opinions are my own, and I was not, and never will be reimbursed for a favorable review of any product. 

Wednesday, October 15, 2014

Halloween Treat Crunch

I am in a Halloween state of mind.  After all besides it being my "littles" first Halloween, and they live here, AND it is a great chance to scare the H-E-double hockey sticks ouf of my sisters, it is also my anniversary.  I will have been married to my angel for 11 years this year.  Or wait, is it 12 years?  No, I think it is 12.  Anyway, we love celebrating all things Halloween, nothing to hideous or horrid, just fun.


This will be an easy treat for a Halloween party, or that last minute, "Mom I need to take something to so and so"  and you need to be there in 30 minutes.  Use whatever you have on hand and call it a success!!  I used items I find typical of Halloween or in Halloween colors but the world is your sandwich, make it how YOU like it.  It is an easy, no bake.  Wait.  You DO have turn on the oven, and let your chocolate melt but.......even that you COULD do in the micro and then spread on parchment paper on a cookie sheet.  So technically...........oh Lordy, nevermind.

You will need:

8 cubes of white chocolate/almond bark ( I wish I could tell you how much that was but let's be honest, I had a couple of packs already opened and well, ya know...)
1 Butterfinger bar
1/2 cup candy corn
1/4 cup chopped peanuts
1 cup mini oreos or 10 large oreos.  Roughly chopped and a few left whole. 

Preheat your oven to 250 degrees.  Line a cookie sheet with parchment paper and set your almond bar on top like so......


After 5-7 minutes, it will be melted, but you won't know because it will hold its shape.  So I poked mine with an offset spatula to find it was in fact all melted and spread it not to thin, and not to thick, you want your "stuff" to stick so do it like so..........


Then I sprinkled all my goodies on top.  Place another piece of parchment on top and press those treats into that melty goodness.  Remove the parchment and it will look like........ SO.......

 
Now let it sit for 30-45 minutes on the counter or about 10-15 in the fridge.  Break it up or cut it up, just get it in your belly!

ENJOY!


Friday, July 4, 2014

4th Of July Strawberries

ACK!!

Happy 4th Of July to my fellow Americans! 


As most of you know I got called out of town for a family emergency and I had just finished making these.  I had no time, didn't take my camera or computer and just got home and decided to throw them up in case anyone needed some last minute thing!  Maybe you are celebrating this weekend or ALL weekend long!  These are so easy and SO delicious!  I love festive desserts fitting for the holiday!

ENJOY and celebrate safe my friends!

2lbs strawberries, rinsed and dried completely
2 cups white chocolate or almond bark
1 tsp. vegetable oil
1- 2.2oz container of blue sugar

After strawberries have been prepared, line a baking sheet with parchment.  Melt white chocolate in the microwave in 30 second increments.  When all melted add vegetable oil and stir to combine.  Put sugar in a small bowl.  Take your strawberry and dip 3/4 of it in white chocolate.  Let the excess chocolate drip off.  Let dry for about 1 minute and then dip half of the white chocolate section into blue sugar.  Place on parchment lined cookie sheet and continue in this fashion until all are done.  Refrigerate for 1 hour and serve!
 
GOD BLESS AMERICA!


Wednesday, January 22, 2014

Chocolate Valentine Candy Cane Hearts

I told you to be looking for mini candy canes on clearance, haven't I?

I know, you knew, this was why.  Didn't you?


There isn't any story here, no history, OR herstory, just adorable treats.  I have seen these floating around the Internet for awhile, but just had to give them a try myself.  I am not a girl who passes up something this easy, ever!

You will need:
Mini Candy Canes (I suppose you could use big ones, CHOCOLATE ones!)
Chocolate Chips, or melts if your choice and color

Make sure to line your pan with foil or parchment, it just is easier because these break so easily!  Lay your candy canes out and using a piping bag or a small spoon, fill them with the chocolate you have melted. 

IF your chocolate needs thinned a bit, add a few drops of vegetable oil to it. 

Let harden and put them in a sweet bag with a ribbon for your valentine!

Your "already has her Valentine" Chefwannabe

Wednesday, December 18, 2013

Snowballs!

I promised to pull out the stops and still get you some easy Christmas (or just winter in general) treats and I WILL!!   I love that nearly all of the recipes I am getting to you this year, are kid friendly.  GET YOUR KIDS in the kitchen, they will love it and you will find they will be more likely to eat what they think they don't like if you let them help cook or fix it!  I know it isn't hard to get them to eat treats, but in general, I found it to be VERY true!  Some of my best Christmas memories are those spent baking with my mom and sisters.

 
I would say I am into snow this year.  But I'm not.  I would say I am into balls this year, but, that...isn't appropriate.  ANYWAY.   That being said, I am not sure where the idea of these came from other than I wanted to make something that looked like a snow ball.  I made some white chocolate covered Valentine Rice Krispy treats last year but they were a bit different.  I went with the traditional rice krispy treats and fancied up the aftermath, so to speak!

I used white chocolate chips but use the melts if you so choose or almond bark.  No biggie there.  For after the chocolate dipping I went with coconut, snowflake sprinkles, fancy flaked sugar, white edible pearls, and I think that is it.  You know I was just in NJ so I picked up some fabulous sprinkles at the Amish Market.  Only to come home and find 9 HUGE bottles of Christmas sprinkles in the big bowl of sprinkles.  Oops.  (teehee)  I hoard sprinkles, apparently. 

Like I said, these are easy, and they will look great on your UNBROWN cookie trays!

6 cups Rice Krispy's
10 ounces mini marshmallows (or regular size)
4 tbsp. butter
18 ounces white chocolate
white sprinkles of choice (and/or shredded coconut)

In a large pot, add in marshmallows and butter.  Stir on LOW until melted and combined.  Add in rice Krispy cereal and mix until ALL combined.  Let sit 10 minutes.  Using a cookie scoop or a spoon, roll into individual balls.  I got approx. 32 out of my mix, but it will depend on how big or small you want your snowballs to be!  When you have rolled them, place them on a baking sheet lined with parchment and refrigerate at least 1 hour, I did mine overnight.  You want them nice and set! 

Dipping and Decorating:
Melt your white chocolate 15 seconds at a time in the microwave.  I use a pint size ball jar for mine, I find it easy to dip in and out quickly!  Stir between each 15 seconds and add a few drops of vegetable oil if your chocolate needs thinned out a bit for easier dipping.  Get your sprinkles, coconut, sugar, whatever you want to use, ready for dipping.   I just used 4 bowls and put one kind in each one.   Using a toothpick or skewer, stab your balls, (omg that sounded horrible but I am leaving it) one at a time, dip in white chocolate, and then GENTLY top on your jar to get ALL excess chocolate off.  Then roll in your sprinkles or coconut or sugar of choice!  Place on your cookie sheet, pull out the skewer and move on.  When you are finished, refrigerate again for 1 hour to set. 

I LOVE these little snowballs.  I love using different finishing sprinkles, and items to give them all a different texture and I love that you expect them to be cake pops and they aren't!  If snowballs could be an elegant Christmas treat, these would be your snowballs!

Your "sneaky rice krispy treat lovin" Chefwannabe
 
PS.  How cute would 3 of these look in a little favor bag for winter party favors?!?

Monday, October 14, 2013

Gross Bloody Bandaids!

Gross, huh?  I know!  I told you I LOVE gross stuff!  I wasn't really kidding.  I am most people's idea of a nightmare dinner guest.  You wouldn't believe the conversations I can have while consuming food!!


These aren't so "OH HALLOWEEN" as they are "OMG HOW GROSS" which to me, is also SO Halloween-y!  I, in fact am delivering some of these sprinkled on a plate of cream puffs for my parents doctors office as a "thank you".    Fun idea, right?  I thought so. 

I, in fact, was trying to think of ways I could add dried up scabs, maybe some pus, oozing infectious discharge or something to these.  My husband was so skeeved out at the simple concept of a bloody band aid he nearly turned green when I made him try one.  They are an easy assembly kind of treat, no baking, and your kids will LOVE the grossness of it all, so get them in the kitchen with you!!

Bloody Band Aids
Graham Crackers (split in half)
Graham Cracker Sticks
1 cup white chocolate melts or chips
1 tsp vegetable oil (to thin melts if needed)
Red gel food coloring
skewer

Melt your white chocolate in a small Ziploc baggie, add in veg oil if you need it thinned out a little bit.  This is a great 2 person job, one person spreads on the white square in the middle, and one adds the blood!  Let harden and bam, easy, fun, and very disturbing Halloween treats!  I promise nobody else is going to be bringing bloody band aids to your Halloween parties!

Enjoy these!  Be disturbed, and possibly even get sick to your stomach at the thought, because all those things mean I was a success!!!

Your "Josie grossy" Chefwannabe

Friday, October 11, 2013

Candy Corn Fudge

Confession.  I don't like candy corn.  I know I can't be the only one.  Now, there are a few "candy corn" flavored (or allegedly flavored) things I love.  Like Candy Corn M&M's.  However, I think they taste more like cotton candy, MAJOR bonus.   I do like the Caramel Apple candy corn, once a year.  (like how I capitalize the first letter of all the names I like?).   Anyway, let me know if you are a candy corn fan or not.   I usually get a stomachache just looking at the bag of them!


This fudge is a major cheat.  It is majorly sweet and it is fairly tasty in small doses.  I mean if you are a sugar fiend, then it is good in huge doses as well.  I love the layered colors like a candy corn.  You know, NOT liking them but still getting to eat a visually comparable Halloween sweet treat.  Did that make ANY sense at all? 

I saw this recipe on YouTube. (about.com).  The truth is, I muffed up the recipe, but it worked out fabulous and I can't imagine their way being near as good.  So let us begin this VERY easy, VERY sugar laden, VERY bad, but oh so good treat!

2 -12ounce bags of white chocolate chips
1 container of vanilla frosting
orange food color
yellow food color
8x8 or 9x9 baking dish lined with parchment paper and sprayed with nonstick spray

In a small bowl add in 1 1/3 cups of white chips, melt 30 seconds at a time in the microwave.  When completely melted, add in 1/3 of the container of icing.  This doesn't need to be precise, just eyeball it!  Mix until combined and add in food coloring.  Yellow first.  Get the yellow you like and spread into the bottom of your baking dish.  Refrigerate about 10 minutes between layers.  Repeat using orange food color and then the last layer using no food color since you want it white.   Let chill in the fridge for about 2 hours before serving.  Use the parchment to remove the entire pan of fudge.  Place on cutting board and cut into small squares. 

This is a very simple treat that everyone will enjoy.  Change these colors up for your favorite team, or any holiday!  Add something to top if you desire, sprinkles, candy corns, the possibilities are endless. 

Your "I will never master real fudge so I continue to make fake fudge" Chefwannabe

Friday, October 4, 2013

Bag O' Bones

Good Evening!


Have you had enough Halloween yet?  I haven't!  But this one, this one is easy, cute, and will please everyone!  Except the very difficult to please, they may find something wrong with them.  These are really just an assembly treat.  Perfect for school, the office, or just for home!  Sweet and salty strikes again!  I found this idea on google, maybe pinterest, not Facebook for sure, but I had to give it a try and see if they turned out as cute as they appeared or if the photos I saw were heavily edited to perfection!

Verdict?  Cute as EVER!  These would be perfect to do with your kids, they can do the assembly and you could do the dipping. 

These bones remind me of a haunted house we went to when we lived in NJ.  It was definitely an adult kind of scary place.  When we arrived and got the instructions and rules, we were told nobody was allowed to touch us.  We were with our dear friends Chip and Jami.  Well, during the first house, (there were like 4) some "dead man" jumped out at my husband.  My husband is tall and not a small man, the kid literally hit his head on my husbands chest and fell to the ground.  HA!  After he got up he asked my husband if he could "mess with me" to which my husband replied, "ABSOLUTELY".  Nice guy eh?  I was terrified as it was, and I could feel something in my hair.  When I turned around, the dead looking guy had some kind of BONE in his hand and was sticking it in my hair.  From that moment on, my husband never looked at me the same.  The profanity that came from my mouth, still hangs in a cloud over "Creamy Acres".  I spewed words I didn't know I knew, I was TERRIFIED.  Looking back, we laugh so hard, but at the time I was terrified, mortified, and my mouth should have been washed out with bubbles.  Perhaps by the "bubble man".  Right Jami?  Anyway, it was the best haunted house experience EVER, and I have never topped it.  One day we will, Horins!!  Miss you guys!  Maybe you had to be there, but in that moment of being so scared, you tend to lose control.....however, as long as it isn't your bladder, we are good.

Here we go.  The amounts of what you need are up to you.  I believe with 1 bag of white chocolate chips I got about 50-60 bones!  You will have PLENTY of the other ingredients for however many you want, the dipping chocolate is what you will need to plan for.

White Chocolate Chips
Pretzel Sticks (small)
Mini Marshmallows
Parchment lined baking sheet.

Take a pretzel stick and poke a marshmallow on to each end.  Make sure it is on good.  Repeat until you have the amount you need.  To melt your chocolate easily, microwave 30 seconds at a time until it is melted. If you want to thin it out a bit, add a cap full of veg oil to the chocolate and combine.  Do this until it is a workable consistency for you.  Some of you might not need any.  I used 1 1/2 tbsp.

Dip the bones in, and I used tongs to remove them.  Let them drain well.   Place on parchment lined paper and when you are all done, refrigerate for 30 minutes to harden.  You can also double dip these for a stronger white color.  I dipped them only one time, the next time I made them I double dipped.  Double dip friends, I give you permission and in fact encourage it in this case!

I hope you have fun eating bones for dessert!!!  Never did bones taste so good!

Your "bone crusher" Chefwannabe
 
PS.  How fun would these be for kids studying dinosaurs or bones in the body?!?  Again, not just a Halloween treat!

Wednesday, May 1, 2013

Chocolate Covered Potato Chips...

I have been going to do these for SO long.  I mean, really long time.   I finally decided today was the day.  I needed a sweet treat and heck, why not, right?


I considered that this was to easy of a recipe to post.  And then, I realized, some people must have the instructions, they must.  I wonder if I was ever like that?  Give me instructions and you can bet I am straying away from them, ESPECIALLY if they are in writing!  HA!  Youngest child syndrome, it controls my life friends, it CONTROLS my life.

You can use, milk, dark, semi sweet, or white chocolate for me.  In my world, there is nothing besides milk and white, so I used both, one for dipping and one for decorating.  I mean if you groove on dark chocolate or semi-sweet chocolate, go with it.  OMG you could mix peanut butter and milk chocolate............oh.  OH.  OH.

Now the good thing about this "recipe" is that you won't need a whole bag of chips.  There will be plenty to snack on at midnight, in your bed, in the closet, whatever.  Is it wrong that I forgot to tell you how many I got from this batch?  I am goign to say 16-20 depending on how big your chips are.  Speaking of chips, you MUST (in my opinion) use WaVy chips!  They are sturdier and well, that is what I recommend.

Here we go.......

1 bag of milk chocolate chips (or whatever you choose)
1 tsp vegetable oil
1 bag of wavy chips, (I use rrrrrruffles because they have rrrrrridges)
1/4 cup white chocolate chips or candy melts

In a small bowl pour in your chocolate chips, and vegetable oil.  Microwave 30 seconds at a time, stirring each 30 seconds until melted.  You could do this in a double broiler too.  To much hassle for me though.

While it is melting sort out your chips.  You want the unbroken, unscathed, pure perfection potato chips.  Ok well, I want those, you can use whichever ones you want.  Do not use tongs for this, no forks, no toothpicks.  Scrub your hands and then get those fingers in there.  Dip one side, hold on to the wet chocolate and dip the other, it will even out when you lay it down and nobody will know your paws were on it.  Ever.  Work fast and make sure to let it drip the extra chocolate.  Lay onto a foil or parchment lined cookie sheet.  Do this with all of them and refrigerate for 30 minutes. 

Meanwhile, back at the microwave, put your white chocolate chips or candy melts in a  small Ziploc bag.  Microwave 20 seconds at a time until they are melted.  Snip the TINIEST bit off the corner and drizzle those pretzels with ribbons of beautiful white chocolate!!  Any designs you want, I just did a basic ziggy, zaggy, crissy, crossy sort of thingy. 

Refrigerate another 15 minutes and serve.  If you have a cool place to keep these, perfect otherwise leave them in the fridge until you are ready to eat!

Enjoy your treats, trust me, it is delicious!


Your "can you possibly make potato chips LESS healthy" chefwannabe

Wednesday, March 13, 2013

Irish Cream Fudge

I am part Irish, so, this recipe was not only necessary, it was MANDATORY!  With the subtle but awesome flavor of Irish cream in the background, it will be mandatory for you too!!


This recipe was a complete fail the first time I made it.  Like, big, fat, hairy, FAIL.  Not pretty in the least.  Then as I decided I could salvage it for icing on a cake, BAM the dog literally sticks his paw in it, trying to paw my arm while I was bent over getting the pan out of the fridge.  Yes, I did say "salvage it for icing".  It was sad.

Since St. Patricks Day falls on a Sunday this year, I am guessing many of you will be either celebrating Saturday night OR, calling out of work on Monday?  Green beer people, it does a body good!  So does red beer, which is an entirely different post.

What are your St. Patricks Day traditions?  Isn't it funny how so many of us corned beef and cabbage and that is a completely American "thing" for St. Patty's Day?  I don't care, I LOVE it and you can bet I am picking up a couple of extra's for the freezer to eat later, when I need to relive my corned beef dreams down the road! 

St. Patty's Day, is a special day for our family as well.  My sister..........Patty.....(my parents ROCK don't they?) was born!  Wishing you a wonderful birthday Patty!!  She is older than I am, but that's right, everyone in my family is OLDER than I am.  Just makes me giddy with happiness!  Enjoy your St. patricks Day friends!!

Irish Cream Fudge
2 12oz bags of white chocolate chips
1 1/4 cup sweetened condensed milk (you won't use the whole can)
1/3 cup Irish Cream (whatever brand you choose)

Prepare an 8x8 or 9x9 baking dish by lining it with parchment paper on the bottom, leaving the paper longer than needed so you can lift the fudge easily out of the pan when it is ready to serve.  Spray with a light coat of nonstick cooking spray as well. 
On low heat, add all ingredients into a medium saucepan.  Stir continuously until all of the white chocolate chips are melted.  Pour into the prepared pan, smooth so it is even.  Refrigerate until set and hard.  Use the long sides of the parchment to lift it out and easily cut into serving pieces.

Couldn't be easier could it?!  It will be a hit.  There is just enough Irish cream flavor to rock your socks off but not over powering! 

ERIN GO BRAGH!

Your "I always forget to wear green" Chefwannabe

Wednesday, November 14, 2012

Coconut Dream Cake

And is it EVER!  I don't even LIKE coconut and this is fabulous!


I am not sure what possessed me to make this.  Oh yes, I do, I had coconut milk and coconut in the cupboard.  It ALMOST falls on me every time I open the cupboard, it was asking to be the star of a dish basically.  I decided to go sweet.  HOWEVER, just forget about that part, it just means you won't be able to eat as big of a piece.  It is like a coconut cloud!

I try and make desserts I don't like and won't eat.  Does that make sense to anyone?  Well I do, and it generally works.  I did taste a bite of this cake.  I liked it, ALOT.  The coconut isn't in your face, fake coconut. The vanilla and white chocolate are subtle and the combination really works well.  So I, the coconut hater, even likes this.  Oh NO........my plan is RUINED!

For the CAKE you will need:
5 egg whites (room temperature)
1 cup coconut milk
3 tsp vanilla
1 3/4 cups granulated sugar
3 cups flour
1 T+1tsp baking powder
1/2 tsp salt
12 T butter (room temperature)
 
Preheat your oven to 350 degrees. In a small bowl mix, egg whites, coconut milk and vanilla together.  Set aside.  In your mixer bowl or a large bowl combine sugar, flour, baking powder and salt.  Use paddle attachment and mix for 1 minute  until all dry ingredients are combined, add butter and mix again, until combined. Next, pour in the liquid ingredients you previously mixed together and mix until smooth and creamy!
 
 
Butter or spray 2 8-9 inch round baking pans.  Lay the bottom with parchment paper!  Divide batter in half and fill both pans. Tap the pans on the counter to get any air bubbles out and back for 30 minutes.  Check them at 25, but make sure not to over bake!  When they are done, let cool for 5 minutes, run a knife around the edges and turn out onto a cooling rack.  Let cool completely. 
 
For the FROSTING you will need:
1/2 cup butter
2 cups sugar
1/2 cup coconut milk
1 cup white chocolate chips
2 tsp vanilla
2 cups powdered sugar
1 cup sweetened coconut
 
GARNISH
1/2 cup toasted coconut (put on a pan in the oven or I did mine in a skillet on low heat, careful though, it will burn easy, this photo is exactly 30 seconds before I ruined the entire batch and had to make a new batch)
 
 
In a medium saucepan bring butter, sugar, and milk to a boil. Stir constantly so it doesn't burn.  As soon as it boils, add in white chocolate chips and vanilla.  Stir a few times and then dump into your stand mixer or into a mixing bowl.  You will need to mix this with your stand mixer or hand mixer until it is cooled and thickened.  It took me over 10 minutes.  No joke.  I was sure at this point, this was never going to work but it does!  When it is completely cooled, it will still be a little loose.  Add powdered sugar and coconut and mix again.  It is done!  Frost your first layer, put the second on top and then frost the whole thing.  Sprinkle your toasted coconut on top!  Now I warn you, you WILL have leftover icing.  If you half the recipe, you risk not having enough.  So the extra, I threw in a container in the freezer.  Going to be great when I need some quick cupcakes!  I don't like having not enough icing, so I did it this way and decided to just leave it.  You can half it, but don't say I didn't warn you in case it isn't QUITE enough! 

Enjoy, and make sure to have some hot coffee or tea with this.  It truly is a dream cake!

Your "totally dreamy" chefwannabe


Friday, July 13, 2012

Zee fruit and zee pizza meet..

and what a wonderful meeting it is.  I swear this is proof there is no bad way to eat pizza.

We all know we have tried some fruit pizza recipes before.  They are all good.  I mean, I don't even like fruit and they are all good.  So I would imagine to the fruit lover, they are a little piece of heaven.  In fact, I am visiting my son next month and this is a definite MAKE for him, he is a fruit fanatic and he is going to love it.


So, for your information, you know that useless info holder in your brain?  The place where people tell you stuff you don't really give a flip about goes?  Well I have decided I know why I don't like fruit.  Growing up, as I have said before in a family of 12, (10 kids), we didn't eat fruit alot.  It was expensive and we ate what we grew.  It was likely much to expensive for my mom to buy on a regular basis, I am sure we had it semi regularly.  Not like my son who had tons of fruit at his beck and call at all times.   Oh how times change.  Regardless, I have embraced and owned my dislike of fruit and I DO try to hack down some strawberries or apple slices once in awhile.  If I find a soft spot, GRROOOSSSSSS, I am completely done!

This fruit pizza can easily have its fruit changed out.  Next time I am going with strawberries, blueberries and rasberries.   I am not a huge peach fan, in fact I don't like them at all, but they were on sale.  And I know, you know. how THAT goes!  I used some premade cookie dough.  Sue me.  Make your own if you have that kinda time to fill.  Let's move along!


1 roll sugar cookie dough
1 8oz. pkg cream cheese softened
1 cup powdered sugar
1 tsp vanilla extract
1 tsp milk
3/4 cup white chocolate chips, divided
1/2 cup mini marshmellows
2 peaches, sliced
1/2 cup blueberries

Preheat oven to temp suggested on cookie dough.  Press out unto a parchment lined pizza pan.  Notice I used foil?  Notice I said use parchment paper?  Yea......exactly. 


Bake for recommended time.  Mine took about 12 minutes.  I undercooked it a couple of minutes because when I sliced the pizza I didn't want it crumbly, I wanted a soft cookie crust!

While it is baking mix together, cream cheese, powdered sugar, vanilla, milk and 1/2 cup of white chocolate chips. Set aside.


When cookie crust is done, take it out of the oven.  Spread mini marshmellows all over the crust, put back in the oven, turn the oven OFF and let sit for 3 minutes.  They will puff up but you can use a spatula and press them down flat when you take it out.  Let cool 5 minutes.  Spread on cream cheese mixture.  Cover entire pizza, leaving a small border.  Arrange fruit however you like or just pile it on!

Melt remaining white choc chips in a bowl and drizzle (or in my case "plop") it ever the top of the pizza.

There you have it.  EASY, quick, and oh so sweet and tasty!  Well, I mean if you like fruit! HA!

Your "non tooty fruity"chefwannabe