Showing posts with label party food. Show all posts

Tuesday, October 11, 2022

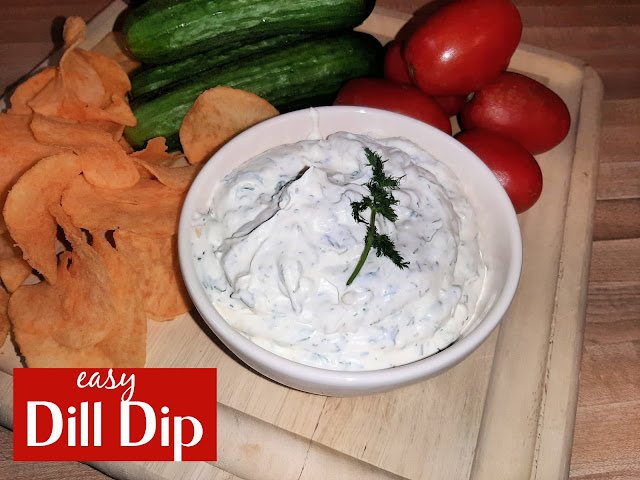
The EASIEST Dill Dip

Goooood Evening!  It is me again, a new recipe, an easy versatile recipe that I thought you guys might like.  We got some fresh amazing dill at the farmer's market a few weeks ago and my husband had asked for pickles AND dill dip.  I couldn't think of two things I like better with dill so I got the pickles done and set off to make my own homemade dill dip.  Homemade is just best, don't you agree?  I like controlling what is in our food, real food.  Just reading the ingredients on any product in the store gives me anxiety.  What is that?  Is that a fancy name for bugs?  Is that sawdust?  Yeah, I just prefer homemade whenever possible.  I mean I am a food blogger and recipe developer.....kind of a requirement that I love cooking!  Honestly, like anyone else, sometimes I don't love cooking and baking.  Sometimes I want to take 3 days off from making dinner and I do.  Anyone else go through short periods of time like this?

Well, along with the dill, I found delicious tomatoes, and baby cucumbers for dipping in said dip and so I got started.  Pretty easy.  Kind of all of the usual suspects of dill dip but I just did the measuring for you!  As with any recipe of mine, always, ALWAYS adjust it to your tastes.  Not big on garlic, add less.  No salt?  Add zero.  And so forth.  Here we go folks!  

Side Note: If you eat salmon, make extra, you might enjoy this shmeared on top or thin out with some milk and use as salad dressing, you are welcome!

  • 1 cup mayonnaise
  • 1 cup sour cream
  • 2 TBSP fresh dill
  • 1 tsp dried dill weed
  • 1 TBSP onion flakes
  • 1 tsp parsley (same amount dried or fresh)
  • 1 tsp garlic powder
  • 1/2 tsp salt
Combine all ingredients in a bowl with a lid.  Make sure all spices and herbs are completely mixed in.  Cover and refrigerate for at least 1 hour but up to 12 hours if you like!  The flavor will grow stronger the longer it chills!!


ENJOY!


Monday, June 20, 2022

Easy Slow Cookier Lil' Smokies

Summertime, summertime, sum-sum-summertime!  All the summer things happening!  Outdoor concerts, BBQ's, gatherings, swimming, and the list goes on.  I momentarily thought I was 10 again and ALMOST hit up a slip and slide.  One of my childhood favorite activities.  We didn't have the money to buy the REAL deal, but we had even better....  Let me set the scene.  My dad would buy a roll of plastic at the local lumberyard each fall to cover the very OLD windows on our 7-bedroom house with an amazing 6 ft. clawfoot bathtub, a kitchen for 12 that was about 6X7 and the best wrap around porch this side of the Mississippi!  He would take what was left, and sometimes add more, and lay it out in our long backyard.  He would run the sprinkler, the kind that fans out, and we would slip, and slide half a city block I swear.  We had the MEGA TONKA version of the Slip N' Slide, and it was awesome!  We always found ways to have fun.  We swam from sunup until sundown, had to be home when the streetlights went off and our bikes in the yard.  Those were the good old days, weren't they?  Neighbors on a walk, stopping by for iced tea on the porch, poured straight out of a Tupperware pitcher, you know the ones. God has certainly blessed me in my life, so I shall be grateful for NOW as well.  

Anyway, this morning as I am typing this up, it will be over 100 today and what better time to get some good use out of that slow cooker it took me years to make friends with?!  Perfect to cook things low and slow, AND to avoid heating up the house with the oven on, right?  This recipe is so easy and probably 98% of you know it, make it, or have at least eaten it once.  But you know what?  There are very beginner or kid home chefs out there (and other countries) who might need something easy to start with or even someone who has perhaps forgotten how good these are!  I have a little mid-size slow cooker because I am not about to dirty my regular size one for such a small amount of food.  I mean big batch, sure, this size no way!

Here we go, Lil' smokies, every football party across America serves them!  WITH a toothpick! THREE ingredients!

  • 1 cup of your favorite BBQ sauce (I only like Cookies which is probably, maybe a Nebraska thing only)
  • 1 cup grape jelly
  • 2-14oz pkgs Lil' Smokies of your choice

I like to mix the sauce separate.  Put the little smokies in your slow cooker (or simmer for an hour on low in a regular pot or in the oven at 300).  Mix up your jelly and BBQ sauce well and pour it over the top.  Mix to combine or let it slowly warm and drip down after heating and don't stir at all!  After 1 hour in the slow cooker, stir well.  Let go another hour or 2 before serving.  Make sure to put out toothpicks next to the paper plates for serving!

NOTE: I don't like my Lil' Smokies to saucy, but feel free to add more jelly and BBQ sauce to yours!  They WILL give off some juice of their own so if it feels like not enough sauce, it is!


Wednesday, December 22, 2021

Easy Cheese Ball

 Happy ALMOST Christmas friends!  Can you believe it has snuck up on us already?  I am so ready.  Ready to celebrate the birth of my Lord and Savior, ready for family, ready to enjoy simple things and great food.

Speaking off......

Last weekend we had Christmas at my dad's house.  One of my sisters brought these cheeseballs from a little grocery store in Tilden, NE.  WOOHOOO for Tilden!  I was tempted to call them, give them my best sappy story to get the recipe, but that is no fun.  I wanted to try and recreate it myself!

Here is what I came up with!

1, 8oz block of cream cheese

2 cups shredded cheddar cheese, DIVIDED

1/2-1 tsp all purpose seasoning (I used adobe)

Salt and pepper to taste

In a medium bowl, add in all ingredients (only 1 cup of the cheese for this part).  Start with 1/2 tsp of seasoning, you can always add more.  Use a hand mixer as it allows you to break down the shredded cheddar into smaller bits, making a more cohesive mixture.  Use remaining 1 cup of shredded cheddar, and sprinkle on a sheet of plastic wrap.  Add your dip mixture to the top, wrap it around, twist the ends and refrigerate for 1 hour at least.  This can be done the day before easily!  Take out of the fridge 15 minutes before serving!

Serve with club crackers, or any cracker.  Maybe even some crostini!


ENJOY!


Monday, October 18, 2021

Ugly Guacamole

 Friends!  I am so glad to have you back here again!  I see a few new friends, and might I ask that if you are here already that you hit that "Follow" button.  You can get emails when I post a new recipe, nothing else.  Thank you kindly!

So now that you have dared click on this recipe, let's talk.  I love guac.  I mean, I just have to get that off my chest, guacamole is divine.  I am honestly not sure I have ever tasted any I didn't like EXCEPT when it was literally all cilantro with a small side of guac.  That is the next subject. I taste soap, it seems there are 2 camps where guac is concerned.  Soap tasters, and non soap tasters.  However, I do like a little cilantro.  I don't love it in guacamole.  There is just this whole thing.  But the most pressing issue is the look of this guacamole.  I mean, can we agree it looks like monster puke?  I mean, maybe that is what I should call it.  I know you know that I keep it real and it isn't like I can hide its lack of beauty!  As a food blogger, it is sometimes so hard to share your favorite recipes, especially when they look less than magazine worthy.  Guess what, today I don't care.  Halloween season is the perfect time to share a really ugly recipe.  I don't know, I just wanted to share it.....


So here is what you will need, super simple, like SUPER simple.  

2 medium avocados

1 tsp garlic powder

1/2 lime for juice (use the other half to garnish if you like or use both halves)

2 Tbsp salsa

pinch of salt and pepper

Cut your avocados in half, remove seeds and inside into a bowl.  Using a fork, combine all ingredients, mushy, mushy, mushy!  I enjoy it a bit chunky, if you like it complelely smooth, consider using a food processor.  If you aren't serving right away, place one of the avocado seeds in the finished product, cover in an air tight container and enjoy it fresh when you are ready!

ENJOY!


Tuesday, February 2, 2021

Cheese Stuffed Bread Sticks

 (This recipe makes 8 bread sticks)


Good Evening friends!

I just returned from a long weekend taking care of my dad with 2 of my sisters.  Boy was that an experience.  I have come away with 2 important messages...\

1. GOD BLESS NURSES

2. THANK YOU GOD FOR NURSES

oops there are 3,

3. NURSES DON'T GET PAID NEAR ENOUGH!

We did however do lots of laughing,  reminiscing, and walking down memory lane.  He went straight to  him and my mom's first date and the "best set of legs he had ever seen".  He is right...I mean it is what it is.  It was a good weekend and all is well.  He has been out of the rehab facility for 5 months just living his best life.  He refers to his meds as his "chicken feed". he wants to be called "Sweetface" and expects 3 meals a day.  Seriously dad?  HA!  Gonna take a hard pass on a career in nursing!

A few nights before I left I wanted to make a nice dinner.  I made steaks and wanted to use up some things in the fridge for sides.  Always shop your fridge and freezer, use things up, don't through your money/food away.  I had a roll of refrigerated pizza dough that needed used.  It must have snuck to the back of my fridge and honestly I had no idea if it was even still good.  I know that has HAD to have happened to  you too!  Right?  Please?  Somebody?  I had 8 rogue string cheeses that were spying on the new cheese and honestly, who can't make something amazing out of pizza dough and mozzarella cheese sticks?


These are easy and I contemplated not even sharing the recipe with the video, but I am.  There are always beginners out there and easy recipes are a good thing!


You will need:

1 roll of refrigerator pizza dough

8 mozzarella string cheese sticks

4T melted butter

1 tsp garlic powder

Italian Seasoning

Preheat oven to the temperature recommended on the package of crust.  Roll out slightly and cut into 8 pieces.  Cover the ends of the cheese and then "smoosh" the dough around to seal and cover the entire stick!  Lay on a parchment lined baking sheet or spray with cooking spray.  Do this until each bread stick is made.  Melt butter and add in garlic powder.  Add more or less if you prefer.  Brush over  breadsticks and then sprinkle each with Italian seasoning.  Bake in the oven until golden brown which will be the time that the pizza dough package recommends.  Serve right away with marinara, ranch or no dipping sauce at all!  OHHHHH dunk these in tomato soup even!  Serve with any soup!


These can be many things but the most important thing they are is DEELISH!


ENJOY!


Tuesday, August 20, 2019

Peanut Butter Cup Popcorn

Good Evening friends!

I hope this finds you well, escaping the heat (we are literally sweating to death AND unable to breath in the midwest today).  I am however looking forward to some possible good storms tonight.  No damage please Lord, just some heavy rain, LOUD thunder and BIG lightening, wind, I am going to need winds just under damaging gusts!  Now I can wrap my soul around that for sure!


You know what else I can wrap my soul around?  Chocolate, and popcorn, and peanut butter!  You are going to laugh when I tell you I got this recipe from the back of a popcorn bag.  Yep.  Tried it a few times for different gatherings and I just had to share it.  I mean cooomme on.  It requires a few steps, but nothing you can't handle, I promise.  Please in all seriousness be careful of flying hot popping in midair popcorn and super hot sugar syrup.  

Ready?

Here is what you will need.....

3 T oil (veg, canola, peanut)
1/3 cup of popcorn kernels
2 T melted butter
1/2 tsp salt
1/2 cup honey
1/2 cup granulated sugar
3/4 cup creamy (or chunky, I mean heck why not?) peanut butter
1/3 cup melted chocolate chips or chocolate almond bark, about 8 ounces
Reeses Peanut Butter Cups (mini's or reg cut into 4ths)

Heat oil in a large pot of medium heat.  When you suspect the oil is up to popping temp, toss in a couple of kernels and place the lid on the pot.  When they pop, add in the rest of the popcorn.  Let it go until the popping starts slowing down.  Now this is where things can get questionable.  Slowing down for some can mean something totally different than what popcorn thinks is slowing down and it so just pay attention.  I am still trying to get burned popcorn marks out of my favorite orange pot!

When it is popped place into a bowl large enough for mixing!  A big one!  Drizzle over melted butter and salt and toss to coat.  Set aside.

In a small-medium saucepan, add in honey and sugar.  Let heat and come to a boil, let boil for 2 minutes.  Remove immediately from heat, and add in peanut butter and vanilla.  When this mixture is combined completely drizzle over the popcorn.  Toss and fold and mix and repeat until all of the popcorn is coated or as coated as you would like it.  Pour on to a parchment lined cookie sheet and spread into a single layer.  Drizzle with melted chocolate and let cool completely then top or toss with peanut butter cups!

  You are VERY welcome


Friday, March 22, 2019

Unicorn Crunch!

Unicorns, unicorns everywhere!  At least for me.  I love unicorns.  While I should probably not announce from the rooftops that I am 45 and obsessed with them, I am anyway!  


Been awhile, eh?  Busy time, just kind of burning both ends of the candle, and still dealing with eye issues.  Had an emergency surgery to replace 2 sutures, 2 weeks ago and fix a vitreous fluid leak.  Joy.  If you follow me on social media or YouTube you probably know the sorted details!

I wanted to make a variation of puppy chow.  No chocolate, no peanut butter.  Just something else, that is new and SPRINGY!  This is what I got.  The first time around I used plain Rice Chex.  The second time I used Vanilla Rice Chex.  If you can get the later, DO IT.  If not, still Do IT, because this is a delicious!  

  I was thinking if you changed up the sprinkles to red, white and blue you could send it home in  fun bags for birthday favors, like a Capt America birthday, black and yellow for a Batman, etc...

You can't beat a quick no bake dessert like this one.  We have all been in a position where we needed something and we needed it like, NOW!

You will need:
1/2 cup dry vanilla box cake mix
5 cups Vanilla Rice Chex Cereal (or plain)
1 1/4 cups white chocolate chips
1 tsp vegetable oil
1/2 cups sprinkles of your choice

Place cereal in a LARGE bowl.  Melt white chocolate chips at 30 second increments at a time until all melted.  I added in vegetable oil to thin my own a TINY bit.  This is optional.  Mix and pour over cereal.  Add in half of your sprinkles and stir until all of the cereal is coated.  Add in your cake mix and the rest of the sprinkles and toss again.  When all of the cake mix has been stirred in, place on a foil covered baking sheet.  Let sit for 30 minutes in a cool place.  Break up and store in a baggie or air tight container!

ENJOY and I hope it makes you feel as magical as a unicorn!


Wednesday, January 30, 2019

Supreme Pizza Dip

You guys.  It is SO COLD outside right now!  It is actually -12 but feels -28 with windchill! Whaaat?  Why do I live here?! 


We all know weather that can freeze your face in one position in like 4 seconds means staying in and blogging!  I feel like I am getting my groove back!  Welcome to all of my new subscribers here AND on  YouTube!  i am grateful for each of you and can't wait to share more of everything with you!


Soooo.....the Super Bowl is this weekend.  I knew I would be keeping this post short because my precious Eagles will not be playing in it this year.  I don't want to talk about it, I don't want to accept it, but I DO want Super Bowl food.  I  mean, I might as well take away something positive from the season right?  I am.  The food.

This dip is hands down, the best hot dip of life.  There are so many ways to make it your own and I hope that you do!  If you make it tag me on Facebook or Instagram with #imachefwannabe.

Here we go.  I hope your favorite team wins.  I love you even though your favorite team is not mine.  I am not bitter, but boy am I ticked! HA!

You will need:
8 oz cream cheese
1/4 cup sour cream
1/3 cup grated Parmesan cheese
1 cup pizza sauce
1 1/2 cups shredded mozzarella cheese
1/2 lb  browned Italian sausage
1/2 cup mushrooms chopped
1/4 cup green bell pepper finely chopped
Pepperoni
Red Pepper Flakes Optional
Garlic and Parmesan Pretzel Crisps, crostini, bread sticks (options for dipping)

Preheat your oven to 350 degrees.  Combine cream cheese, sour cream and parm.  Spread into the bottom of a deep dish pie pan or something similar.  After you spread it evenly, add on pizza sauce.  Next comes the mozz cheese!  Let it rain!  Add on the rest of your toppings, and bake for 25-30 minutes.  Your life is about to change!

Now, I did not add a measurement of pepperoni, but just use how much you want!  These toppings can be changed to anything you want or love on your pizza!  There is going to be no bad combination!  (unless you are a pineapple on pizza person)  Sorry I just can't accept it, eat it or feel comfortable with it! HA!

ENJOY this for the big game, or anytime.  You guys, it is SO good!

ENJOY!!