Saturday, August 31, 2013

Creamy Chicken Pasta Soup from Cookingplanit.com

Where to being....where to begin.  I am so excited to share this recipe with you guys.  This is a review of a wonderful website AND includes a FABULOUS recipe.  This was really hard for me because, I am not a follower or rules.  I am not a follower of recipes (accept my own) and my attention span is as long as an ant.  I did it though, I followed the steps, exactly as written so I could offer you a real opinion and my real experience.


That being said, you all may know from my many reminders I am part of a group of 50 bloggers all working with Cookingplanit and T-fal.  I am always completely honest with you all when I do these things and I NEVER endorse or review positively a product or site I think is crap.  I am thrilled to share BOTH of these with you.  And I think this review and recipe are beyond, well worth your read.  Because of these kind folks, I get to give back to you all, and I will give you more info on THAT in a couple of days!

Cookingplanit is a website that gives you recipes, any which way you like them, step by step instructions on prep and cooking and how to get it all done, your whole meal, at the same time.  That is my biggest kitchen challenge, getting everything done at the same time!  You can register on the website for free, to use for FREE.  It is easy and (hint, hint) you WILL need to be registered there to be able to win the set of T-fal pots and pans later this week).  You can also buy the app for your IPhone for 2.99.  It makes your grocery list, tells you what time it will be ready, and pretty much does everything but cook the meal!  For that, you are going to need an entirely different website! HA!  Another thing I really love is being able to pick the ingredients I want, the kind of meal I want,  and that it will take food allergies into consideration as well.  Just go check it out, my fingers hurt and if I could come to each of your homes and pull it up for you, I would.  That is how strongly I feel about it.  They are always adding new recipes too! 

There is ONE teeeeeeny little detail I would love to see Cookingplanit incorporate into their website.  That is alternate ingredients.  I substituted 2 things, both of which as a cook I know I can substitute but for someone who is new to the kitchen, they may be unsure. 

As part of my Cookingplanit adventure, I was asked to pick a recipe and make it, and then share with you all.  Oh gosh.  It took me weeks to decide, I mean, have you BEEN over there?   Everything looks fantastic.  I am a soup lover as you all know, and you know I cook for my parents for their freezer as well so I had a double agenda, I wanted something I would enjoy as well as my 80 year old parents who can't eat with as much spice and such as they may have once.  I found the answer to my dreams.  In fact, this pot is goin' down MY hatch, I will make them another batch! 

On a serious note, I am positive you will enjoy the kitchen ideas, assistance, and learn a ton.  I hope you enjoy the site as much as I do, in fact it is now a permanent fixture on my bookmarks BAR, yea, I know, the BAR not just the regular bookmarks.  See?!?!

Here are a couple of things I changed.  I used skim milk instead of heavy cream and I used rotini pasta instead of penne.  I felt like the creamy broth would just get caught up in the rotini better.  I also omitted the wine and used extra chicken stock in its place.  Here are the ingredients and directions as they are on the website for.... Creamy Chicken Pasta Soup


I hope this was helpful for you and you check out this delicious soup for sure!!

Remember, giveaway is coming up soon, in the meantime make sure to get entered in one of the current giveaways!


The Cooking Planit and T-fal 2013 Giveaway
Start End Flight 1 Flight 2
8/19/13 8/25/13 Baby Boomster Mrs. Schwartz's Kitchen
8/20/13 8/26/13 CopyKat Recipes Daily Dish Recipes
8/21/13 8/27/13 Lisa Cooking LarksCountryHeart
8/22/13 8/28/13 ME Redone Hot Eats and Cool Reads
8/23/13 8/29/13 Mother Would Know The Two Bite Club
8/24/13 8/30/13 Sophistishe Citron Limette
8/25/13 8/31/13 Kitchen Concoctions Cupcakes and Kale Chips
8/26/13 9/1/13 I Can Cook That Leave a Happy Plate
8/27/13 9/2/13 Peaches & Cake i love my disorganized life
8/28/13 9/3/13 Diddles & Dumplings Yates Yummies
8/29/13 9/4/13 Basil Momma Cooking With Libby
8/30/13 9/5/13 Persnickety Plates Creole Contessa
8/31/13 9/6/13 Ancestral Chef Bite Sized Blog
9/1/13 9/7/13 The Staten Island Family Mamal Diane
9/2/13 9/8/13 Food Fash Recipes For My Boys
9/3/13 9/9/13 The Wicked Noodle Hungry Little Girl
9/4/13 9/10/13 Unorganized Mommy of 3 The Tasty Fork
9/5/13 9/11/13 Yi Reservation Dixie Chik Cooks
9/6/13 9/12/13 Chicago Foodie Sisters The Fountain Avenue Kitchen
9/7/13 9/13/13 Cooking from a SAHM FoodThoughtsOfaChefWannabe
9/8/13 9/14/13 Bobbi's Kozy Kitchen Rants from My Crazy Kitchen
9/9/13 9/15/13 What Jew Wanna Eat Sumptuous Spoonfuls
9/10/13 9/16/13 The Mama Report Busy Mom of Two
9/11/13 9/17/13 Culicurious Huppie Mama
9/12/13 9/18/13 Three Diets. One Dinner. Spice's Bites

Thursday, August 29, 2013

Hoss's Carolina BBQ Sandwich

Greetings from me and my adorable husband!  He has been wanting to make some BBQ for awhile, he has wanted to replicate one he had as a kid, that he swears he can still taste!  We added coleslaw to the top, with the spicy of the pork and the sweet of the coleslaw, holy cow, amazing!  Here is my recipe for coleslaw. 
 
Get a 4 to 5 pound pork butt or shoulder and cover it with my dry rub,  ( or choose a rub of your choice). Place the rub covered pork in a zip lock bag or a covered bowl overnight. Try to rotate the pork from one side to the other every 2 to 3 hours until you go to bed. It really makes the pork tasty! Early the next day pull out your crock pot ( I would use a smoker if I had one but this works well too). Place the pork into the crock pot with the fattier side down. Pour in one cup of cider vinegar and one cup of water onto the pork. Cover it with the lid and turn on low if you plan on being gone for at least 8 hours or high if you want it done in 4-6 hours
Please note: this is NOT I repeat NOT a traditional BBQ sauce. It is thin and spicy. Not thick and smoky. This sauce in it’s perfect form is only slightly thicker than water.
NC BBQ Sauce (non-Traditional Eastern NC BBQ sauce- The traditional Eastern NC does NOT have Ketchup, sugar, salt or even Tabasco- But Western does and I like to mix them both and this is my recipe)
1 cup of cider vinegar
½ cup of water
¼ cup of ketchup (sometimes I go with ½ cup if I want it thicker- remember though this is a THIN sauce)
2 heaping TBS of brown sugar
1 TBS white sugar
1 TBS Kosher salt
1 TBS Tabasco sauce
1 TBS Black Pepper
1 TBS cayenne pepper ( if I am making this for me I add 3 more TBS- 1TBS for me per pound of Pork)
1 TBS Red Crushed pepper
Place all of your ingredients into a 5 quart pot. Bring to a boil, then turn off the heat. Now add the 4-5 pound pork shoulder or butt (from the crock pot) ( I use boneless because I hate the little bones from a bone in roast even though it gives you better flavor with the bone in)  into the pan and pull your pork apart with 2 forks incorporating the pork into the sauce.  
Place a generous amount of pork on a roll of your choice and place Cole slaw on top of the pork.
This recipe makes at least 12 to 16  good sized BBQ sandwiches.
I know this may not be the traditional Eastern or Western North Carolina BBQ sandwich, but I lived there for over 4 years and it’s a pretty close blend of one of my tastiest memories as a kid so please enjoy one with me and let me smile without the arguing on which one is better!
"HUSBAND TO ONE CHEFWANNABE" 
George (aka Hoss)
 

Wednesday, August 28, 2013

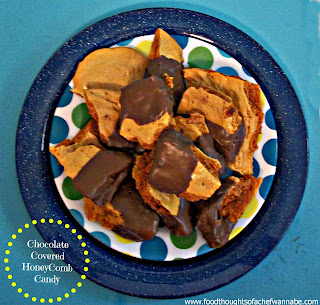
Chocolate Dipped HoneyComb Candy (Hokey Pokey)

I love this recipe.  I have been dying to share it and just never found the 10 minutes it takes start to finish to get it done.  Seriously, why can I sometimes just not get the easiest of recipes or tasks done?


I saw Nigella Lawson make this so long ago.  Her recipe calls for golden syrup, something I have been unable to find.   I know some people have been able to, but I can't.  I used honey instead, I mean it IS honeycomb, so it seemed, ya know, appropriate.  It worked great.  I burned the heck out of my first batch, so let me give you some advice.


1.Have EVERYTHING measured and ready to be used. 

2. When you add the baking soda, REMOVE the pan from the heat before you do so and whisk it as fast as you can in about 2 seconds and get it poured out.  When it begins to cool, your screwed.


3. Use parchment or tin foil, with a wee bit of nonstick spray on your cookie sheet


4. If you smooth it out, you will get a crunchier, more dense honeycomb, if you just let it flop out of the pan like a big giant blob, and let it go where it wants, not touching it, you will get a more airy honeycomb, which for the record is MY choice.


You do not have to dip any of this in chocolate.  I did. 

When the recipes says to add the soda when you see your sugar start to change color, I mean it.  I mean......like I MEAN it.  You will burn that stuff so fast you won't have any idea what happened or HOW it happened.  Trust me, experience speaking here.

So all that being said, this is so fast, so easy and just so fun.  Let's get you started, and DO NOT BURN IT!

1 1/2 cups sugar
4 tbsp. water
4 tbsp. honey
3 tbsp. baking soda

You need a large pan, because when you add the soda, this will bubble up like it is alive. 
Add in sugar, water, and honey.  Whisk until combine, turn heat to medium-low.  DO NOT walk away.  Do.  Not.  Walk.  Away.   Just whisk it and wait for the moment when you see even one spot begin to caramelize.


 REMOVE from heat, add in soda and whisk quickly, you don't want to over whisk it and lose your lightness. 

Just before it blew up all the way!
IMMEDIATELY pour unto prepared cookie sheet.  Let sit for 1 hour.  Then you can crack and break it how you want. 

If you want to dip in chocolate, just melt your favorite kind of chocolate and dip.  You can do the whole thing or half.  I thinned my chocolate melts out with a bit of veg oil to make it more workable.


I hope you enjoy this fun treat!!

Your "burnitupbetty" Chefwannabe

Monday, August 26, 2013

Orange Walnut Muffins

Oranges, not my favorite thing to eat, but one of my favorite smells and by far my favorite color!  I like orange IN things but to sit and eat an orange alone, nah, not my cuppa tea, to be honest.


My niece had stopped by a couple of months ago.  She always has ideas, suggestions and we like to talk food often.  She said she had seen these muffins on a website, maybe a camping website.  I thought they were such a cool idea.  I mean, using food for the delivery of food, is perfect.  Or is it actually using trash for the delivery of food?  Regardless of how you work it, I wanted to give it a try.   After much searching I found a few versions but, you know me, I made my own path with this one!

You will need to prepare your oranges.  Cut in half and I used a grapefruit spoon to clean them out.  KEEP the guts!  Do you ever call the inside of anything guts?  Innards?  Whatever you call them, keep them, including the juice, just put it all in a bowl.  I yielded the exact amount of juice I needed for this recipe from the 3 oranges.  Use your fingers and break up the orange sections, we will use those as well.  I wrote this for 6 muffins, but NEWS FLASH, it will make 3 regular muffins as well.  Unless you use HUGE oranges, which I thought I did.  Anyway clean those babies out and set them up into a muffin pan.  (zest your orange for the 1/2 tsp before you cut and clean them, it is easier)


Here is what you need for 6 muffins IN the orange:

3 oranges, cut in half and cleaned out
1 cup all purpose flour
1 tsp baking powder
1/8 tsp baking soda
1/2 tsp salt
3/4 cup sugar
1/3 cup orange juice
1/2 tsp orange zest (optional)
1/4 cup melted butter
1 egg
1/3 cup finely chopped walnuts
orange sections you removed from the oranges

Preheat your oven to 350.  Mix all ingredients together and mix until completely combined.  Divide into the 6 orange halves and 3 liners for the leftover batter.  Bake for 30-35 minutes. 

This is such a fun way to bake muffins!  I hope that you give them a try!!


Your "orange lovin" Chefwannabe


PS.  Make sure to eat these right away or the pith will bitter the muffins!!


Wednesday, August 21, 2013

Jam Squares

Good evening!  Hoping this finds you enjoying time at home, after a day of work or school and relaxing!  I am at my parents house, my sister is making me breakfast, I have coffee in my hand, and enjoying being the youngest, and being waited on! HA!  Seriously, I know all you "youngsters" think it, I just am brave enough to SAY it! HA!


I got this recipe SO LONG AGO from a dear reader, Michelle.  Michelle is from South Africa, (now living in Belgium) but when I asked her about sending me a recipe, she hit the nail on the head!  I am so grateful she took the time to send it, and at the same time, sorry I haven't made it before now!  OH MY GOSH, this is amazing.  This recipe I am told is a staple in South African homes, and very traditional.  Now you know how I generally feel about fruit.  Well, this throws out all the rules.  I LOVED this.  I mean, L O V E D this!  It just proves my point that you must always try what you think you won't like, because you just never know when you might like something you didn't think you would! 

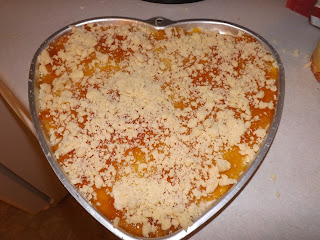
I think you could use ANY kind of jelly with this.  It is traditionally made with apricot, and I accidentally grabbed peach.  Holy yum batman.  I made this in an odd size pan, but it worked perfectly.  Use a jelly roll pan, or whatever you want to use.  I mean, you know how I roll, just do whatchawannado. 

Here we go, and again, thank you Michelle for sending this and it has become a staple.  It is so easy and so quick, you just can't say no!!

Jam Squares
2 1/4 cups flour
1 tbsp. baking powder
1/8 tsp salt
1/2 cup butter (room temp)
1 1/2 tbsp. vegetable oil
3/4 cup granulated sugar
1 large egg
1- 18oz jar of apricot or peach jelly

Preheat your oven to 350 degrees F.

Sift the flour, baking powder, and salt together.
Cream the butter, oil, sugar and egg together.  Add flour mixture to egg mixture and mix until a dough forms. 
Using 2/3 of the dough, push it into the bottom of your greased pan.  Spread the entire jar of jelly evenly over the top. 


Take the last 1/3 of the dough and crumble it over the top of the jelly. 


Bake until the top becomes golden brown.  I seriously can't remember how long I baked it.  I think it was 20 minutes.  However, literally, when the top becomes golden, it is done.

Let cool about 15 minutes and cut into square. 

Now the truth of the matter is, I just mixed all of the ingredients together in my stand mixer.  It came out perfectly.  So whichever way, tickles your fancy, go with it!

Your "doinwhatIwannado" Chefwannabe


Monday, August 19, 2013

Chicken Parmigiana

How many of you are elated over it being "BACK TO SCHOOL" time? HA!  Come on, you can admit it, we have all been there!   I am a schedule freak.   Even with 10 activities, I could plan around them and for them and know they were coming.  That somehow made me feel much better about life in general.


Anyway, I enjoyed having a little more time to cook and it being cooler so I WANTED to spend more time cooking!  I only realized 2 hours ago I hadn't shared this recipe with you guys.  It was one of the first recipes I "pulled out of my shoes" when I had to learn to cook.  I love my version.  There are so many, but I am here to tell you, well, I love mine!  My family loves it, my friends love it and frankly, they are pretty tough to please!  Ok, not really but it seemed the natural thing to say in my little "sales pitch".  This recipe is a little bit of a process.  Well, not really.  Well, it depends on if a process to you is normally opening a jar or catching your own dinner.  It is easy, and good things sometimes take a few extra steps.  It will be well worth your time and energy.  This freezes like a charm and I make extra for just that reason. 

This really is a family favorite and all joking aside, it is the kind of dish you can feel good about serving, you will know their tummy's and their souls are fed!  I mean after all, food IS love!

Fasten your seatbelt, here we go!

4 chicken breasts, cut in half thickness then pounded out to make slightly thinner
4 cups or 24 oz jar of marinara sauce
14.5 ounce can diced tomatoes
1 1/2 cups flour
2 eggs
water
2 cups bread crumbs
1/2 cup finely grated parmesan cheese
salt
pepper
2- 8 ounce balls of mozzarella cheese or 16 ounces grated mozzarella
peanut or vegetable oil

Preheat your oven to 350 degrees.  Prepare your chicken breasts by slicing them in half horizontally, so you get 2 out of 1.  They will be thinner that way.  When you have done that, gently pound the chicken until it is just slightly thinner and bigger pieces than the original.  This is a no brainer, don't pound it to thin, just give it few hits.  Lay your chicken out and salt and pepper both sides.   You should have 8 pieces (servings)

Now prepare your sauce.  In a medium saucepan, add in your marinara and your diced tomatoes.  Regardless if you doctor up store bought, or use your own, add any other seasonings you like at this point, turn to low heat and let simmer while you prepare the rest. 

Now to bread that beautiful chicken!  Put 1 1/2 cups flour in a large Ziploc back.  In a shallow dish whisk 2 eggs with a splash of water.  Salt and pepper the egg as well.  In a second shallow dish or pie plate, add in 2 cups of bread crumbs and 1/2 cup parmesan cheese.  I use fresh, and seasoned them with Italian seasoning and salt and pepper.  If you use dry and already seasoned that is fine. 

OMG, now you know I used JARRED sauce! ACK!

Toss all of your chicken pieces into the flour, zip up the top and toss to coat all of the chicken evenly.  Remove one piece at a time, dunk in the egg and then coat in the crumbs.  Place into a skillet heated on medium with your oil.  Fry on medium, slowly!  You will get the most gorgeous golden brown crust, your heart will melt!  Fry approx. 3 minutes on each side.  If you choose to not pound out your chicken breasts you might need an extra minute or 2 since they will be thicker. 


When they are all coated, fried and finished, place unto  a foil lined baking sheet.  (I am all for easy cleanup)

Now take a spoonful of your sauce, and lay it on the top of your chicken, then using whatever mozzarella cheese you choose, cover the top.  It is my opinion fresh is best, but use what makes you happy. 


Bake at 350 for 20-30 minutes.  This is a good time to boil up your pasta and have it all ready at the same time!   ENJOY!!


Your "Italian food for the Italian soup" Chefwannabe

Friday, August 16, 2013

Choffee Cookies

It is like your (OK some of you) favorite 2 addictions in one.  Coffee and Chocolate!  If I threw in liquor and nicotine just imagine the people I could reel in!  HA!


I have this weird relationship with chocolate and coffee.  I love to eat these flavors but I do not care to drink them.  Is that odd?  I don't want chocolate coffee, but give me coffee and chocolate on a fork and I am all in.  I actually only made this realization while on the phone with my mom telling her about these cookies.  OK, end of the story.

Really though I do love the flavors in desserts and realized I had not ever made anything for you all with coffee and chocolate.  I LOVED the chocolate cookie recipe I used in my S'Mores Sandwich Cookies.  I mean they were so soft and chewy and that is how I like my cookies.  Not hard and crusty, ugh.  So I played with that recipe and made these.  I love them.  I love them so much I asked my husband to hide them.  Nothing good was going to come of those babies sitting in plain sight while my husband was at work.  Just the facts, just the facts.   I hope you enjoy how easy these are to make.  I think you will find they become a little addictive!

1 devil's food cake mix
2 eggs
1/2 cup vegetable oil
2-3 tsp instant coffee granules

Preheat your oven to 350.  Line your cookie sheet with a silpat or parchment.  There is a method to the mixing here, simply to dissolve the coffee and have it distribute evenly.  Whisk your eggs and add veg oil.  THEN add coffee and whisk until they are dissolved.  Add in cake mix and combine completely.  I used a 1.5 inch scoop.  This should yield about 36-40 cookies.  Bake for 8-9 minutes.  Let cool 5 minutes on the cookie sheet and then transfer to a cooling rack.  Let all cookies cool. 

Drizzle
1/2 cup chocolate chips or chocolate melts
1/2-1 tsp vegetable oil
1 tsp instant coffee granules

Heat chocolate chips in the microwave, 30 seconds at a time.  When they are melted, add in veg oil, according to how thin you want it to drizzle.  Add in coffee granules as well.  Drizzle cookies and let sit 30 minutes. 

Enjoy!!

Your "coffee, I NEED coffee" Chefwannabe

Thursday, August 15, 2013

T-Fal Cookware GIVEAWAY!

Oh you guys........

This is SO exciting!  You know how much I love giving you chances to win free things, right?  Well this one is a doozy. 

I have teamed up with T-fal and Cookingplanit and 49 other bloggers to give away, not just 1, but 50 sets of T-fal cookware!  Oh yea, you read it right, you have a chance, oh wait....you have 50 chances to win!  Get a look at this beautiful cookware!  We will all be running a one week giveaway, for a set of these gorgeous pans. 


I will be posting more details later but let me give you a couple of hints!  Go to Cookingplanit and register.  It takes only a minute and the website ROCKS.  It helps you plan meals so that you can get everything done at one time AND the recipes are fab!  I am the girl who has shoe leather roast beast because the potatoes aren't done.  Some refer to my type as a "hot mess"!!  You can choose the kind of meals, ingredients, allergies, etc.  It also makes a grocery list for you!   I am having a ball exploring this website and I know you will too!  There is also an app for your IPhone via ITunes for
$2.99. (android version is promised soon!)   This registration, that is completely free WILL be a requirement for your chance to win! 

Take a minute and check out these other bloggers, and take advantage of their great recipes, and more chances to win!  You will see the beginning and ending dates of their giveaways in the first column!  Now, run, don't walk, and get ready to read great reviews of this cookware, and website along with great recipes!

The fine print: Open to US citizens only.  Limit 1 winner per household.  If you win on multiple contests you will receive only one set of cookware and an alternate winner will be chosen to receive your other sets.   I have received a set of cookware that I have agreed to review for T-fal and agreed to promote Cookingplanit.com.  These reviews are my own, and are completely uninfluenced by either company. 

The Cooking Planit and T-fal 2013 Giveaway
Start End Flight 1 Flight 2
8/19/13 8/25/13 Baby Boomster Mrs. Schwartz's Kitchen
8/20/13 8/26/13 CopyKat Recipes Daily Dish Recipes
8/21/13 8/27/13 Lisa Cooking LarksCountryHeart
8/22/13 8/28/13 ME Redone Hot Eats and Cool Reads
8/23/13 8/29/13 Mother Would Know The Two Bite Club
8/24/13 8/30/13 Sophistishe Citron Limette
8/25/13 8/31/13 Kitchen Concoctions Cupcakes and Kale Chips
8/26/13 9/1/13 I Can Cook That Leave a Happy Plate
8/27/13 9/2/13 Peaches & Cake i love my disorganized life
8/28/13 9/3/13 Diddles & Dumplings Yates Yummies
8/29/13 9/4/13 Basil Momma Cooking With Libby
8/30/13 9/5/13 Persnickety Plates Creole Contessa
8/31/13 9/6/13 Ancestral Chef Bite Sized Blog
9/1/13 9/7/13 The Staten Island Family Mamal Diane
9/2/13 9/8/13 Food Fash Recipes For My Boys
9/3/13 9/9/13 The Wicked Noodle Hungry Little Girl
9/4/13 9/10/13 Unorganized Mommy of 3 The Tasty Fork
9/5/13 9/11/13 Yi Reservation Dixie Chik Cooks
9/6/13 9/12/13 Chicago Foodie Sisters The Fountain Avenue Kitchen
9/7/13 9/13/13 Cooking from a SAHM FoodThoughtsOfaChefWannabe
9/8/13 9/14/13 Bobbi's Kozy Kitchen Rants from My Crazy Kitchen
9/9/13 9/15/13 What Jew Wanna Eat Sumptuous Spoonfuls
9/10/13 9/16/13 The Mama Report Busy Mom of Two
9/11/13 9/17/13 Culicurious Huppie Mama
9/12/13 9/18/13 Three Diets. One Dinner. Spice's Bites

Wednesday, August 14, 2013

Bacon Cheddar Burger Roll

Good evening my friends!  Hoping you are all well, healthy and happy!!  If not, maybe this recipe will be just what you need!!


I am admittedly not the biggest fan of the burger.  They always seem dry and there is just to much of it.  I love thin, thin, THIN patties.  My husband likes a thicker burger.  I mean, who can keep track?  With this burger roll, you don't have to!  Everyone's burger is done at the same time, and you can cut them as thick or thin as YOU prefer!  Already filled up with bacon and cheddar, I mean, it has to be delish, and it is!  I thought of a ton of variations on this, most importantly, Swiss cheese and mushrooms!  That will be the next one, it is hubs favorite.  You could do turkey burgers and fill them with veggies, ham and cheese, ohhhh yea......  Ground chicken, filled with ham and cheese for cordon bleu burgers! AAHHH!!

You get my point.  If you dislike the burger, like I do, give this a go, you might feel differently.  Can you think of any other variations and fillings??  Let me know!  I know this might seem a bit of work, but it really isn't and the presentation is so stinkin' nice.  Ya know?  I can remember my dad teasing my mom always telling her that her food was amazing but she could work on "presentation".  HA.  Men!

I think this could just as easily be sliced, and served with potatoes and veggies.  It is all up to you guys!!

2lbs ground beef
2 tbsp. of your favorite seasoned salt
1 tsp black pepper
1 tbsp onion powder
1 egg
1/2 cup bread crumbs
8-10 strips of bacon, cooked crispy and crumbled
2 cups grated or cubed cheddar cheese

Mix all ingredients except bacon and cheese.  When they are thoroughly combined, turn your mixture out until a sheet of tin foil.  Flatten it out, as thick or thin as you want, just remember you will be rolling it and you need it to stay together so not to thin!  When it is pressed out to your liking, top it with the cheese and bacon.  Then using your foil as support, start rolling the meat.  Just keep pulling over the foil and then pull it out so it doesn't get stuck, continue until it is all rolled up.


When it is done, carefully move it to a cookie sheet.  *or start with the foil already ON the cookie sheet so you don't have to transfer it*  Make sure it is seam side down and close up any holes that might have been made. 


Place it in a preheated 375 degree oven for 40-50 minutes.  Let cool for 10 minutes before slicing.
 
I hope you enjoy this recipe and make sure to let me know if you make it and how you adjust it to your taste!!
 
Your "now loves burgers" Chefwannabe