Showing posts with label supper. Show all posts

Saturday, January 26, 2019

Cheesy Blushed Chicken

Happy Saturday!  We got a little more snow.  I don't care how much "little" it is, I don''t want anymore!  I want about 70 degrees and sunny.  Oh my gosh, THAT is what I want!


I hope this finds you all doing well.  Everyone eating well?  I hope so and I hope this recipe will have you eating even better in the very near future!

My husband has decided in the last few years, he doesn't love red sauce anymore.  Once in awhile, but not on the regular.  I, on the other hand, could eat it daily.  He loves a good blush sauce so I decided to go this direction and holy moly was it a hit!  He has asked for it twice in one week.  All that means is next time I make a double batch for lots of leftovers AND a freezer meal too!  This recipe will get you dinner on the table in about 20-30 minutes.  You can buy chicken cutlets (thin cuts) or just cut regular boneless skinless breasts in half width wise so you get 2 thin cutlets from each piece.  My recipe will call for 3-4 boneless chicken breasts, that is a full thickness as I cut my own.

Let's get to the recipe shall we??  I made a video on this recipe as well so I will link it.  Don't forget to hit SUBSCRIBE on my YouTube Channel!


You will need:

3-4 bonless skinless chicken breasts cut into 5-8 cutlets
Olive oil
slat and pepper
23 oz jar of pasta sauce or 3-4 cups of your own homemade
1 cup heavy cream
1/2 cup grated Parmesan cheese
Fresh Basil or Parsley

In a high sided skillet drizzle soe olive oil and turn on heat.  When the skillet has heated up place your well salt and peppered chicken in and brown each side.  No need to cook all the way through at this point.  Brown up all sides of all pieces and remove from the pan.

Pour in your marinara, heavy cream, and grated parm.  Stir to combine.  Place chicken back into your sauce and cover.  Simmer for 10-15 minutes until chicken is completely cooked through.

Serve over a pasta or your choice or rice and don't forget to sprinkle with basil or parsley!

Enjoy this easy, DELISH meal on a weeknight or to enterain your friends!


Friday, March 23, 2018

Sweet Heat Chili

WARNING!  WARNING!  WARNING!
NO BEANS WERE CONSUMED IN THE MAKING OF THIS CHILI!

How long have I been blogging now and I have never shared my recipe for chili?  Everyone it seems has their "famous" chili recipe or "makes the best chili".  Well, yeah.....that has never been an issue for me.  It has taken me years to perfect how we like our chili.  Even then, it was sometimes not the same as the last time.   No consistency, always a crap shoot.  I finally nailed it down, wrote it down, and got it right, for GOOD!


This is a sweat chili with a good amount of heat.  Heat, as always, can be adjusted to your preference.  The sweet isn't overwhelming but definitely there.  I worked my sweetness so many ways sugar, honey, agave, and you know, nothing does it like the corn syrup.  So there you go.  If you happen to go a little over the amount on the recipe, no worries, just makes it better!  My husband will add in a couple of Thai chilies to his, but, that is how he rolls.

Let me get you started, to me, in this recipe, the order of the ingredients seems important.  I don't know why, please don't ask, because I have no sane explanation, it just seems that way!

2 lbs ground beef
1 lb ground Italian sausage (hot or mild)
1/2 tsp red pepper flakes (adjust to your taste)
1 can tomato soup
i can petite diced tomatoes1
1 tsp onion powder
3 tsp cumin
1 T chili powder
1 tsp salt
1 tsp black pepper
2 T light corn syrup

Brown your ground meats.  If it renders a lot of fat, drain it, if not, no worries.  And in your red pepper flakes.  Let cook for a minute while stirring.  Wake those babies up!  Add in soup, diced tomatoes, onion powder, cumin, chili powder, salt, and black pepper.   Stir to combine and let simmer for abut 15 minutes.  Add in light corn syrup, and make those tablespoons heaping!  Adjust to your taste adding more if you want.  Stir and simmer on low for another 30 minutes.

If you are using a slow cooker, just put your browned meet and peppers in the slow cooker, add all other ingredients except corn syrup.  Cook on low for 4 hours, and add corn syrup in about 30 minutes before serving.

Obviously you can adjust the sweet or heat to your taste, this is how we do it, and sometimes end up adding more heat to individual bowls.  Don't forget the cheddar cheese on top!

PS.  If you prefer a thinner chili, please feel free to add water or beef stock!If you groove on beans, (erp) add those too!

ENJOY!


Monday, October 9, 2017

Hasselback Caprese Chicken

Welcome back!  Time is flying, fall is falling and the garden produce is beginning to get to tired and worn out and cold to make anything more!  Bummer!  I picked the last of my basil, the last of my tomatoes, and decided to close the season with a bang!  This is a dish I have seen around here and there, but I wanted to make it my own way.  I wanted to add some seasonings, and better yet, I wanted to lay them on a bed of creamy, silky, alfredo-like sauce!


This came together in about 15-20 minutes, and another 45 in the oven.  I served it with a side of spaghetti that was lightly buttered, added some parsley, and a drizzle of this awesome sauce!


I gave you kind of an approximation of ingredients.  I wrote it for 4 servings, but for the tomato and basil and cheese it will depend on how thick you cut your slices, AND how many slits you put in the chicken.  See what I am sayin'?

Let's get started!

Cream Sauce:
2 T butter
2 T flour
1 1/2 cups milk
1/2 cup chicken stock (up to 3/4 depending on how thick or thin you want your sauce)
1 cup grated Parmesan cheese
salt and pepper to taste


Melt your butter in a medium saucepan.  Add in your flour and whisk to combine for 1-2 minutes.  Add in milk and chicken stock.  Whisk until slightly thickened and then add in cheese.  Again, whisk until cheese is melted and taste for seasoning. Add salt and pepper to taste.  Now, pour this mixture into a 9x13 baking dish.  Also, preheat your oven to 350 degrees F!


Now for the chicken prep you will need:

4 boneless skinless chicken breasts
2=3 large tomatoes
2-8oz balls of mozzarella cheese
20 leaves of fresh basil
1 tsp Italian seasoning
1 tsp garlic salt
salt and pepper to taste

Slice your cheese and tomatoes into half moons.  Now take your chicken and slice across it.  Don't go all the way through, just about 3/4 of the way.  Do that to tall of the chicken breasts.  Using your Italian seasoning, and garlic salt, season them up all over.


 You can stuff these however you like.  Where you cut, you will stuff with tomato or mozz cheese. I used a basil leaf in each one, alternating mozz and tomato slices.  When you finish one, carefully place it in the 9x13 pan of cream sauce.  Do this until all chicken is done.


Lightly salt and pepper when all done and place into the oven.  You will need to start checking for doneness at about 35 minutes.  I used large breasts (teehee) and mine took upwards of 45-50 minutes.  Use your thermometers!


Enjoy this with a side of pasta, a salad, some nice crusty bread, the possibilities are endless and delicious!


Monday, August 7, 2017

Cheesy Kielbasa and Pasta Dinner

Good evening my friends!  It feels so good to bring you a new recipe last week and another one this week!  I have missed it, and all of you.


I found kielbasa at the store marked down.  1.00!  I bought a handful, ok....I bought 8,  Straight into the freezer for a good potato and kielbasa hash with a fried egg on top or something for breakfast or breakfast for dinners.  I asked you all on Facebook for your best recipes using kielbasa, and what great feedback.  I plan to give many of them a try!  I wanted to use pasta and cheese, and had never run across much of that nature so I went to work and hit this on the head, the first time and I can assure you, this might be a once a weeker in our house now!

This is a one pot show.  Everything into one hot tub and you are golden.  I even served it straight out of the pot.  Why not?  Added some crusty bread and a green salad and boom!

Feel free to trade out the can of diced tomatoes for a very large fresh tomato, diced!

1 T olive oil
1 lb kielbasa, cut into coins
1 tsp minced garlic
1- 14.5 oz can of diced tomatoes (feel free to swap out one LG fresh tomato, diced)
3 1/2 cups chicken stock
1 T onion powder
16 ounces short pasta (I used rotini)
1 cup heavy cream
2 cups shredded cheddar cheese (divided)

In a large pot, on medium heat add in your olive oil.  Let warm for a minute and add in your keilbasa and let heat through and brown for 2-3 minutes.  Add in your garlic and stir constantly for 1 minute.  Add in your chicken stock and tomatoes (with juice).  Stir in your onion powder and bring the mixture to a boil. 


When it boils, add in your pasta, stir and cover and let simmer 8-9 minutes.
 

Remove lid, stir in heavy cream and 1 cup of cheddar cheese.


Mix until combined.  Add the other cup of cheddar on top and put the lid back on.  Let sit for 3-4 minutes to melt the cheese.

I served this with some nice crostini and fresh green beans!


If you enjoy this recipe you may also enjoy:

Mexican Spaghetti
Goulash
Orecchiette and Sausage


Monday, December 5, 2016

Cavatini

Good evening friends!  I know it is a busy time of year for everyone!  I hope you are taking time to enjoy it, taking in the laughter, the conversation and the good food!


This is an old family favorite.  We always called in cavatini, not sure why, we just did.  Give me enough time and it will come back to me but as of now, it is what it is.....cavatini!  We make this with mushrooms, without them, it is not cavatini!  We also must have the radiatore pasta  You just use any short cut pasta and you will be fine!

Don't slaughter me over the canned mushrooms, they are actually my husbands favorite and some people have VERY strong opinions about them for sure! Feel free to use fresh, no biggie, your cavatini, your decision!  The red pepper flakes are a must, this is spicy, and sweet, and has beefy mushrooms and ground beef, it is so hearty and ABOVE ALL...........do NOT skimp on the massive amount of cheese, I won't be able to forgive myself for failing you, if you do!

16 oz pasta, cooked and drained (we MUST use radiatore)
1 T butter
1 T olive oil
2, 7 oz cans of mushrooms or (16 oz fresh, sliced mushrooms)
1 lb hamburger (lean)
1  10.75 oz can tomato soup
1 16 oz jar pasta sauce
2 T sugar
1 tsp red pepper flakes
salt and pepper
2 cups shredded mozzarella cheese
1/4 cup grated Parmesan


Get your pasta cooked according to package directions and drained.  Preheat your oven to 375 while it is groovin'.

Drain your pasta and add in your butter and olive oil.  Let it begin to sizzle and add in your drained mushrooms.  Saute for a couple of minutes and then remove with a slotted spoon into a bowl.  Set aside.

Add in your hamburger and cook until browned.  Toss in your tomato soup and pasta sauce, and RINSE that pasta sauce jar, you need that bit of extra liquid anyway!  Dump it into the pot and stir.  Now for the red pepper flakes, I use usually 1.5 tsp, but start with one, or even half.  Toss them in and stir to combine and heat those babies up!  Add in your sugar, salt and pepper to taste.  Add your mushrooms and pasta in and stir until completely combined.

Pour into a buttered 9x13 casserole and smooth out the top.   Let it rain cheese and in the oven you go!  Bake for 20-25 minutes.  Serve bubbling hot! (with crusty bread)

ENJOY!


Tuesday, November 1, 2016

Spaghetti and Meatball STUFFED Calzones

I feel a carb coma coming on just reading the title.  How about you?  Do you know who had this idea?  I will give you one guess..........wait for it.............wait for it.............GEORGE!  Admittedly though, when he suggested I try this, my mouth salivated like a rabid dog all the way to the grocery store.


I am a bit addicted to spaghetti and meatballs.......  Since my childhood when my made it every single birthday because I would request it, I have loved it.  We would sometimes make spaghetti and meatball sandwiches with the garlic bread the next day.  This reminded me of that!

I used prepackaged items simply because this was a last minute request, and so yea.....I cheated.  Majorly cheated.  I will link my meatballs, marinara and pizza dough recipes below if you want to do all homemade. 

12 oz spaghetti, cooked
24 oz marinara sauce
3 cups shredded mozzarella cheese
frozen meatballs that you have thawed (about 5 per calzone)
2 cans of store bought pizza dough
olive oil
oregano

Boil your pasta, drain and let cool.  In a large bowl combine the pasta, with the marinara sauce.  Mix until combined and set aside. 

Here is where you decide if you are making 4 LARGE calzones or 8 smaller.  The choice is  yours, the only thing it affects is how many meatballs you use or how you portion out the spaghetti mixture.  Either do it in 8 or 4.

Unroll and cut your dough to the size you have decided on.  Place your spaghetti on first, in equal portions.  Next, add on your cheese.  Let it RAAAIIINNNN cheese friends! (as you can see we made 4 huge ones)


Then go the meatballs!  I cut them in half!


Now, fold it over and press the edges down to seal.  You can use a fork to press down the edges to seal better!

Place onto a baking sheet you have sprayed with cooking spray.  Drizzle the top with olive oil and brush on evenly.  You can sprinkle on some oregano if you like!


Bake according to the pizza dough package directions.  Right after you take them out, sprinkle the top with a little Parmesan if you like!  Let sit about 5 minutes before serving!

ENJOY!

RECIPES for homemade ingredients!
Pizza Dough
Meatballs and Sauce

Tuesday, October 18, 2016

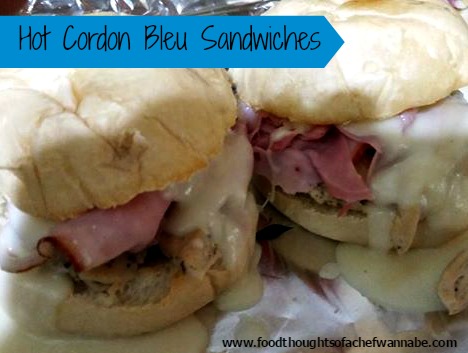
Hot Cordon Bleu Sandwiches

Chicken Cordon Bleu......

I love this stuff.  My husband makes the best, which is a recipe here on the website. (I will link at the end).  I was at the grocery store a couple of days ago and found a huge mega section of fresh bakery items on clearance.  You know what I did, right?  You guessed it, swooped up a bunch of rolls and buns and tossed them in the freezer.


I have been on a bit of a sandwich kick lately.  I just would be happy with a sandwich for every meal.  Perhaps it is the fresh tomatoes I can top each one with, or maybe it is the unfortunate carb addiction I have.  Either way, if my husband has to eat another sandwich he will probably fall over!  In order to disguise said sandwiches, and being hungry for the cordon and the bleu, I decided to make one of my favorite dishes into a a hot sandwich.  Ask me how soon you should make these.  Go ahead, ask me.

You can't get to the kitchen fast enough!  These are SO very good.  In fact, they turned out 100 times better than my best expectations  I can't wait for you to try them, all cheesy, and toasty and resting right next to a bowl of soup!

Fall, it's the most wonderful timmmeeeeee of the yeeeaaaarrrr!

3 large chicken breasts cut into bite size pieces (or strips)
1 T. Italian seasoning
3 T. butter
2 heaping T. flour
2 cups milk
6 oz. Swiss cheese
pinch of salt
1 lb thin sliced deli ham
6 rolls of your choice

In a large skillet, add in chicken and Italian seasoning, stir and cook until the chicken is completely cooked through.  Set aside.


Preheat oven to 400 degrees F.

In a small saucepan melt the butter, add flour and let it cook for about 1 minute, stirring often.  Add in milk, salt and whisk.  Let the mixture begin to simmer and thicken, then add in your cheese.  Mix until completely melted and remove from heat.

Line a baking sheet with foil.  Lay the rolls out and drizzle lightly with olive oil.  Place in the preheated oven for 3-5 minutes until toasted.  Remove.


Place a spoonful of chicken on the roll, top with 2-3 pieces of ham, cover the top with a ladle of swiss cheese sauce.  Do this with all of the sandwiches.  Place back in the oven for 5-10 minutes.

Serve with a delicious Garden Caprese Salad!

ENJOY!
If you like this recipe, you may also enjoy:
Chicken Cordon Bleu

Tuesday, October 4, 2016

Anna's Special Request: Hot Brown Copycat from Chik-Fil-A (Dwarf House)

This is a VERY special request.  I have been educated in so many ways with this recipe and the person who requested it!

There are so many of you that I have had the pleasure of "meeting" through messages, and a couple of you in person at Trader Joes!  You are all special, you all rock my socks off and without you, Chefwannabe would be pretty stinkin' boring.


So, last week-ish, I get a request.  "Can you make the Chik-Fil-A (Dwarf House) version of the Hot Brown"?  She continues to explain why she can't get one, "I am unable to leave my home due to cancer treatment and it is the one recipe I can NOT find online".  We discuss the dish, what is in it, how it tastes, how it looks, etc.  I ask her to describe every detail of it that she can remember.  Then we go on to discuss life, and her treatment, what kind of cancer she has, family, meeting our husbands, etc.  We became fast friends and learned we had a few things in common!  She said I could share her photo and so I want you to meet my new friend, Anna!  Gorgeous, inside and out! 

Here we are chatting it up and I am thinking, she is the one going through these trials, treatments and icky stuff, and she is making ME laugh!  In the short time we have known each other, it is clear she is a fireball, and her such a good heart, and sense of humor!

So, off I went to attempt to make this lady the dish she desperately misses!  Boy was I livin' on a prayer, I had NO idea other than what she said, and the photo of the dish what I was doing!  The good news is, I think I got it, she hasn't had it yet,  but my husband loved it as well!  Obviously unless you go grab nuggets from Chik-Fil-A, you aren't going to have the EXACT same taste but one thing I HIGHLY recommend is that you deep fry your nuggets or make homemade batter dipped ones.  I just used frozen, I wanted to get this knocked out as soon as possible for her.  But if you don't deep fry they will get a bit soggy and, in my opinion, not good.

Here we go!  This is not a traditional hot brown like the Kentucky Hot Brown, it is just a version from the Dwarf House she loves!  This recipe will serve 4 regular servings or 2 of the restaurant size servings! HA!

4 T butter
3 T flour
2 cups chicken stock
1/2 cup grated Parmesan cheese
PINCH of salt
16-20 chicken nuggets
1 cup shredded cheddar cheese
8 slices of bacon
buttered toast for the garnish

Prepare your nuggets and set aside.  The rest won't take long so they will be fine and the sauce will heat them back up!

For the sauce, melt the butter in a small pot.  When it is melted add the flour, and let it cook while you stir it for 30-45 seconds.  Add in your chicken stock and whisk until smooth and it begins to thicken.  When it is thickened add in Parmesan cheese and a pinch of salt and whisk until smooth and creamy.

The plating is where this all comes together.
1.  Place chicken nuggets on your plate.
2.  Ladle over the top some of your sauce.
3.  Sprinkle cheese down the center.
4.  You can microwave for about 20 seconds if you want the cheese to be completely melted on top.
5. Place bacon strips in the center.
6.  Add butter toast points all around.

This was awesome!  I made one large plate that my husband and I shared.  I hope it is exactly what you are wanting Anna, but if nothing else, it is an awesome treat of a dinner!

I hope you give this a try.  Let me know what you think and if you have had it from the Dwarf House, if it is even close to the real thing!

ENJOY and please keep Anna in your thoughts, your prayers!  Please send her love, light and healing vibes!

I think taking time to make my Batter Dipped Chicken Nuggets would take this OVER the moon!


Thursday, September 29, 2016

Egg Roll Stuffed Chicken

Sounds delicious doesn't it?  It is!  There is a hot topic for me involved in this recipe.  It is the whole dark meat vs. white meat, thing.


Let's just talk chicken for a minute.  By the way, I wish I had chickens, although I am scared of them if one bit me, I could just eat it.  How bad can that turn out?  Not really, the reality is I would name them try to dress them, and hug them VERY much against their will.  They would be in family photos and it would be way over the top.  That is how I am with animals.  I would never be able to live with myself knowing that my chicken son "Chuck" was on the dinner table.  I just couldn't.  Wait, this isn't the chicken conversation I wanted to have.

The conversation I wanted to have involved, white, dark, bone in, boneless, skin on, skinless, etc.....  Everyone has a very distinct preference it seems.  I used to prefer just white boneless meat until boneless thighs came along, and since I grew up and started cooking, I realize you can't beat the flavor of a piece of bone in chicken.  Regardless of what you prefer, please trust me when I tell you that just because it is white mean does NOT mean it has to be dry!  I hear so often, "Oh I don't like white meat, it is to dry".  That would mean it was overcooked.  Why is it that some people will overcook the CRAP out of anything they can get in an oven or on a grill?  Thermometers are our friends!  The point is, this recipe does call for boneless chicken.  I used thighs as we love them but you choose what you would like.  Either way it will be healthy, and tasty, and served on a bed of rice (fried rice) you will have people thinking you are a culinary legend!

Here is what you will need
7-9 boneless skinless thighs or breasts.  (Pounded thin or butterfly the breasts to easier rolling)
1 tsp. vegetable oil
1, 1lb bag of shredded coleslaw mix with carrots
1 tsp. minced garlic
1 tsp. dried ginger
3 T soy sauce
1/4 tsp. white pepper (regular pepper will also do)
 2 T. additional vegetable oil

Preheat your oven to 350 degrees F.  If you are using chicken breasts, either butterfly them open or pound them thinner for easier rolling.  I used thighs and this made 8-9 but using breasts, go with 7 or so.  Set aside.

In a large high sided skillet or wok, heat up your 1 tsp of vegetable oil.  Add in the cabbage mix, and garlic and saute for 3 minutes.  Add in the rest of the ingredients, ginger and soy sauce.


Stir to combine and continue stirring until the cabbage is soft and reduced by half.  Turn off heat and let it cool completely.


Place a large spoonful of mixture into the center of each piece of chicken and roll it up.  Use toothpicks if you need them to stay together better.


Place seam side down on a baking sheet.  Do with with all of the chicken.  Now, use a paper towel and wipe out your pan, place your 2 tablespoons of oil and let it get hot again.  Place 2 or 3 pieces of chicken at a time, seam side down in the oil and let them brown for approximately 3 minutes on each side.


Just get some good color on them and then place back onto the baking sheet.  When you are done, bake them for 25-30 minutes until chicken is cooked through.

Serve on some rice for a tasty dinner!!!  Check out the recipe suggestions below for other options to go with this meal!

ENJOY!


If you like this recipe, you might like....
Egg Drop Soup
Chicken Spring Rolls
Wonton Soup

Wednesday, September 7, 2016

Cheese Stuffed Shells

 Here we are again!  I hope your day has been great, and happy!  I love this time when we get together to share food.  I especially enjoy sharing family favorites with you.  It is hard to not share them all at once, and spread them out.  This is one I have never shared, and it is just your everyday run of the mill stuffed shells.  My family loves them and this is what I would consider a quick weeknight meal. If you are a meal planner/prepper, have your sauce made, shells boiled and all of your grated cheeses put together in one large resealable bag.  When the night comes you want to make it, it is not much more than just assembly.


This makes about 20 shells.  You can only cook that many or cook them all and eat the leftovers with butter and salt and pepper!  That is what my husband lives for when I make extra pasta.

You will notice I use what some of you may consider a lot of salt.  I don't find that the saltiness of Parmesan cheese hits the same notes as actual salt seasoning in a dish.  I find ricotta needs plenty of seasoning and that is just what I do.  When you divide that salt out among a large casserole, I think you will live.  If you want to omit it, please do, or cut it back, please do that as well.  You have to adjust things to what is good for your family.  I won't mind, in fact, I will welcome it !  Lets get started on this basic stuffed shell recipe that your family will love!

Oh wait!  You can also shred some provolone to use in this.  I saw some of those cheese blends at the store include a provolone/mozzarella combination....um, YUM.  OK, now we are ready.


1/2-1 full box of jumbo shells, cooked per package directions
15 oz. ricotta cheese
8 oz.  shredded mozzarella cheese (hold out 1/4 cup)
8 oz. shredded Parmesan cheese (hold out 1/4 cup)
1 T. Italian seasoning
1 tsp. onion powder
1 tsp. garlic powder
1 1/2 tsp. salt
1/4 tsp. black pepper
4 cups marinara sauce (divided)
1 can diced tomatoes
2 T. sugar

Preheat your oven to 350 degrees.  Cook shells according to box direction, drain and run under cold water until they are completely cool.  Let sit and drain while you mix up the cheese filling.  In a bowl combine, ricotta cheese, shredded mozzarella, shredded Parmesan, Italian seasoning, onion powder, garlic powder, salt and pepper.


Mix to combine.  Use about 1/2 cup of your marinara (just plain) to dump in the bottom of the pan.  Spread it around as it will keep the shells from sticking.  Fill your shells with a teaspoon.  This mixture will fill about 20 shells.  You can cook the whole package or just the 20.  Fill and place into the baking dish.


Continue until your filling is gone.  In the same bowl as the filling (hey I am not about using as many dishes as possible ya know?) Pour in the rest of the marinara and the diced tomatoes UN drained.  Add in sugar and stir.  Carefully pour over the shells as evenly as possible. 


Spread out the sauce with a spoon, and use the cheese you held back to sprinkle on top!  Now, confession time..........  I used like, a lot more mozz.  The photo below show only Parmesan but I decided I wanted more mozzarella on top!


ENJOY my friends!


Friday, August 26, 2016

Cheesy Chicken Gnocchi

 So....as my husband and I sit in a popular Italian chain restaurant, eating soup and bread sticks like tomorrow may never come, he says to me, "OMG, you need to make this soup into a casserole or a real "dish".  And that my friends is how this happy accident began.


.....Fast forward 2 days, he keeps asking me to make this.  Admittedly I have 2 packages of gnocchi in the cupboard.  I have everything else I need to create his own personal heaven.  I decide that today is THE day.  I turned on my fave music, put on some lipstick and off I went.  End result? Complete FAIL!   However, that is now how this story ends.  While it was a complete fail as far as a copycat, sort of, not really version of the soup, it turned out to be a pan of cheesy, chickeny, gnocchi-ee goodness and I do not for one second feel bad that it "didn't turn out".  I feel so "unbad" I am sharing it with you!

This will feed a crowd, and I can't imagine anyone not liking it.  If you groove on making your own gnocchi, get on with your bad self, I purchased mine.  If you make it, make sure to tag me on Instagram or Twitter!!  Snapchat me!!


2 pkg. gnocchi (mine were 17.5 oz. each)
4 T. butter
2 large chicken breasts, cut into small cubes or pieces
1 cup shredded carrots
1/3 cup flour
2 cups chicken stock
3/4 cup heavy cream (or half and half)
1 T. dried parsley
1/2 cup grated mozzarella cheese
1/2 cup grated Swiss cheese
1/4 cup grated Parmesan cheese

In a large pot, melt your butter.  and add your chicken and carrots.  Cook over medium-high heat until chicken is cooked all the way through.  Add in flour and stir well, let it cook for about 1 minute.  Add in chicken stock, while still on medium high heat, bring to a boil, stirring constantly, when it has begun to thicken add in heavy cream, parsley, and all of your grated cheeses.


Stir to combine,remove from heat and let sit.

Bring another large pot of water to boil.  Follow the direction on your package of gnocchi.  If you are making them homemade, you are a better person than me, so you will know how to cook them!  When the water boils, chuck them in and the second they float they are done.  Make sure to get these out right away.  They will be going in the oven for a very short time and you don't need them overcooking.

So as I was saying, when they are done, use a slotted spoon or spider and scoop them out, let them drain and toss them in the pot with the sauce!  Get them all in, gently stir to combine and pour into a greased 9x13 casserole dish or pan.  Bake at 400 degrees for 10 minutes, then turn to broil and let it get golden brown on top!  That cheese and butter get a little crusty and it is heaven!!

Enjoy friends!


Tuesday, April 5, 2016

Lasagna Cordon Bleu

 Happy Spring!  It finally feels like spring!  I shouldn't speak up so fast, it could be snowing tomorrow, but right now....awesome!


This is a recipe my husband has been wanting me to work up for awhile now.  This is the first recipe I have made since losing my mom.  I think she brought me good luck, it was amazing.  He told me what he was thinking, I wrote down a tentative recipe, and nailed it.  I am going to make it again this week, because, well, it was THAT awesome.  Have you ever put food in your mouth that made you close your eyes and just soak it in?  This is that food.  I swear.

This seems like a bit of a hassle but it really isn't, I just wanted to be as thorough as possible for any new cooks wanting to try it.


Did I mention it felt awesome to be back in the kitchen?  Thank you ALL for your private messages, emails, tweets, etc, they made my heart joyful, and thankful.  I am so blessed to call you all my friends.  Enjoy this lasagna, and if you make it, tweet me, post it on Facebook, tag me in your Instagram photos, all of it!

Did I mention to NOT skip the topping?  The crunchy, delicious, almost just want to eat it off the whole thing, crunchy top.  YES!!!!


2 large chicken breasts
1 lb thin sliced deli ham
1/2 box of lasagna noodles
16 ounces grated Swiss cheese
4 tbsp. butter
4 tbsp. flour
4 cups half and half
salt and pepper to taste
1 cup bread crumbs
4 tbsp. melted butter

Preheat your oven to 350 degrees F.  Spray 9x13 pan with nonstick spray or butter it and set aside.  In a medium pot, poach chicken breasts.  If you have leftover chicken or want to roast it, go for it, but I poached mine.  When they are done, remove from water and set aside to cool.  Take your deli meat and give it a slice, into strips.  No science here, I just cut mine all at the same time into smaller pieces, 3 or 4 cuts top to bottom and it was perfect.   When the chicken cools at some point during this process, just shred it. 

Cook your lasagna noodles.  Just follow package directions, you will only need about 9 noodles.  Make them all, and let your husband use the rest for buttered noodles.  (yes, I am a fabulous wife) Drain and rinse in cold water to stop the cooking and to be able to handle them without visiting a burn unit.

Time for that cheese sauce!  In a large-ish pot, melt your butter, add flour and stir to let the flour cook for a minute or two.  Slowly whisk in your half and half.  When it begins to boil, add in HALF of your grated cheese.  Stir until melted and thickened.  Now, set that aside so we can assemble this bad boy.


Lay down 3 noodles to cover the bottom, now add 1/3 of your cheese sauce, half of your chicken and half of your ham.  Just cover it evenly.  Now take 1/3 of your remaining shredded Swiss and sprinkle that over it all, then back to the noodles.  Rinse and repeat.  When you put your next layer of noodles on (the last layer)  you should have a bit of your cheese sauce and shredded cheese left.  Now STOP.


In a small bowl melt your 4 tbsp. butter.  When it is melted and slightly cooled, add in bread crumbs and remaining shredded cheese.

To finish the top, pour and spread over the remaining cheese sauce, and then sprinkle buttered breadcrumb/cheese mixture on top.  Trust me on this one.

Bake for 30 minutes at 350 degrees, then 15 more minutes at 375.  Perfection.  Just, perfect perfection.  If you love Chicken Cordon Bleu, and you love pasta, this might be your most perfect culinary dream!

PS. Excuse these photos.  I used my phone, it is a long story but, back to regular photos next time!

ENJOY!