Showing posts with label italian. Show all posts

Monday, July 11, 2022

Ravioli Lasagna

 Ready for another easy recipe?!  This was a family favorite back in the day and I just started making it again on occasion.  It is easy, maybe a good one to get the kids in on.  I have said it before and I will say it again, getting your kids in the kitchen to cook WITH you will make them much more willing to eat food they think they don't like.  Stop the whole chicken nuggets, frozen pizza, cereal thing if they don't like what is being served for dinner, get them to try new food.  I apologize if this offends anything but, it is exactly how I feel, add a face in my hands emoji and it is spot on.

You can easily add some fresh spinach into the cheese filling, some grate veggies, or whatever else you can think off.  Bump it up wherever you can in nutrition.  You know the second you tell the kids you are having ravioli for dinner, they are going to be all in anyway.  You can do it mom and/or dad!


Here is what you will need:

1-2 1lb bags of frozen ravioli (I use beef, use whatever you like)

1 cup ricotta cheese

3 cups mozzarella cheese divided (or more :) )

1/2 tsp salt

1 tsp Italian seasoning

1 jar of marinara or 4 cups homemade


Preheat oven to 400 degrees.  Spray your 9x11 baking dish with nonstick cooking spray.  I used parchment on the bottom.  In a bowl combine ricotta cheese, half of the mozzarella cheese, Italian seasoning and salt.  Mix until combined completely.  (This is also where you could stir in spinach, etc)  Set aside.  Start laying out your frozen ravioli until the bottom is covered. Spoon the ricotta cheese mixture over the ravioli and spread out.  Pour half of the marinara sauce over the cheese mixture and spread out evenly.  Now add the next layer of ravioli, if you only have one bag, it may be sparse but don't quit now!  Pour over the last of the marinara sauce, top with cheese and cover tightly with foil.  Bake for 40 minutes covered, remove foil and bake another 10 minutes to get the cheese good and golden and bubblahhhhh!

Serve, and enjoy!


Saturday, June 8, 2019

Italian Style Meatloaf

Good Saturday evening my friends!

Oh what a beautiful day it has been!  I have 3 of my grandchildren today and overnight and the sun is shining and they took a long nap and ahhh......


My husband has been asking me to make him Italian meatloaf and I have been poopoo'ing him off a bit.  THEN, I was asked by one of my dear YouTuber friends if I was interested in doing a meatloaf collaboration video.  She had gotten 4 of us together and we each would share a version of meatloaf we enjoy!  It was the perfect opporutniy to share my Italian Meatloaf AND make my husband happy!  Win! Win!


This meatloaf might seem a little out in left field for you but if you aren't ready to try it with the eggs, do it without.  I encourage you though, to try it.  While I shouldn't give such secrets away, this mixture will make meatballs that your family and friends will beg you to make again and again!

2lbs ground beef
1lb Italian sausage
1cup breadcrumbs (plain or seasoned)
1/2 cup shredded or grated Parmesan cheese2 eggs
2 tsp salt
1 tsp granulated garlic
1 tsp Italian seasoning
1/4 cup marinara sauce
4-6 hard boiled eggs

Topping:
1/2 cup mozzarella
1/2 cup marinara

Preheat oven to 350 degrees F. 
In a stand mixer or large mixing bowl combine all ingredients, for the meatloaf.  Mix with a hand mixer or let mix for 3-4 minutes (see video).

Place meat mixture into a backing pan and form into a loaf.  Make an indention in the middle and place eggs in a row.  Cover with meat mixture well to try and avoid it cracking.  If it does crack, no big deal!

Now to top the meatloaf, pour over 1/2 cup marinara, and bake for 66 minutes.  Remove meatloaf, add shredded mozzarella cheese and back another 10 minutes. 


Let rest for 5 minutes and enjoy!


Tuesday, October 30, 2018

Homemade Cannoli

Good Evening my friends!
This blog has been a little hard to get out to you.  As you know I also have a YouTube channel and this recipe is also going there.  What you also know is I am 2 weeks out of a cornea transplant.  I am only able to sit at the computer about 20 minutes at a time before I have to rest my eye.  However, since nobody has time for that kind of nonsense, I have my eye patch on and I am getting this out to you this evening come hell or high water!


 My daughter in law has literally been asking me to make these with her for 4 years.  Yes, seriously.  I don't know what caused me to dive into this 6 days out of surgery but I did.  It was a fun day spent together and the outcome was nothing short of heaven.  Jersey girls looking for real cannoli in the midwest doesn't usually work out so well for us.  No pudding, no custard.  The fakery must be stopped!  This filling is true sweetened ricotta, with a custard like base.  It is perfection.  Just the way we love them!


Use chocolate chips or don't.  Use dried pieces of fruit or don't.  Use pistachios, or don't.  These are your cannolis!  I like mine plain, but we did most with chocolate chips!  It isn't a hard process but it is a bit of a lengthy one.  You WILL NEED CANNOLI FORMS!  You can find them almost anywhere these days!

Shells:
2 cups Flour
2 TBSP Butter
2 TBSP Sugar (White Granulated)
2 TBSP Unsweetened Cocoa
1 TSP Cinnamon
1/2 cup Seltzer Water or Marsala Wine

(You can do this in a bowl with a fork or pastry cutter, but I am using my food processor)
In your food processor add, flour, butter, sugar, cocoa and cinnamon.  Pule until ingredients are in crumbs.  Add in seltzer water slowly, pulsiing until mixture is combined.  Your dough should be wet enough to hold together but not sticky.  If it is a little dry add a bit more water, if it is sticky add just a wee bit more flour, it is pretty forgiving that way.  Wrap dough in plastic wrap and refrigerate for 30 minutes to rest.

Filling:
2 cups Milk
3/4 cup Cornstarch
2 cups Sugar
2 LBS Ricotta Cheese
2 Tsp Vanilla Extract
1-2 cups Mini Chocolate Chips

NOTE: This will make extra filling.  I will put a link at the end for a recipe to use it for, or freeze it for later cannoli making!
In a large pot add milk, cornstarch and sugar.  Slowly bring to a boil and stir constantly until thickened.  Transfer to a bowl and let sit, covered, in the refrigerator until COMPLETELY cooled!  When it is cooled, place mixture into the bowl of your stand mixer or use a hand mixer and add ricotta cheese and vanilla.  Mix until smooth and well combined.  I used the whisk attachment on mine for about 30 seconds at the end.  Place back in the refrigerator.

To make the shells, roll out your dough as thin as possible without it ripping.  Using a cookie cutter or glass, cut circles out of the dough.  Wrap around your cannoli forms and using an egg wash, brush the sides that lay on each other to seal your shell!  Continue with all of your dough or as with as many forms as you have.

Heat oil to 350 degrees and fry a few at a time until golden brown.  About 4-6 minutes.  Place on a paper towel lined cookie sheet, let sit for a couple of minutes and remove form.  You may need to use tongs, if they are still hot.  Make sure to let the shells cool completely to make sure they are as done and hardened as they should be (the first batch) so you can adjust if needed!

When all of your shells are fried and cooled, using a piping bag or food storage bag with the corner cut off to fill your cannolis!  Make sure to add a few chocolate chips to the ends so they can be seen!

ENJOY!
Buon Appetito!


SAVE THAT EXTRA FILLING!  Freeze it and use it for the holidays or later with this recipe!
Mini Cannoli Bites


Monday, December 5, 2016

Cavatini

Good evening friends!  I know it is a busy time of year for everyone!  I hope you are taking time to enjoy it, taking in the laughter, the conversation and the good food!


This is an old family favorite.  We always called in cavatini, not sure why, we just did.  Give me enough time and it will come back to me but as of now, it is what it is.....cavatini!  We make this with mushrooms, without them, it is not cavatini!  We also must have the radiatore pasta  You just use any short cut pasta and you will be fine!

Don't slaughter me over the canned mushrooms, they are actually my husbands favorite and some people have VERY strong opinions about them for sure! Feel free to use fresh, no biggie, your cavatini, your decision!  The red pepper flakes are a must, this is spicy, and sweet, and has beefy mushrooms and ground beef, it is so hearty and ABOVE ALL...........do NOT skimp on the massive amount of cheese, I won't be able to forgive myself for failing you, if you do!

16 oz pasta, cooked and drained (we MUST use radiatore)
1 T butter
1 T olive oil
2, 7 oz cans of mushrooms or (16 oz fresh, sliced mushrooms)
1 lb hamburger (lean)
1  10.75 oz can tomato soup
1 16 oz jar pasta sauce
2 T sugar
1 tsp red pepper flakes
salt and pepper
2 cups shredded mozzarella cheese
1/4 cup grated Parmesan


Get your pasta cooked according to package directions and drained.  Preheat your oven to 375 while it is groovin'.

Drain your pasta and add in your butter and olive oil.  Let it begin to sizzle and add in your drained mushrooms.  Saute for a couple of minutes and then remove with a slotted spoon into a bowl.  Set aside.

Add in your hamburger and cook until browned.  Toss in your tomato soup and pasta sauce, and RINSE that pasta sauce jar, you need that bit of extra liquid anyway!  Dump it into the pot and stir.  Now for the red pepper flakes, I use usually 1.5 tsp, but start with one, or even half.  Toss them in and stir to combine and heat those babies up!  Add in your sugar, salt and pepper to taste.  Add your mushrooms and pasta in and stir until completely combined.

Pour into a buttered 9x13 casserole and smooth out the top.   Let it rain cheese and in the oven you go!  Bake for 20-25 minutes.  Serve bubbling hot! (with crusty bread)

ENJOY!


Wednesday, September 7, 2016

Cheese Stuffed Shells

 Here we are again!  I hope your day has been great, and happy!  I love this time when we get together to share food.  I especially enjoy sharing family favorites with you.  It is hard to not share them all at once, and spread them out.  This is one I have never shared, and it is just your everyday run of the mill stuffed shells.  My family loves them and this is what I would consider a quick weeknight meal. If you are a meal planner/prepper, have your sauce made, shells boiled and all of your grated cheeses put together in one large resealable bag.  When the night comes you want to make it, it is not much more than just assembly.


This makes about 20 shells.  You can only cook that many or cook them all and eat the leftovers with butter and salt and pepper!  That is what my husband lives for when I make extra pasta.

You will notice I use what some of you may consider a lot of salt.  I don't find that the saltiness of Parmesan cheese hits the same notes as actual salt seasoning in a dish.  I find ricotta needs plenty of seasoning and that is just what I do.  When you divide that salt out among a large casserole, I think you will live.  If you want to omit it, please do, or cut it back, please do that as well.  You have to adjust things to what is good for your family.  I won't mind, in fact, I will welcome it !  Lets get started on this basic stuffed shell recipe that your family will love!

Oh wait!  You can also shred some provolone to use in this.  I saw some of those cheese blends at the store include a provolone/mozzarella combination....um, YUM.  OK, now we are ready.


1/2-1 full box of jumbo shells, cooked per package directions
15 oz. ricotta cheese
8 oz.  shredded mozzarella cheese (hold out 1/4 cup)
8 oz. shredded Parmesan cheese (hold out 1/4 cup)
1 T. Italian seasoning
1 tsp. onion powder
1 tsp. garlic powder
1 1/2 tsp. salt
1/4 tsp. black pepper
4 cups marinara sauce (divided)
1 can diced tomatoes
2 T. sugar

Preheat your oven to 350 degrees.  Cook shells according to box direction, drain and run under cold water until they are completely cool.  Let sit and drain while you mix up the cheese filling.  In a bowl combine, ricotta cheese, shredded mozzarella, shredded Parmesan, Italian seasoning, onion powder, garlic powder, salt and pepper.


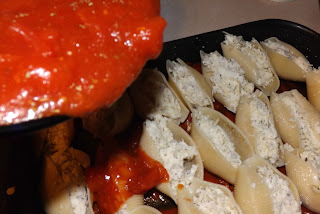
Mix to combine.  Use about 1/2 cup of your marinara (just plain) to dump in the bottom of the pan.  Spread it around as it will keep the shells from sticking.  Fill your shells with a teaspoon.  This mixture will fill about 20 shells.  You can cook the whole package or just the 20.  Fill and place into the baking dish.


Continue until your filling is gone.  In the same bowl as the filling (hey I am not about using as many dishes as possible ya know?) Pour in the rest of the marinara and the diced tomatoes UN drained.  Add in sugar and stir.  Carefully pour over the shells as evenly as possible. 


Spread out the sauce with a spoon, and use the cheese you held back to sprinkle on top!  Now, confession time..........  I used like, a lot more mozz.  The photo below show only Parmesan but I decided I wanted more mozzarella on top!


ENJOY my friends!


Wednesday, September 9, 2015

Tomato and Mozzarella Bruschetta

Tis the season.  The season for fresh veggies, straight from the garden, straight from the farmer's market, straight from a friendly neighbor or co-worker!  I have waited for this this very time of year, ALL year for this reason!


This very simple bruschetta, which you probably will notice isn't a traditional bruschetta, it is a version I have been making my family for years.  We love this stuff and while I adore traditional bruschetta, this one, will probably blow you right outta your socks.

As far as the tomatoes, I used cherry tomatoes, it is what I picked up at the farmers market but please feel free to use slices of tomato.  I just think the cherry or grape that you halve are easier to eat.  For the cheese, there is no reason you can't use the shredded variety, but come on, take a look at this photo, do you see the thick winter coat of mozzarella on top?  Nothing can beat that.  I don't care for my mozz to be browned on this particular dish but just a personal preference, feel free to let yours go until browned on top.

Get a nice loaf of French bread or a baguette.  Either one gets the job done.  I used a large loaf, as I was serving these as a side dish.  If you are using them for an appetizer, use a smaller loaf to accommodate your needs. 

Here is what you will need to pick up:
10 oz. cherry or grape tomatoes
1 loaf of French bread or a baguette
8 oz. ball of fresh mozzarella
olive oil
Italian seasoning
salt
pepper

Cut your bread in slices the thickness that you choose.  (I made 8 of these but you could easily get 10 if you are doing the large slices like I did with this amount of tomatoes).  Preheat your oven to 400.  Lay your bread out on a baking sheet  Now, drizzle each piece with a little olive oil, flip it and do it again.  Do this with each piece.  Sprinkle on some dried Italian seasoning, just go with your gut on this one, a little bit of salt and pepper, do NOT forget that part and place in the oven for 5-7 minutes, until golden and crusty!  While that is happening, half your tomatoes and put them in  bowl.  Add a SMALL drizzle of olive oil, salt, and some Italian seasoning.  This is all to taste friends.  Mix to combine and let sit while bread finishes.


Get your mozzarella sliced if using fresh and just feel the excitement in the air.  My mouth is literally watering while I type.  When the bread is done, top each one with the tomato mixture until it is all used.  Lay a piece of mozz on the top and put back in the oven until the cheese is melted and/or browned to your desired taste.


This is so good.  Just so simple and so good.  I hope you enjoy it as much as we do!


Saturday, January 24, 2015

500th Post!!! Italian Ricotta Cheesecake

Good morning ladies and gents!  Another dessert!  WOOHOO!  Seriously, this is getting a BIT out of control.  I mean, these may not go live back to back but I have literally made 4 desserts in less than a week.  It just happened that way.  Good thing I have lots of family to share with! 


Before I get started, take a look at the piece I cut out and the place I cut it from.  Seriously?  I can't even cut a proper triangle?  Very sad.  BUT interesting, right? HA!

Oh and one more TINY thing.  This is officially my 500th post!  What does this mean to me?  It means 500 times I have sat down at my computer to share food, fun, love, and memories.  I have made loving fun of nearly everyone in my family, and I have been able to share it with you, my Chefwannabe family, the extension of my real family.  Thank you for every bit of support, every ounce of advice, every teaspoon of criticism, even ever single gulp of pride.  I love you all, I respect you all, and you are pure joy in my life.  How many people get to be so blessed?  I count myself as one of those who are!  Crazy love to you every single one of you!

This ricotta cheesecake has been so long coming.  I have eaten it several times, back in the land of my Italian family and friends!  HOLLA South Jersey!  I have just tried to make it myself.  You will see it is so easy to make.  I mean, I used to be all intimidated by cheesecake.  Shhyeeaaahh, not anymore.  I had no recipe for this cheesecake.  In fact, I picked a part a few recipes I found and ended up ditching half the ingredients I came across.  I decided to fly with it, go with my gut on this one and it worked.  I mean, come on food bloggers and home cooks alike, how many times do you "get it" on the first try?  Exactly!.  And  then I decided to take the "no water bath" part from the Cake Boss and see if it really worked.  I figured if it cracks, and tastes like crap I learned two lessons in one day! 

Now, for anyone has never had a ricotta cheesecake.  Do not expect the texture of a regular cheesecake.  It is the same slight sweet flavor, I omitted the lemon, (ugh with the lemons already) and probably left out the most vital Italian ingredients.  But this turned out awesome and I had to share it with you.  The consistency is a bit grainy, maybe not grainy, hmm...what is it.  It has texture, where regular cheesecake it just smooth.  This is much lighter than a New York cheesecake so if you don't like the dense cheesecake this might be for you.  If you don't like light cheesecakes this may STILL be for you! 

Give it a try, and if you feel so inclined, add the lemon zest, but you aren't going to find it in my recipe!

Now, go, make this!

32 oz. whole milk ricotta cheese
4 eggs, separated whites and yolks
2 T. heavy cream
2 cups cup granulated sugar
1 T. vanilla extract

Preheat your oven to 450 degrees F.  In your stand mixer or with a hand mixer, beat egg whites to a medium peak.  If they go a bit further, no biggie, just get them to at least medium peaks and set aside. 


This part I do in the food processor, but you can easily just do it with a bowl and a spoon.  In a large bowl or the food processor, add in ricotta cheese, egg yolks, heavy cream, sugar and vanilla.  Mix until combined, or process until smooth and combined. 

 
Transfer to a large bowl if you need to.  Carefully, fold the egg whites into the ricotta cheese filling, in 3 editions.  You don't want to lose all of that beautiful fluff!  When it is completely combined, butter a 9 inch spring for pan WELL.  Bottom and sides.  Pour the cheesecake mixture into the spring form pan, and then give it a slight tap or two on the counter to get out any air bubbles.
 
 
Now place into the oven and IMMEDIATELY turn your oven down to 350.  Let back 55 minutes. and then shut the oven off.  DO NOT, I repeat DO NOT open the door and it shouldn't crack!  No need for the pain in the rear water bath!  When the 55 minutes is up, slightly crack the oven door, and shut off the oven, let the cheesecake sit in the oven until it comes to room temperature.  Chill for at least 2 hours.  I chilled mine overnight. 

Look Ma, no cracks!
Run a knife around the edges, and remove the sides of your spring form pan.  I heavy hand the powdered sugar on top, because, well, I like too!

Enjoy this delicious and unique dessert that will make you look like a rock star!


Thursday, September 18, 2014

Meat Manicotti

I can't get enough Italian food.  I mean seriously, I can't.  Since living in New Jersey, close to my Italian relatives, friends, and coworkers, it has gotten worse.  Now that I live back in Nebraska, and have had long discussions with my dad about holidays, I finally found out that his family in fact, used to have Italian food for Thanksgiving and Christmas and a turkey, just because it was required, I guess!  My mother in law extraordinaire hosted the same kind of holidays.  All the fixins and an almost entirely different Italian meal as well!  My GOD, it was my dream come true.  The point is, when I returned to Nebraska, I made it a tradition for my family to always serve an Italian dish along with the traditional holiday spread.  This is one I serve often because I love it.  I usually do 2 separate kinds, one with meat and one with just cheese.  I am sharing my favorite with you today. 


I am a cheater with mine, I do not cook the noodles first.  Ain't NOBODY got time for all that shell ripping, slip sliding, filling of a wet noodle stuff.  Oh no.  Mine works out perfectly.  This is a large batch, it will fill 28 shells.  Feel free to halve the recipe.  Otherwise just divide everything between the two pans it will take!

Preheat your oven to 400 degrees F.  Get out 2, 9x13 pans and let's get ready to rumble!

For the meat mixture you will need:
2lbs ground beef
1/2 lb. ground pork
3 T dried Italian seasoning
1 T onion powder
1 tsp. salt
1/2 tsp. black pepper
1/4 cup grated parmesan cheese
3/4 cup ricotta cheese

In addition you will need:
28 Manicotti Shells
2, 23.9 oz. (approx.) of your favorite pasta sauce or homemade
1 14.5 (ish) can of petite diced tomatoes
1-2 cups water
2 cups shredded mozzarella cheese
extra parmesan for the top

Combine all ingredients for your meat mixture.   You can do it in a stand mixer or by hand, the choice is yours.  Set aside and add about 1 cup of pasta sauce to the bottom of each pan.  Spread it around so the shells don't stick.  In a large bowl combine the rest of the pasta sauce, diced tomatoes, and rinse those pasta sauce jars out with about 1 cup of water each and swish and add to the bowl.  Mix to combine and set aside. 

You can fill the shells with a small spoon but I prefer a pastry bag, so that is what I did.  You should have exactly enough to fill all the shells.  Don't over fill but make sure they are full end to end.  Fill a shell, place in pan, flip it to cover with some sauce and continue until all shells are filled.  Now take the sauce in the bowl and pour half over each pan. Sprinkle on cup of mozz over each pan, and grate or sprinkle a bit more parmesan on top for good measure. 

Now cover TIGHTLY with foil.  Place in the oven for 45-50 minutes and they will be done perfectly!  Remove foil and let cool for a minutes before serving!

ENJOY!!

Wednesday, May 14, 2014

Pepperoni Bread

Oh man.  It has been one of THOSE days.  I got out of bed just to take some Excedrin migraine and go back to bed.  At 11am I still hadn't knocked this baby out, but life goes on, right?  I had bread to make!  And making bread is what I did!


This is an age old recipe, but......  I just never shared it.  I got this recipe so long ago from someone I taught with.  I can't believe I can't remember her name.  I will think of it, you know, in the middle of the night.  Anyway it is just an easy recipe to throw together.  I used frozen bread dough, if you have a great recipe for a white bread dough, feel free to make your own.  Headache people, it means convenience!  So enjoy this as an appetizer, a picky, serve it with a meal, whatever you want.  Just enjoy it!

If you like, you can serve with marinara for dipping!  Use as much pepperoni as you want.  There are no boundaries on the love of pepperoni!

2 loaves of frozen bread
1 pkg sliced pepperoni
1/2 cup grated mozzarella cheese
1/2 cup grated Parmesan cheese
1/4 cup olive oil, divided
2 tbsp. Italian or Pizza seasoning
2 tsp. garlic powder

Combine 2 loaves of your frozen bread.  Roll out until desired thickness is achieved and a rectangular shape and drizzle half of the olive oil over the top.  Sprinkle with Italian seasoning, garlic powder and grated Parmesan cheese.  Lay the pepperoni to cover the dough, as much as you like and then top with grated mozzarella cheese.  Carefully roll the bread up, starting at one side (long side) moving up and down the side to roll it evenly.  Pinch the edge to the rolled dough when you get to the end, flip the sides up and lay seem and tucked end side down on a parchment lined cookie sheet.  Rub the top with your remaining olive oil and sprinkle with some extra seasoning!

Cover with a lint free towel and let raise for approximately 1 hour.  Bake at 350 for 20-25 minutes

ENJOY!

Monday, April 14, 2014

Pork Braciole

Good evening friends, I hope this finds you all relaxing after a day hard at work or play!  Oh, I just considered it might find you with 2 screaming children, a barking dog, a ringing phone, and smoking oven, all at the same time.  Oh dear, if that is the case.... WHY are sitting reading this?!


Braciole.  My mother in law makes ZEE best.  Now I would like to say that this is traditionally made with beef.  Flank steak is my meat of choice on the regular but, I am not sure if that is REALLY traditional or just, what most people do.  Isn't that the same thing? HA!  Hey I had pork loin I wanted to use, so I went with it.  And might I say, I am so very glad I did!

This is a bit of a process, but not to bad.  You can use small pieces of meat and make small braciole, or use a larger piece and slice it to serve several.  What a great idea to get a lot of bang for your buck, one nice thick piece of steak to serve at least 4 adults.  We could be on to something here!  So do not let the size or instruction of the recipe keep you from trying it.  It isn't hard, it is just a few steps to perfection.  I used 2 small pork loins.  Wait, not small, just short.  I by the gargantuan size pork loins and cut them into 3.  This recipe will do a large steak, or 2 pork loins as I did.

First you must prepare the meat.  If you can't find a thinly pounded piece of beef or pork, you will need to do it yourself.  I butterflied my 2 smallish pork loins and then went to town pounding them out with a meat tenderizer.  You could also use a heavy skillet if you want.  Get it about 1/2 an inch thick or less all over.  You know, you can really pound it to whatever thickness you like.   If you do not know how to butterfly a piece of meet, just cut it horizontally, leaving about 1 inch at the end NOT cut, flip it open like a book and then start to pound it thin.  Easy enough?  This filling recipe will make 2 bracioles.  If you are using only ONE piece of meat, HALF the recipe!

Filling
1 1/2 cups seasoned breadcrumbs (I use fresh)
3/4 cup grated Parmesan cheese
1/4 cup finely chopped parsley
1 tbsp. Italian seasoning
1 cup grated mozzarella cheese
1 egg
2 tsps. or 2 cloves of garlic grated or VERY FINELY minced
2=4 tbsp. olive oil
salt and pepper
4-5 cups of pasta sauce, homemade or purchased

Combine all ingredients together.  Use more or less olive oil depending on how dry or wet your filling is.  You want it to hold together when you squeeze it.  I trust you can eyeball this little detail.

With your piece of meat laying out flat, top it with your filling, spreading it evenly over the entire thing.  Carefully roll the meat up, and using some kitchen string, tie it in about 3-5 places, holding it together.  (I had already rolled my braciole and had to unroll it for a photo!)


In a large pot, brown the meat for 2-3 minutes on each side until nicely browned.


When browned, add your crushed tomatoes or pasta sauce!  I also add a bit of water to mine.  Cover and let simmer for 1-2 hours depending on the thickness of your meat and size of the braciole!  When it is done, remove and let sit for 10 minutes before slicing!

Use your sauce over some short cut pasta and call it a meal!

Monday, November 4, 2013

Spaghetti And Meatball Soup featuring Dei Fratelli

Hello friends!!  I am thrilled to share this recipe with you for 2 reasons.  I have had a years long love with Dei Fratelli Products AND it is my entry into their "Ripened Recipe" Contest! 


It isn't often that I get asked to share products with you, that I already love.  I mean seriously, I have been using them for years.  This makes it all more exciting for me.  When I started venturing through their website, I found out many things I didn't know.  Their tomato sauces, juices, and soups,  are all natural, and gluten free.  They also offer low sodium and no salt products.  Dei Fratelli has a new line of products called, "Dei Fratelli Truly".  These tomato products are packaged in a light puree, and they are preserved within 10 hours of being harvested.  They are packaged in a BPA-Free carton.  How awesome IS that?!

I could go on and on, I just can't say enough good things about the quality and flavor.  The truth is, you have to try it for yourself, and let me, AND Dei Fratelli know how you love them!

This Spaghetti and Meatball Soup, is something I have wanted to make for years.  No, I mean, literally, years.  Why is it, sometimes, the easiest of tasks we put off the longest?  Well when my products arrived from Dei Fratelli and I heard of this contest, I HAD to make it.  It was like a sign from above!  It turned out amazing, and let me just tell you how good a stringy, melty, grilled cheese would taste dunked into this tomato-ee goodness!

Thanks for taking time to let me tell you about one of my favorite products AND share my new recipe with you!  This will be a home run at your house, I promise!

Mini Meatballs:
1lb ground beef (I use very lean)
1/4 cup breadcrumbs
1/4 cup grated Parmesan cheese
1 egg
1 tsp. dried Italian seasoning
1 tsp. salt
1/2 tsp. pepper
1 tsp. grated onion
1 tsp. garlic powder

In a medium bowl, combine all ingredients.  Using a small scoop or just eyeballing it, make small meatballs.  I got about 44 meatballs from my mixture.  When you get them all rolled, place on a plate and set aside. 

In a large pot, add in 3 tbsp. olive oil and heat on medium heat.  Add in meatballs a few at a time to brown them up.  You don't need to cook them all the way through, though they are so small they may do that anyway.  When they are browned up on all sides, remove to a paper towel lined plate.  Do this until all meatballs are done.  Using the SAME pot, (get all the good flavor up off the bottom from the meatballs!) combine the following ingredients for the sauce:

Dei Fratelli Marinara -24 oz
Dei Fratelli Gluten Free Tomato Soup - 10.75 oz
Dei Fratelli Petite Diced Tomatoes - 14.5 oz
4 cups water
1 tbsp. dried oregano
1 tbsp. garlic powder
1 tbsp. onion powder
1 tbsp. sugar
8 oz. dried spaghetti (broken in half)

Combine all ingredients and bring to a simmer.  Add in meatballs and let simmer for 10 minutes.  Stir gently, occasionally.  (At this point, you can decide if you love the thickness of the soup and if you want it thinner, just add bit more water until it is your desired consistency.)  After 15 minutes, add in 8 ounces of spaghetti that has been broken in half.   Cook per the suggested cooking time on the pasta package.  Serve with some crusty garlic bread or don't forget that melty, gooey,  grilled cheese sandwich for dunking!

This soup will freeze beautifully.  You can thaw it out in the fridge overnight, OR just pop it in a pot  and warm it up, on low.  You can add more water if you choose, depending on the thickness you prefer. 

Enjoy this recipe!  I LOVED Dei Fratelli products, long before this!  I enjoy knowing I am using quality products, mace from locally grown tomatoes, in the food I make for my family.  Give them a try and make sure to get your recipe entered in their "Ripened Recipe Contest"!


Your "keep your fingers crossed for me to win" Chefwannabe


 I am in no way compensated for a favorable review on any product.  I review each product honestly, and informitavely for you, to the best of my ability.  I strive to give my readers all of the information I can, so that you can make an informed decision on the products you choose to buy and use in your recipes. 

Wednesday, October 23, 2013

Zeppole

Good evening friends!  Hoping this finds you all enjoying a beautiful day!  I was recently going through the recipes I have shared with you and when I realized I hadn't shared this one, it was a MUST do.  My poor husband, was so upset I was making these for him....again!


Zeppole are the equivalent of like......an American "donut hole".  They are fried balls of dough, which in my life,  is pizza dough!  You can buy pizza dough or you can use my recipe, which I have deemed the best ever.  Click here for that recipe. 

These are very simple.  After you fry them you can toss them in powdered sugar, regular sugar, cinnamon sugar, etc.  The options are limitless.  I filled half of mine  on this batch with pastry cream!  You can find that recipe here.  You could also use vanilla instant pudding or whipped cream to fill these.  I don't usually fill mine but I was hungry for this version, thus doing half.  Let's get started on these quick and easy zeppole!

1 ball of pizza dough (or more if you are making a TON)
vegetable/canola oil
1 cup sugar
1 tbsp cinnamon

Prepare a cooking sheet or large platter, by lining it with paper towels.  In a medium bowl, combine sugar and cinnamon.  Set aside.   Get 4 inches of oil into a pot.  Bring up to 350 degrees F.  While that is heating up, using a pizza cutter for ease, cut the flattened out dough ball into strips.  Then cut small pieces from those strips, like this.   Don't cut them TO big, they will blow up in size when you fry them!


Take each piece and just quickly roll into a ball.  This is optional but I always do it.  Do this with the entire ball of dough.  When the oil is ready, drop in a few at at time.  They won't take long, and when they are golden brown they are ready!


 Remove and place on paper towel lined platter.  Take them and immediately toss them in your cinnamon sugar mixture.  Toss to coat and transfer to a serving platter.

Let cool for 5 minutes before filling, IF you are filling them.  Otherwise, dive in, these are best when they are still warm!

Enjoy your zeppole, I know we did!

Your "is there such a thing as a bad version of a donut?" Chefwannabe

PS.  Confession.  I didn't use all my pastry cream, so I used it to dip some of the regular zeppole in.  Yes, I did.  I am not proud, but I do not regret it. LOL

Monday, August 19, 2013

Chicken Parmigiana

How many of you are elated over it being "BACK TO SCHOOL" time? HA!  Come on, you can admit it, we have all been there!   I am a schedule freak.   Even with 10 activities, I could plan around them and for them and know they were coming.  That somehow made me feel much better about life in general.


Anyway, I enjoyed having a little more time to cook and it being cooler so I WANTED to spend more time cooking!  I only realized 2 hours ago I hadn't shared this recipe with you guys.  It was one of the first recipes I "pulled out of my shoes" when I had to learn to cook.  I love my version.  There are so many, but I am here to tell you, well, I love mine!  My family loves it, my friends love it and frankly, they are pretty tough to please!  Ok, not really but it seemed the natural thing to say in my little "sales pitch".  This recipe is a little bit of a process.  Well, not really.  Well, it depends on if a process to you is normally opening a jar or catching your own dinner.  It is easy, and good things sometimes take a few extra steps.  It will be well worth your time and energy.  This freezes like a charm and I make extra for just that reason. 

This really is a family favorite and all joking aside, it is the kind of dish you can feel good about serving, you will know their tummy's and their souls are fed!  I mean after all, food IS love!

Fasten your seatbelt, here we go!

4 chicken breasts, cut in half thickness then pounded out to make slightly thinner
4 cups or 24 oz jar of marinara sauce
14.5 ounce can diced tomatoes
1 1/2 cups flour
2 eggs
water
2 cups bread crumbs
1/2 cup finely grated parmesan cheese
salt
pepper
2- 8 ounce balls of mozzarella cheese or 16 ounces grated mozzarella
peanut or vegetable oil

Preheat your oven to 350 degrees.  Prepare your chicken breasts by slicing them in half horizontally, so you get 2 out of 1.  They will be thinner that way.  When you have done that, gently pound the chicken until it is just slightly thinner and bigger pieces than the original.  This is a no brainer, don't pound it to thin, just give it few hits.  Lay your chicken out and salt and pepper both sides.   You should have 8 pieces (servings)

Now prepare your sauce.  In a medium saucepan, add in your marinara and your diced tomatoes.  Regardless if you doctor up store bought, or use your own, add any other seasonings you like at this point, turn to low heat and let simmer while you prepare the rest. 

Now to bread that beautiful chicken!  Put 1 1/2 cups flour in a large Ziploc back.  In a shallow dish whisk 2 eggs with a splash of water.  Salt and pepper the egg as well.  In a second shallow dish or pie plate, add in 2 cups of bread crumbs and 1/2 cup parmesan cheese.  I use fresh, and seasoned them with Italian seasoning and salt and pepper.  If you use dry and already seasoned that is fine. 

OMG, now you know I used JARRED sauce! ACK!

Toss all of your chicken pieces into the flour, zip up the top and toss to coat all of the chicken evenly.  Remove one piece at a time, dunk in the egg and then coat in the crumbs.  Place into a skillet heated on medium with your oil.  Fry on medium, slowly!  You will get the most gorgeous golden brown crust, your heart will melt!  Fry approx. 3 minutes on each side.  If you choose to not pound out your chicken breasts you might need an extra minute or 2 since they will be thicker. 


When they are all coated, fried and finished, place unto  a foil lined baking sheet.  (I am all for easy cleanup)

Now take a spoonful of your sauce, and lay it on the top of your chicken, then using whatever mozzarella cheese you choose, cover the top.  It is my opinion fresh is best, but use what makes you happy. 


Bake at 350 for 20-30 minutes.  This is a good time to boil up your pasta and have it all ready at the same time!   ENJOY!!


Your "Italian food for the Italian soup" Chefwannabe

Wednesday, July 17, 2013

Homemade Ricotta Cheese

Good evening friends!  Hoping this finds you all doing well and enjoying your evening!!


This cheese making thing, is getting a little out of control.  First hubs and I made mozzarella cheese, we have made it several times.  He has been on me about making ricotta cheese forever.  He LOVES ricotta cheese.  Not my favorite, but I get that he enjoys it.... immensely. 

I wish I had 1.00 for every single time I put him off about this.  I used every excuse in the book, from "it will be to hard" to "why can't we just buy it in the store" to "NO, I am NOT making ricotta".  Well finally he was done taking no for an answer.  I mean, he is a HUSBAND, shouldn't he be able to take NO for an answer? :)  Anyway, I gave in.  We looked up all kinds of recipes and techniques.  I can't believe the variance from super easy recipes to super involved recipes.  We ended up going with a recipe from epicurious.com for our first ever ricotta cheese making adventure.  It was easy, took no special equipment, other than needing to pick up some cheesecloth we were ready to go.

I will tell you in advance, this cheese was SO incredibly delicious, I will likely never buy it in the store again.  Not only was it delicious, but I knew exactly all 4 things that went in it!  How can you argue with that?!?

You will need:
1 large pot
cheesecloth
colander
1 1/2 tsp salt
1 gallon whole milk
2 cups heavy cream
6 tbsp. fresh squeezed lemon juice.  (do NOT use the stuff in a bottle)

Place cheese cloth into the colander and set in the sink.  Make sure you cut the cheese cloth bigger than you need so it stays put and cover the entire colander

In a large pot, add in milk, cream, and salt.  Bring slowly to a rolling boil.  This might take a bit!  Be patient. 

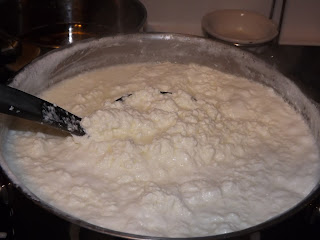
When it is at a rolling boil, add in the lemon juice and turn off the burner.  Let it sit for approx. 2-3 minutes.  You will see it curdling immediately.


When you think it is curdled as it should be, pour into cheese cloth lined colander and let drain. 


The longer you let it sit and drain the dryer your ricotta will be. 

This yields 1 qt of ricotta.  (at least it did for us).  Refrigerate at least 4-6 hours.  Let it cool completely and then use however you choose.  Use it savory, use it sweet, the options are endless.  This is the best thing goin' and I can't WAIT to make it again and again!  Funny how things change, eh?

Your "admittedly likes making ricotta" Chefwannabe