Showing posts with label mozzarella cheese. Show all posts

Tuesday, February 2, 2021

Cheese Stuffed Bread Sticks

 (This recipe makes 8 bread sticks)


Good Evening friends!

I just returned from a long weekend taking care of my dad with 2 of my sisters.  Boy was that an experience.  I have come away with 2 important messages...\

1. GOD BLESS NURSES

2. THANK YOU GOD FOR NURSES

oops there are 3,

3. NURSES DON'T GET PAID NEAR ENOUGH!

We did however do lots of laughing,  reminiscing, and walking down memory lane.  He went straight to  him and my mom's first date and the "best set of legs he had ever seen".  He is right...I mean it is what it is.  It was a good weekend and all is well.  He has been out of the rehab facility for 5 months just living his best life.  He refers to his meds as his "chicken feed". he wants to be called "Sweetface" and expects 3 meals a day.  Seriously dad?  HA!  Gonna take a hard pass on a career in nursing!

A few nights before I left I wanted to make a nice dinner.  I made steaks and wanted to use up some things in the fridge for sides.  Always shop your fridge and freezer, use things up, don't through your money/food away.  I had a roll of refrigerated pizza dough that needed used.  It must have snuck to the back of my fridge and honestly I had no idea if it was even still good.  I know that has HAD to have happened to  you too!  Right?  Please?  Somebody?  I had 8 rogue string cheeses that were spying on the new cheese and honestly, who can't make something amazing out of pizza dough and mozzarella cheese sticks?


These are easy and I contemplated not even sharing the recipe with the video, but I am.  There are always beginners out there and easy recipes are a good thing!


You will need:

1 roll of refrigerator pizza dough

8 mozzarella string cheese sticks

4T melted butter

1 tsp garlic powder

Italian Seasoning

Preheat oven to the temperature recommended on the package of crust.  Roll out slightly and cut into 8 pieces.  Cover the ends of the cheese and then "smoosh" the dough around to seal and cover the entire stick!  Lay on a parchment lined baking sheet or spray with cooking spray.  Do this until each bread stick is made.  Melt butter and add in garlic powder.  Add more or less if you prefer.  Brush over  breadsticks and then sprinkle each with Italian seasoning.  Bake in the oven until golden brown which will be the time that the pizza dough package recommends.  Serve right away with marinara, ranch or no dipping sauce at all!  OHHHHH dunk these in tomato soup even!  Serve with any soup!


These can be many things but the most important thing they are is DEELISH!


ENJOY!


Monday, October 9, 2017

Hasselback Caprese Chicken

Welcome back!  Time is flying, fall is falling and the garden produce is beginning to get to tired and worn out and cold to make anything more!  Bummer!  I picked the last of my basil, the last of my tomatoes, and decided to close the season with a bang!  This is a dish I have seen around here and there, but I wanted to make it my own way.  I wanted to add some seasonings, and better yet, I wanted to lay them on a bed of creamy, silky, alfredo-like sauce!


This came together in about 15-20 minutes, and another 45 in the oven.  I served it with a side of spaghetti that was lightly buttered, added some parsley, and a drizzle of this awesome sauce!


I gave you kind of an approximation of ingredients.  I wrote it for 4 servings, but for the tomato and basil and cheese it will depend on how thick you cut your slices, AND how many slits you put in the chicken.  See what I am sayin'?

Let's get started!

Cream Sauce:
2 T butter
2 T flour
1 1/2 cups milk
1/2 cup chicken stock (up to 3/4 depending on how thick or thin you want your sauce)
1 cup grated Parmesan cheese
salt and pepper to taste


Melt your butter in a medium saucepan.  Add in your flour and whisk to combine for 1-2 minutes.  Add in milk and chicken stock.  Whisk until slightly thickened and then add in cheese.  Again, whisk until cheese is melted and taste for seasoning. Add salt and pepper to taste.  Now, pour this mixture into a 9x13 baking dish.  Also, preheat your oven to 350 degrees F!


Now for the chicken prep you will need:

4 boneless skinless chicken breasts
2=3 large tomatoes
2-8oz balls of mozzarella cheese
20 leaves of fresh basil
1 tsp Italian seasoning
1 tsp garlic salt
salt and pepper to taste

Slice your cheese and tomatoes into half moons.  Now take your chicken and slice across it.  Don't go all the way through, just about 3/4 of the way.  Do that to tall of the chicken breasts.  Using your Italian seasoning, and garlic salt, season them up all over.


 You can stuff these however you like.  Where you cut, you will stuff with tomato or mozz cheese. I used a basil leaf in each one, alternating mozz and tomato slices.  When you finish one, carefully place it in the 9x13 pan of cream sauce.  Do this until all chicken is done.


Lightly salt and pepper when all done and place into the oven.  You will need to start checking for doneness at about 35 minutes.  I used large breasts (teehee) and mine took upwards of 45-50 minutes.  Use your thermometers!


Enjoy this with a side of pasta, a salad, some nice crusty bread, the possibilities are endless and delicious!


Wednesday, September 7, 2016

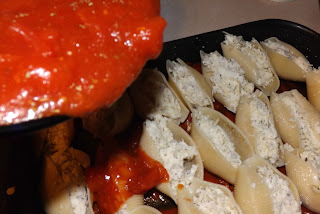
Cheese Stuffed Shells

 Here we are again!  I hope your day has been great, and happy!  I love this time when we get together to share food.  I especially enjoy sharing family favorites with you.  It is hard to not share them all at once, and spread them out.  This is one I have never shared, and it is just your everyday run of the mill stuffed shells.  My family loves them and this is what I would consider a quick weeknight meal. If you are a meal planner/prepper, have your sauce made, shells boiled and all of your grated cheeses put together in one large resealable bag.  When the night comes you want to make it, it is not much more than just assembly.


This makes about 20 shells.  You can only cook that many or cook them all and eat the leftovers with butter and salt and pepper!  That is what my husband lives for when I make extra pasta.

You will notice I use what some of you may consider a lot of salt.  I don't find that the saltiness of Parmesan cheese hits the same notes as actual salt seasoning in a dish.  I find ricotta needs plenty of seasoning and that is just what I do.  When you divide that salt out among a large casserole, I think you will live.  If you want to omit it, please do, or cut it back, please do that as well.  You have to adjust things to what is good for your family.  I won't mind, in fact, I will welcome it !  Lets get started on this basic stuffed shell recipe that your family will love!

Oh wait!  You can also shred some provolone to use in this.  I saw some of those cheese blends at the store include a provolone/mozzarella combination....um, YUM.  OK, now we are ready.


1/2-1 full box of jumbo shells, cooked per package directions
15 oz. ricotta cheese
8 oz.  shredded mozzarella cheese (hold out 1/4 cup)
8 oz. shredded Parmesan cheese (hold out 1/4 cup)
1 T. Italian seasoning
1 tsp. onion powder
1 tsp. garlic powder
1 1/2 tsp. salt
1/4 tsp. black pepper
4 cups marinara sauce (divided)
1 can diced tomatoes
2 T. sugar

Preheat your oven to 350 degrees.  Cook shells according to box direction, drain and run under cold water until they are completely cool.  Let sit and drain while you mix up the cheese filling.  In a bowl combine, ricotta cheese, shredded mozzarella, shredded Parmesan, Italian seasoning, onion powder, garlic powder, salt and pepper.


Mix to combine.  Use about 1/2 cup of your marinara (just plain) to dump in the bottom of the pan.  Spread it around as it will keep the shells from sticking.  Fill your shells with a teaspoon.  This mixture will fill about 20 shells.  You can cook the whole package or just the 20.  Fill and place into the baking dish.


Continue until your filling is gone.  In the same bowl as the filling (hey I am not about using as many dishes as possible ya know?) Pour in the rest of the marinara and the diced tomatoes UN drained.  Add in sugar and stir.  Carefully pour over the shells as evenly as possible. 


Spread out the sauce with a spoon, and use the cheese you held back to sprinkle on top!  Now, confession time..........  I used like, a lot more mozz.  The photo below show only Parmesan but I decided I wanted more mozzarella on top!


ENJOY my friends!


Friday, August 26, 2016

Cheesy Chicken Gnocchi

 So....as my husband and I sit in a popular Italian chain restaurant, eating soup and bread sticks like tomorrow may never come, he says to me, "OMG, you need to make this soup into a casserole or a real "dish".  And that my friends is how this happy accident began.


.....Fast forward 2 days, he keeps asking me to make this.  Admittedly I have 2 packages of gnocchi in the cupboard.  I have everything else I need to create his own personal heaven.  I decide that today is THE day.  I turned on my fave music, put on some lipstick and off I went.  End result? Complete FAIL!   However, that is now how this story ends.  While it was a complete fail as far as a copycat, sort of, not really version of the soup, it turned out to be a pan of cheesy, chickeny, gnocchi-ee goodness and I do not for one second feel bad that it "didn't turn out".  I feel so "unbad" I am sharing it with you!

This will feed a crowd, and I can't imagine anyone not liking it.  If you groove on making your own gnocchi, get on with your bad self, I purchased mine.  If you make it, make sure to tag me on Instagram or Twitter!!  Snapchat me!!


2 pkg. gnocchi (mine were 17.5 oz. each)
4 T. butter
2 large chicken breasts, cut into small cubes or pieces
1 cup shredded carrots
1/3 cup flour
2 cups chicken stock
3/4 cup heavy cream (or half and half)
1 T. dried parsley
1/2 cup grated mozzarella cheese
1/2 cup grated Swiss cheese
1/4 cup grated Parmesan cheese

In a large pot, melt your butter.  and add your chicken and carrots.  Cook over medium-high heat until chicken is cooked all the way through.  Add in flour and stir well, let it cook for about 1 minute.  Add in chicken stock, while still on medium high heat, bring to a boil, stirring constantly, when it has begun to thicken add in heavy cream, parsley, and all of your grated cheeses.


Stir to combine,remove from heat and let sit.

Bring another large pot of water to boil.  Follow the direction on your package of gnocchi.  If you are making them homemade, you are a better person than me, so you will know how to cook them!  When the water boils, chuck them in and the second they float they are done.  Make sure to get these out right away.  They will be going in the oven for a very short time and you don't need them overcooking.

So as I was saying, when they are done, use a slotted spoon or spider and scoop them out, let them drain and toss them in the pot with the sauce!  Get them all in, gently stir to combine and pour into a greased 9x13 casserole dish or pan.  Bake at 400 degrees for 10 minutes, then turn to broil and let it get golden brown on top!  That cheese and butter get a little crusty and it is heaven!!

Enjoy friends!


Monday, August 8, 2016

Mozzarella Stuffed Pizza Burgers

 How many of you have pizza night at your house?  You know, every this day or that day you have pizza for dinner?  We always had Chinese food night at our house but, I know TONS of people who do pizza night.  Maybe this could be a little change up one of those nights that you surprise your family with!


I have made pizza burgers for years, but my husband, the wonderful genius that he is (yes, he made me say that) suggested I try a new version and stuff it.  Well, I don't know about you but when someone uses the words "stuffed" and "mozzarella" in the same sentence, something amazing is likely about to happen.  That being said, I of course tried it for him because after all, he is awesome and his birthday is tomorrow.  Wowzers, is about all I have to say.  I might have teased you on Instagram or Facebook!  (insert innocent face)

I hope you give this a try, if you do, post me photos friends!  I love to see how your versions of my recipes turn out!  Share the love!  Tag me, everywhere!

Heeeeeeeere we go!

2 lbs Ground Beef
1 T. Italian Seasoning
1 tsp. salt
1 1/2 tsp onion powder
1 tsp. oregano
1/4 tsp. black pepper
sliced mozzarella
shredded or thick slices of mozzarella for the "stuffed part"
pizza sauce

Preheat your oven to 375 degrees F.  In a large bowl combine your ground beef and all of your seasonings.  Mix well with your hands.  Yes, your hands!  Just do it!


When you have the meat mixed completely and the seasoning is distributed throughout, divide into equal parts, according to how many burgers you want.  I got 7 burgers, you might be able to get 8.   Once they are divided, divide eat part in half, making two THIN patties.  Place a chunk of mozz in the middle and carefully seal the edges.  I always just seal mine by going over the edges repeatedly but, you can use some water to help seal it.


When you have them all formed, stuffed and sealed, fry in a bit of olive oil for 2-3 minutes per side.  (Notice, ZERO cheese leaking out?) My husband and I had a bet.  You clearly see who won.   Anyway, when you have fried both sides, place on a parchment lined cookie sheet.  Finish all the burgers.


Top each burger with a generous amount of pizza sauce, and then lay down the goodness.  One piece of mozz or shredded, if you prefer on top.


Pop this beautiful burgers into the oven for 10 minutes.  They will be done absolutely perfectly.  I could lightly squeeze the burger and see the beautiful juiciness. Eat this hot, so the cheese in the middle stretches and is gooey!

Now, what takes these over the top is the bun.  Use regular hamburger buns.  Spread a light layer or butter on all of the tops and bottoms.  Sprinkle with Italian seasoning, a bit of salt and pepper and some Parmesan cheese.  Pop under your broiler for a couple of minutes until you pull them out and they look like this....


Now, go make it happen........trust me.

ENJOY!

Thursday, June 16, 2016

Caprese Garden Salad

I am sitting here listening to old songs my husband and I used to jam to in the truck while driving down the Atlantic City Expressway, heading to the beach.  Life living near the shore.  Loved it.  I miss the beach, not much compares to the peaceful crashing of waves on the back bay, or sitting on the beach at night, watching boats roll in and out.  Good memories...


Anyway, back to food, and this salad.  My husband wanted a salad, emailed me what he wanted in it, and as any good, obedient (oh that word is gonna get to some of you) and loving wife would do, I did it.  Holy salad shooter Batman we have a winner!  This will serve 6 as a starter or side salad, and 4 for a meal.  Toss on some grilled chicken and BAM, lunch!  BAM, deliciousness.  BAM, everyone will ask you to make it again and again!

Seriously though, caprese salad is like my number 4 favorite food of life, and making into a garden salad with some other additions, is just the bomb.  Make this, make this now.  I admittedly love salad, and admittedly, I could eat salad everyday.  THIS salad, I don't want, I NEED.

Thank you to my darling hubby for that beautiful email that changed our salad lives forever!  Academy award contender?  I love you babe, thanks for all you do to support me in my general misadventures of life.  I bet all those years ago when we had the windows down in your truck, listening to Phil Vassar, wind blowing, sand in our butts.........you never knew I would be such a pain, eh?

2 heads of romaine lettuce
1 pint cherry or grape tomatoes
4-5 large basil leaves, fresh (if using dried, 1 tbsp) torn or chopped small
1 8oz ball of fresh mozzarella diced or use smaller mozzarella "pearls"
1/2 cup grated Parmesan cheese
1/4 tsp salt
fresh black pepper
1 T dried Italian seasoning
3-4 T olive oil
3-4 T red wine vinegar

Chop or tear romaine and place into a large bowl.  Add in tomatoes, basil, mozz, parm, salt, pepper and Italian seasoning.  Give it a good toss and then drizzle in your olive oil and red wine vinegar.  Though I give a measurement it is really just on a "to taste" basis.  Give another toss and serve.  Oh man, this is a fabulous salad.  Props to the hubby.  My man genius!

ENJOY!

Wednesday, September 9, 2015

Tomato and Mozzarella Bruschetta

Tis the season.  The season for fresh veggies, straight from the garden, straight from the farmer's market, straight from a friendly neighbor or co-worker!  I have waited for this this very time of year, ALL year for this reason!


This very simple bruschetta, which you probably will notice isn't a traditional bruschetta, it is a version I have been making my family for years.  We love this stuff and while I adore traditional bruschetta, this one, will probably blow you right outta your socks.

As far as the tomatoes, I used cherry tomatoes, it is what I picked up at the farmers market but please feel free to use slices of tomato.  I just think the cherry or grape that you halve are easier to eat.  For the cheese, there is no reason you can't use the shredded variety, but come on, take a look at this photo, do you see the thick winter coat of mozzarella on top?  Nothing can beat that.  I don't care for my mozz to be browned on this particular dish but just a personal preference, feel free to let yours go until browned on top.

Get a nice loaf of French bread or a baguette.  Either one gets the job done.  I used a large loaf, as I was serving these as a side dish.  If you are using them for an appetizer, use a smaller loaf to accommodate your needs. 

Here is what you will need to pick up:
10 oz. cherry or grape tomatoes
1 loaf of French bread or a baguette
8 oz. ball of fresh mozzarella
olive oil
Italian seasoning
salt
pepper

Cut your bread in slices the thickness that you choose.  (I made 8 of these but you could easily get 10 if you are doing the large slices like I did with this amount of tomatoes).  Preheat your oven to 400.  Lay your bread out on a baking sheet  Now, drizzle each piece with a little olive oil, flip it and do it again.  Do this with each piece.  Sprinkle on some dried Italian seasoning, just go with your gut on this one, a little bit of salt and pepper, do NOT forget that part and place in the oven for 5-7 minutes, until golden and crusty!  While that is happening, half your tomatoes and put them in  bowl.  Add a SMALL drizzle of olive oil, salt, and some Italian seasoning.  This is all to taste friends.  Mix to combine and let sit while bread finishes.


Get your mozzarella sliced if using fresh and just feel the excitement in the air.  My mouth is literally watering while I type.  When the bread is done, top each one with the tomato mixture until it is all used.  Lay a piece of mozz on the top and put back in the oven until the cheese is melted and/or browned to your desired taste.


This is so good.  Just so simple and so good.  I hope you enjoy it as much as we do!


Monday, August 10, 2015

Stuffed Tomatoes

 How are your gardens doing?  Are you running over with anything?  We aren't!  Rabbits, rabbits, rabbits.  Need I say more?  So I went to the farmers market today and picked up some tomatoes.  I know many of you have gardens and hopefully have a bountiful harvest, count yourself lucky!


These stuffed tomatoes are just an old standby but I was making them for dinner tonight, I realized, I had never shared with you.  I don't know if everyone makes them this way but I always have, probably always will.  I bet there is a million things you could do with this.  Chicken salad served in a hollowed out tomato would be good served on a hot summer day!  YUM!

There isn't much explaination.  Just when you think you have shared all the family and regular stuff you make, you realize you were wrong!  Thank goodness for you all, because these are really delicious.  Perfect for a meatless meal, or a meatless side dish. 

4-6 tomatoes
1 cup orzo pasta (measure before cooking)
2 T. butter
1/2 cup Parmesan cheese
1/2 tsp. Italian seasoning
1/2 tsp salt
pepper to taste
8 oz. ball of fresh mozzarella cheese (or more)

Bring a medium pan of generously salted water to a boil.  Add in your orzo pasta and cook according to package directions.  Drain well and put back in the pan.  Add butter, cheese, Italian seasoning, salt and pepper.  Mix until cheese and butter are melted.  Set aside.


Preheat your oven to 350.  Cut about 1/2 inch off the tops of the tomatoes.  Using a small knife run it around the inside of the flesh of the tomato and then use a spoon to scoop out the centers.  Be careful not to pierce the sides or bottom.  Set them into a cupcake pan.  I find it works best.


Slice the cheese into as many slices as you have tomatoes.  I did 4 tomatoes, there was a bit of stuffing left, so you might need more cheese for the extra 2 tomatoes.  Following me?  You will need one slice and one small cube for each tomato.   Take a small spoon and fill each tomato up 3/4 of the way.  Poke a cube of mozz in the center  and then fill to the top.  Lay a slice of mozzarella over the top.

Bake for 15-25 minutes.  Let the cheese get melted and ooze down the sides and for it all to heat through.  If you want the cheese browned on top, pop your oven to broil for a minute or two until it browns up.

Serve this next to a steak, a grilled piece of chicken, or with a salad.  It is a great meatless main dish or side dish!

ENJOY!


Wednesday, May 6, 2015

Chicken Parmesan Bake

This is one of my favorite dishes  I think it is a popular dish, that lots of people love, but don't always feel like dealing with the whole process.  Well, I am happy to tell you I took the process out of it. 


Ok, I can't take ALL of the credit, my sister has a friend who has a friend who told her about this recipe.  I, as usual made some of my own modifications but, it will taste very much the same no matter how you do it   Originally I think the breasts were left whole, which just seemed like so much work.  If this was going to be an easy version, then it should already be cut up.  Right?  Wow, that sounded so very lazy of me.  The breasts I was working with (teehee) were huge (teehee again) and while I would use as many breasts as you have people, I used only 3 of these monsters.  Sorry, my maturity level is at an all time low lately.  Blame it on the grand littles.  HA!

You can use store bought sauce, or use your own.  We aren't having that battle tonight, I have been to busy, and don't have the strength.  I actually just laughed at that comment.  I used store bought jarred sauce for this recipe.  I could have made homemade croutons but, duh, this is supposed to be the easy version of chicken parmesan. 

Serve this over any pasta you like, I served it with rotini, and loved it.  In fact, I loved this so much, I might make it every week all summer because, I just like it that much.   Alright, that might have been a bit dramatic but I will be making this often. 

Oh wait did I mention the oven decided to stop working about 15 min after I put this in?  Yea, well, it will be fixed up soon, and I don't think 3 hours to wait was THAT long.  Do you?  HA!  Hopefully your oven isn't moody, and it will take the real amount of time!

You will need
3-4 chicken breasts, boneless skinless, cut into cubes
2 T. olive oil
1 T. onion powder
1 tsp. salt
2 tsp. dried Italian seasoning
1 jar of marinara (omg I can't remember the ounces)
1 can of tomato soup
1 T. sugar
2 cups shredded mozzarella cheese
1 cup parmesan cheese
1, 5oz bag of seasoned (garlic) croutons
Extra dried Italian seasoning

Preheat your oven to 350 degrees F.  Place chicken cubes into the bottom of a 9x13 baking dish.  Add olive oil, onion powder, salt, and Italian seasoning.  Toss the chicken to get everything seasoned up! In a bowl mix together marinara, tomato soup and sugar.  Pour over your chicken!


Now sprinkle liberally with your mozzarella cheese  Make sure to get the corners!  Don't let the corner people out!  Now top with your croutons  You could use the double the amount but trust me when I tell you this is enough even thought it may seem like it isn't.

I think this pic is upside down  Oh well, let's go with it, to change things up!

Now cover the top with parmesan cheese!  Then sprinkle on more Italian seasoning, a lot or a little the choice is yours, I did a LOT!


Now, bake this bad baby for 35-50 minutes  I know that is a large range of time but it just depends on how big your chunks of chicken are.  As soon as you are certain they are done, this is ready to eat!  If the top gets a bit, or starts to get a bit brown cover with foil for the duration of baking.  I personally am all about those really brown cheese bits.  Oh yea!

Serve with pasta of your choice or eat it alone!

ENJOY

Monday, December 29, 2014

Pizza Crescents

Well, hello again!  I hope this finds you all recovering from a wonderful holiday, with tons of food, fun, family, friends, and joy!  It was the Christmas of my dreams this year.  After almost 7 years I got to spend Christmas with my son and his family.  The best gift I received was to be able to watch them open gifts and share happiness and love.  What better way to celebrate the birth of my Savior!  Bliss, it was pure bliss.

After taking the week off from blogging, I wanted to jump back in with something perfect for your New Years parties or just if you are at home alone.  These are so easy, one of my sisters made them for our family Christmas a few weeks ago and I thought, I had to share them, they were so easy yet so good.  I did add a couple of extra steps, because, that is just how I roll.  It is the only thing I thought could make them better!  She had eaten them at a work party and had no idea what they were called, so I am calling them simply "Pizza Crescents".


These really couldn't be easier to make.  Just pick up a few ingredients and get to assembling.  They are addictive, you might want to double the recipe, because honestly, I think they would freeze like a dream for lunches, school, or adults, or snacks.  So just keep that in mind.  Bake them off as per the instructions, let cool and bag them up maybe 2 in a bag, my son would have loved these in his school lunch!!

This recipe yields 16 pizza crescents:

2 rolls of  refrigerator crescent rolls (8 per roll)
sliced pepperoni (I used 3 per roll so you will need 48 slices)
8 mozzarella string cheese sticks
3 tbsp. butter, melted
Italian seasoning

Preheat your oven to the recommended temperature on your crescent rolls.  Line a baking sheet with parchment or spray with nonstick cooking spray.  Cut all of your string cheese in half, and get your pepperoni ready to go.  Unroll the crescent dough and work with one at a time.  Lay the pepperoni at the wide end, and lay the cheese on top, and roll that baby up, nice and easy!


This is kind of a "rinse and repeat" situation.  Get them all filled and rolled and line them up on your tray.  Now, sprinkle with a little Italian seasoning on top.  You will bake them for the recommended time on the package.  I found that using the longest recommended time works best.  If it says 11-13 minutes, go with 13. 

 
While they are baking, melt your butter.  When they come out of the oven, immediately brush on a little melted butter and then sprinkle on some more Italian seasoning.  Let cool just a couple of minutes and dip in!  Make sure to serve with some pizza sauce or marinara sauce. DO NOT be tempted to add the sauce into the pizza roll.  I mean you can, but it is a hot mess friends.  Ask me how I know.  If you add enough for it to make a difference, that is!

Enjoy these as an appetizer, light lunch, kids lunch, or anytime.  I mean let's be honest with each other, there is never a BAD time for pizza!!

ENJOY!


Thursday, September 18, 2014

Meat Manicotti

I can't get enough Italian food.  I mean seriously, I can't.  Since living in New Jersey, close to my Italian relatives, friends, and coworkers, it has gotten worse.  Now that I live back in Nebraska, and have had long discussions with my dad about holidays, I finally found out that his family in fact, used to have Italian food for Thanksgiving and Christmas and a turkey, just because it was required, I guess!  My mother in law extraordinaire hosted the same kind of holidays.  All the fixins and an almost entirely different Italian meal as well!  My GOD, it was my dream come true.  The point is, when I returned to Nebraska, I made it a tradition for my family to always serve an Italian dish along with the traditional holiday spread.  This is one I serve often because I love it.  I usually do 2 separate kinds, one with meat and one with just cheese.  I am sharing my favorite with you today. 


I am a cheater with mine, I do not cook the noodles first.  Ain't NOBODY got time for all that shell ripping, slip sliding, filling of a wet noodle stuff.  Oh no.  Mine works out perfectly.  This is a large batch, it will fill 28 shells.  Feel free to halve the recipe.  Otherwise just divide everything between the two pans it will take!

Preheat your oven to 400 degrees F.  Get out 2, 9x13 pans and let's get ready to rumble!

For the meat mixture you will need:
2lbs ground beef
1/2 lb. ground pork
3 T dried Italian seasoning
1 T onion powder
1 tsp. salt
1/2 tsp. black pepper
1/4 cup grated parmesan cheese
3/4 cup ricotta cheese

In addition you will need:
28 Manicotti Shells
2, 23.9 oz. (approx.) of your favorite pasta sauce or homemade
1 14.5 (ish) can of petite diced tomatoes
1-2 cups water
2 cups shredded mozzarella cheese
extra parmesan for the top

Combine all ingredients for your meat mixture.   You can do it in a stand mixer or by hand, the choice is yours.  Set aside and add about 1 cup of pasta sauce to the bottom of each pan.  Spread it around so the shells don't stick.  In a large bowl combine the rest of the pasta sauce, diced tomatoes, and rinse those pasta sauce jars out with about 1 cup of water each and swish and add to the bowl.  Mix to combine and set aside. 

You can fill the shells with a small spoon but I prefer a pastry bag, so that is what I did.  You should have exactly enough to fill all the shells.  Don't over fill but make sure they are full end to end.  Fill a shell, place in pan, flip it to cover with some sauce and continue until all shells are filled.  Now take the sauce in the bowl and pour half over each pan. Sprinkle on cup of mozz over each pan, and grate or sprinkle a bit more parmesan on top for good measure. 

Now cover TIGHTLY with foil.  Place in the oven for 45-50 minutes and they will be done perfectly!  Remove foil and let cool for a minutes before serving!

ENJOY!!

Friday, June 13, 2014

Margherita Grilled Cheese Sandwiches

Hey friends!  Hope you are all well!  How is the summer starting off for everyone?  Storms and more storms, and more heat and humidity here than ever.  Joy, pure and utter joy.  NOT!


In the summer we do lot of sandwiches and salads.  Some days it is just to hot to cook a big dinner, nobody wants to heat up their house more than necessary when it is hot outside.  Am I right or am I right?!?!

I have been on a grilled cheese kick.  Experimenting with different things I like and other ingredients.  A margherita pizza any day, anytime, anywhere makes me happy.  I decided to just work those ingredients into my grilled cheese.  They were so good, I decided to share. it.  No big secret or back story, (for once, huh? HAHA)  Just a great, quick, sandwich that will fill your tummy and it might make you moan a little when you eat it.  I won't say if it does that to me, but, I know a few people who it might affect that way!

Be ready to see a few of my grilled cheese experiments.  Here are a couple you might enjoy that are already posts, French Onion Panino, or my  Cheese Frenchee!  We have been trying to have a meatless night or two a week and these cheesy treasures make it much easier!!

I prefer my grilled cheese on plain old white, doughy (not so great for you) bread.  You choose your own favorite!  This will make 4 sandwiches!

8 slices of bread your choice
8 slices of fresh mozzarella cheese
sliced tomatoes, as many as you want per sandwich
Fresh basil leaves, about 3 per sandwich (tear them up!)
Butter

I know, you know how this goes.  I butter my pan instead of the bread.  Layer cheese, tomato and basil.  Use a slice of bread, slice of cheese, then tomato, then basil, last slice of cheese and bread.
This makes the cheese act like a glue, and oh LAWDY, my mouth is watering.  Sadly, I am not joking.   Place in the pan, and cook slow!  That is the secret when you have multiple ingredients.  Let that cheesy goodness melt slowly and the bread brown perfectly and errrr meeh gerrrd!

I do like to add a little pinch of salt to the top of my tomato! 

Enjoy this simple supper or lunch!