Showing posts with label bacon. Show all posts

Saturday, October 1, 2022

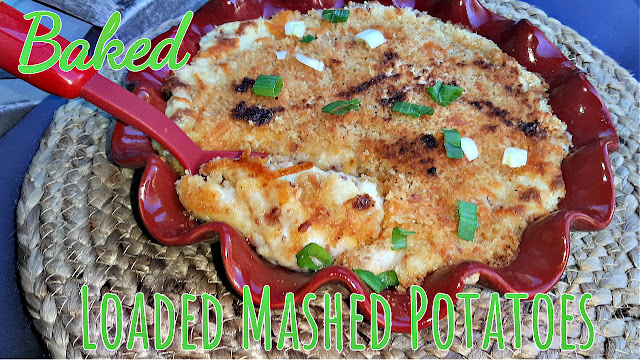
Loaded Baked Mashed Potatoes

 Good morning my friends, it is good to have you.  Welcome to my website!  Make sure before you leave to click the JOIN button!  No spam, no ads, and only an email update when I post if you wish!  I have over 600 recipes, here!  It kind of jars me to think about that number!

I pray this finds you all doing well and being happy!

This recipe is brought to you courtesy of my hubby.  He asked me if I could make mashed potatoes in the oven with bacon and cheese and something on top.... here it is.  These are AMAZING, and I am grateful he is so supportive and technically, my most viewed and popular recipe here on my website is HIS recipe for Baked Spaghetti and Stuffed Meatballs!  He knows his food let me tell you and I am never amazed at what he comes up with next!

Let's get to the recipe, shall we?

MASHED POTATOES

  • 4 med-large russet potatoes
  • 3 TBSP melted butter
  • 1/4 cup sour cream
  • 1/4-1/3 cup milk (depends on the consistency you prefer)
  • 1/2 cup chopped bacon pieces
  • 1 cup shredded cheddar cheese (reserve approx 1/4 cup for topping)
  • salt and pepper
  • 1 green onion
For the TOPPING:

  • shredded cheddar cheese (1/4 reserved from your 1 cup of cheese)
  • 1/2 cup breadcrumbs of your choice
  • 4 TBSP melted butter
Preheat your oven to 400 degrees F.  Get a pot of cold water, WELL salted, ready for you.  Peel your potatoes, and cut into about 1-inch pieces, they will cook much faster.  Keep them a pretty uniform size.  Bring your water to a boil and boil for about 10-15 minutes.  Check with a fork to see if they are done.  Drain and place potatoes into a mixing bowl.  Using a hand mixer, mash potatoes, adding in all of your ingredients, sour cream, milk, cheese, bacon, and pepper.  Mix until well combined.  Place into a buttered or sprayed (nonstick cooking spray) dish.  I used about a 9-inch round baking dish, use what you like.  Spread potatoes to cover.  Now, sprinkle your cheese on top evenly, sprinkle the breadcrumbs over the top, and drizzle it all with your melted butter.  Bake at 400 degrees for 25-30 minutes, until the top is golden brown!!!  When you remove from the oven, top with green onions and dig in!

Hope to hear from you if you try this recipe.  It is perfect next to a steak, a thick pork chop, a grilled chicken breast, and a salad!!

ENJOY!


Tuesday, October 4, 2016

Anna's Special Request: Hot Brown Copycat from Chik-Fil-A (Dwarf House)

This is a VERY special request.  I have been educated in so many ways with this recipe and the person who requested it!

There are so many of you that I have had the pleasure of "meeting" through messages, and a couple of you in person at Trader Joes!  You are all special, you all rock my socks off and without you, Chefwannabe would be pretty stinkin' boring.


So, last week-ish, I get a request.  "Can you make the Chik-Fil-A (Dwarf House) version of the Hot Brown"?  She continues to explain why she can't get one, "I am unable to leave my home due to cancer treatment and it is the one recipe I can NOT find online".  We discuss the dish, what is in it, how it tastes, how it looks, etc.  I ask her to describe every detail of it that she can remember.  Then we go on to discuss life, and her treatment, what kind of cancer she has, family, meeting our husbands, etc.  We became fast friends and learned we had a few things in common!  She said I could share her photo and so I want you to meet my new friend, Anna!  Gorgeous, inside and out! 

Here we are chatting it up and I am thinking, she is the one going through these trials, treatments and icky stuff, and she is making ME laugh!  In the short time we have known each other, it is clear she is a fireball, and her such a good heart, and sense of humor!

So, off I went to attempt to make this lady the dish she desperately misses!  Boy was I livin' on a prayer, I had NO idea other than what she said, and the photo of the dish what I was doing!  The good news is, I think I got it, she hasn't had it yet,  but my husband loved it as well!  Obviously unless you go grab nuggets from Chik-Fil-A, you aren't going to have the EXACT same taste but one thing I HIGHLY recommend is that you deep fry your nuggets or make homemade batter dipped ones.  I just used frozen, I wanted to get this knocked out as soon as possible for her.  But if you don't deep fry they will get a bit soggy and, in my opinion, not good.

Here we go!  This is not a traditional hot brown like the Kentucky Hot Brown, it is just a version from the Dwarf House she loves!  This recipe will serve 4 regular servings or 2 of the restaurant size servings! HA!

4 T butter
3 T flour
2 cups chicken stock
1/2 cup grated Parmesan cheese
PINCH of salt
16-20 chicken nuggets
1 cup shredded cheddar cheese
8 slices of bacon
buttered toast for the garnish

Prepare your nuggets and set aside.  The rest won't take long so they will be fine and the sauce will heat them back up!

For the sauce, melt the butter in a small pot.  When it is melted add the flour, and let it cook while you stir it for 30-45 seconds.  Add in your chicken stock and whisk until smooth and it begins to thicken.  When it is thickened add in Parmesan cheese and a pinch of salt and whisk until smooth and creamy.

The plating is where this all comes together.
1.  Place chicken nuggets on your plate.
2.  Ladle over the top some of your sauce.
3.  Sprinkle cheese down the center.
4.  You can microwave for about 20 seconds if you want the cheese to be completely melted on top.
5. Place bacon strips in the center.
6.  Add butter toast points all around.

This was awesome!  I made one large plate that my husband and I shared.  I hope it is exactly what you are wanting Anna, but if nothing else, it is an awesome treat of a dinner!

I hope you give this a try.  Let me know what you think and if you have had it from the Dwarf House, if it is even close to the real thing!

ENJOY and please keep Anna in your thoughts, your prayers!  Please send her love, light and healing vibes!

I think taking time to make my Batter Dipped Chicken Nuggets would take this OVER the moon!


Monday, December 1, 2014

Three Meat Quiche

Good Morning......err... wait, evening! HA!  Eggs, sausage, etc, had me thinking morning, but in reality, this can be eaten anytime!  This is my first quiche, ever.  It is true, I have never made a quiche.  Why not you ask?  No idea, none at all, just haven't. 


This was a request of my husband.  And how about this, I have him thinking like a food blogger/food stylist.  He asked me to not put the bacon inside but make the top a lattice work of bacon.  Genius.  He is adorable and he never ceases to throw out ideas for me.  I love that he is so supportive, I am grateful and blessed.  He is a meat man, so I made this a 3 meat quiche.  I mean, it is basically a savory custard, what have I been so afraid of?  I feel so silly!  This is EASILY made ahead if you are expecting company.  And how about lunch with a salad?!  Soup and some quiche, YES!

There are just a couple of things that need to be done ahead.  You need a pie crust, you can either buy one or use my recipe which is perfection, you can find  it here.  You need to blind bake the crust.   I baked mine at 425 for 12 minutes.  You need the pie crust to be baked so it will hold your custard filling and not get soggy!

While you have that in the oven, use 1lb, thick cut bacon and lattice it on parchment paper laid on a baking sheet.  (see photo) Bake it for 20-30 minutes, same temp as the shell, until it is crispy.  Remove from the oven and let it sit to cool so you can pat off the extra fat.  I can trimmed mine, so when I was ready it would fit perfect on top.  The trimmings you ask?  Cooks treat, duh!  Lower oven to 350 now!


Ingredients:
4 eggs
3/4 cup heavy cream
1/2 cup grated parmesan cheese
1 cup diced bacon
1/2 lb. ground breakfast sausage, browned and drained
1 lb. thick cut bacon
1 pie crust

Preheat oven to 350 degrees F.  In cooled crust, add in browned sausage and diced ham.  Spread evenly like this...


In a bowl whisk together eggs, heavy cream, and parmesan cheese.  Pour over the meat in the pie crust.  Bake for 30-40 minutes, or until set.  You should be able to insert a knife and have it come out clean.  Let it sit for 10 minutes.  Lay your latticed bacon that you have patted dry of extra grease over the top. 


ENJOY!!


Thursday, July 17, 2014

Crockpot O' Pintos

Ahh, so we meet again.  Me....and the bean. I mean, you and I as well, but that is a beautiful meeting.  Me and the bean have not had a relationship for 40 years.  I want to love the bean, my health wants to love the bean, and always having to pick beans out of chili at the parties of friends and family gets tedious.  This recipe, didn't make me love the bean any better. 


Let me clarify.  This is a great recipe.  It is especially great for someone who loathes beans, but wanted to learn to make a good pot of beans and has no idea what a good pot of beans tastes like.  Phew, did you get all that?  I listened to a lot of your comments and advice.  I even attempted this "method" that would make the room smell nice even after consuming the beans. 

Let's just cut to the chase.  I hope you give you these a try.  They are crockpot friendly for all of you crocky lovers out there and I hope you enjoy them as much as the beans lovers in my family did!

This is a bit of a process at first, but, well not really.  Ok for some of you it might be but just do it.  Trust me.

First off you will need:
4 cups dried pinto beans

Rinse these in a strainer.  Pick out any rocks, odd pieces, I even have heard of there being sticks in them.  Just clean them up and rinse a couple of times.  Now place in a pot, and cover with water.  Make sure the water comes up a few inches higher than the beans.  Place on high heat and bring to a boil.  Let boil for 5 minutes.  Immediately drain the water.  It will be brown and gross looking.  This is "supposedly" all the toxins that will keep your house from blowing up with gas from whoever eats these!   Now, rinse the beans again.  Place back in the pot, cover with water.  Again, make the water a few inches higher, cover and let sit for at least 8 hours.  Overnight is awesome, 12ish hours is even better. 

Now get up, get yourself going and get your crockpot out.   Here is what you will need for the rest:

1 ham bone (ham hock or bacon will work too) 
2 medium onions, peeled and quartered
2 cups beef stock (use veggie or chicken if you choose)
2 cups water
1 tsp. minced garlic
1 tbsp. chili powder
1 tbsp. cumin
2 tsp. oregano
1 tsp. salt
1/2 tsp. black pepper

Place beans in your slow cooker.  Add stock, water, and all seasonings.  Stir it up and then nestle your onions and ham bone down in the beanie bed of love.  Put the lid on, set on high and let it rip for 8 hours.  If you need to add water as it cooks, please do so.  (or stock).  Serve as you wish.  With cornbread, with cheese, with cilantro, with anything you please!


You can feel free to smoosh the life outta these babies, toss them in a skillet with a bit of oil, and make some homemade refried beans!

ENJOY!

PS.  What I failed to tell you when I wrote this post was that I actually used a CORNED BEEF for the first 2 hours.  I had leftover corned beef in the freezer sitting right next to the ham bone.  I saw pink and tossed it in.  When I went to stir it, I was like...hmm, this is NOT ham.  Holy cow, it was in fact, corned beef!  Of course this was after I forgot to turn the crockpot ON for an hour.  UGH!  See, everyone makes mistakes, especially in a hurry.  Moral of the story, MARK YOUR ZIPLOC BAGS! HAHA!


Monday, March 3, 2014

Geo-Normous Breakfast Casserole

And GEO-NORMOUS it is!  Ok so it is Ginormous but since this is hubby's recipe, he gets to call it Geo-normous!


He has been telling me "you don't have a breakfast casserole on your website", because, I guess he trolls my website for hours at a time and checks on these things! ROFL.  Seriously, do you guys know how fun and hilarious this guy is?  Anyway, so he said, just make something easy that anyone could make and that will feed a ton of people.  My response was "Ok, give me an ingredient list and I will work it out".  I guess he didn't realize how easy a breakfast casserole would be to make!  He gave me his list, and I picked it up.  Now fast forward to today, when I finally made it.  SO good, so perfect for a crowd.  SO PERFECT for making ahead, so perfect for...everything!

You might shriek at the ingredients.  Keep two things in mind, 1) a man requested this and these ingredients, and 2)this should feed a good 8 people.  I would serve this with some bread and some fruit and call it breakfast!

Heeeeeeeeeeere we go...............!!

14 eggs
1 cup milk
1 tsp. onion powder
salt and pepper to taste
1 lb. pork sausage, browned
1 lb. bacon, fried crispy and then cut into small pieces
2 cups cheese (your choice, I went with cheddar)
1 pkg (just short of 2lbs) shredded hash browns.

Preheat your oven to 375 degrees F.  In a frying pan, brown sausage, when it is done, remove and place on a paper towel lined plate.  In the same skillet, crisp up your bacon well.  Crumble or cut into smaller pieces when cooled and drained of grease.  Now brown off your hashbrowns, in 2 or 3 batches.  When they are done, place them in the bottom of a 9x13 (ish) pan that has been sprayed with cooking oil.  Spread them out evenly and sprinkle on the sausage and bacon.  Now in a bowl combine the eggs, milk, onion powder, salt and pepper and whisk well.  You could even use a hand mixer to incorporate a little more air into these eggs.  Gently pour over the ingredients already in your baking dish, top with the cheese  and bake 30=35 minutes. 

Now, put on the coffee and dig in!

Wednesday, August 14, 2013

Bacon Cheddar Burger Roll

Good evening my friends!  Hoping you are all well, healthy and happy!!  If not, maybe this recipe will be just what you need!!


I am admittedly not the biggest fan of the burger.  They always seem dry and there is just to much of it.  I love thin, thin, THIN patties.  My husband likes a thicker burger.  I mean, who can keep track?  With this burger roll, you don't have to!  Everyone's burger is done at the same time, and you can cut them as thick or thin as YOU prefer!  Already filled up with bacon and cheddar, I mean, it has to be delish, and it is!  I thought of a ton of variations on this, most importantly, Swiss cheese and mushrooms!  That will be the next one, it is hubs favorite.  You could do turkey burgers and fill them with veggies, ham and cheese, ohhhh yea......  Ground chicken, filled with ham and cheese for cordon bleu burgers! AAHHH!!

You get my point.  If you dislike the burger, like I do, give this a go, you might feel differently.  Can you think of any other variations and fillings??  Let me know!  I know this might seem a bit of work, but it really isn't and the presentation is so stinkin' nice.  Ya know?  I can remember my dad teasing my mom always telling her that her food was amazing but she could work on "presentation".  HA.  Men! 

I think this could just as easily be sliced, and served with potatoes and veggies.  It is all up to you guys!!

2lbs ground beef
2 tbsp. of your favorite seasoned salt
1 tsp black pepper
1 tbsp onion powder
1 egg
1/2 cup bread crumbs
8-10 strips of bacon, cooked crispy and crumbled
2 cups grated or cubed cheddar cheese

Mix all ingredients except bacon and cheese.  When they are thoroughly combined, turn your mixture out on to a sheet of tin foil.  Flatten it out, as thick or thin as you want, just remember you will be rolling it and you need it to stay together so not to thin!  When it is pressed out to your liking, top it with the cheese and bacon.  Then using your foil as support, start rolling the meat.  Just keep pulling over the foil and then pull it out so it doesn't get stuck, continue until it is all rolled up.


When it is done, carefully move it to a cookie sheet.  *or start with the foil already ON the cookie sheet so you don't have to transfer it*  Make sure it is seam side down and close up any holes that might have been made. 

  
Place it in a preheated 375 degree oven for 40-50 minutes.  Let cool for 10 minutes before slicing.

I hope you enjoy this recipe and make sure to let me know if you make it and how you adjust it to your taste!!
 
Your "now loves burgers" Chefwannabe


Wednesday, July 10, 2013

Creamy Broccoli and Cauliflower Salad

I have made it a point to open my mind up to salads.  You may or may not know, because I MAY or may not have made it clear how I feel about salads and casseroles.  Don't give me any flack, I know, I know, most of you love them both.  But if you read the first sentence, you will see, I SAAAAIID, I am opening my mind.  Albeit, slowly, I AM opening it. 


This is another summer salad.  In my mind, some salads are for winter and some are for summer.   Remember the heinous cabbage, carrot, jello salad I mentioned before?  Yea, that graces the table at Thanksgiving only, so, a winter salad.  This is one that I think would be great for your garden produce and has some nice crunch and texture.  This is a bit of a "take" off of a recipe I have seen at many a potluck, many a funeral dinner, and many a family get together.   As I have mentioned before,  I come from a family of salad lovers.  I mean, REAL salad loving peeps.  I sometimes shutter at what the next salad might consist of.  Dramatic?  Maybe.  But, true. 

This salad needs to chill an hour.  More is fine, less is probably fine, but, an hour seems to make it perfect to me. 

Some people add raisins or craisins.  I won't even go any further into it, I loathe both, and thus, did not write them in, because this is MY version and NOTHING in my life, includes either raisins or craisins.

You will need:
1 medium head of fresh broccoli, cut into small florets
1 medium head of cauliflower, cut into small florets
3/4 cup good quality bacon bits or fry your own
3/4 cup sunflower seed kernels
small red onion, finely minced

Combine all ingredient in a large bowl.  Set aside to prepare dressing.

Dressing:
1/2 cup sour cream
2 cups salad dressing
1 envelope of ranch dressing mix

Mix in a small bowl until all ingredients are well combined.  Pour over the veggies and toss. 

Chill 1 hour. 

 
Your "do you tell your kids broccoli is little trees?" Chefwannabe

Friday, May 24, 2013

Brussel Sprouts with Bacon

Finally, we see the SUN!  This cloudy, dreary stuff was on my last raw nerve and quite frankly, I am tired of it!  Give me 20 degrees, just GIVE ME SUN!  I love spring, I love tulips and I love peony's and I love fresh air and green grass.  I am in heaven this time of year!! 


So how do YOU feel about brussel sprouts?  I swear, I have turned every brussel sprout hater into a lover after they eat these.  The funny part is, they aren't anything spectacular, nothing I am sure a bazillion other people don't do.  I think the problem lies in the preparation of the actual brussel sprout.  People get it mushy or crunchy, no happy medium.

Now, to prep the brussel sprouts, you will choose either fresh or frozen.   No turning your noses up, frozen is fine.  Trust me.  They will retain a nice bright green color too!!  No icky, nasty dark mushy green syndrome here!

You will need approx 3/4 to 1lb of brussel sprouts. 

FROZEN- Take out of the freezer and microwave 2 minutes.  Leave in the bag until ready to saute.

FRESH-  Clean the outer leaves off if you need too.  Place into salted boiling water, boil for 3-4 minutes.  No more, no less.  Drain. 

In a large skillet, add in 1 tbsp butter, 4 slices of bacon that you have cut into small pieces.  Saute for 3 minutes. 


Add in drained brussel sprouts and saute another 3 minutes.  Crack some fresh cracked black pepper over the top and serve!


Trust me, this might just turn your brussel sprout hating family/friends into brussel sprout lovers.  I mean if bacon doesn't help turn them to the sprout side, NOTHING can!!

Your "thank GOD for brussel sprouts" Chefwannabe


Monday, May 6, 2013

Blue Cheese Potato Salad

As most of you have probably noticed by now, this blog is really a family affair.  I am blessed to have a great husband great family who share their recipes, their food and their ideas!  I truly am thankful.


My husband works with a great group of people.   He is always discussing and sharing food ideas with them and Tyler, who works with my husband emailed me this potato salad recipe.  He was telling my husband how amazing it was, and wanted me to try it.  It is a newspaper clipping so I am not sure who the originator is, however I made a few changes anyway.  I wanted to use a few things I had on hand and sort of change up a few things so my husband would eat this.  I don't do blue cheese, so I counted on his refined palette (did I really say that?) to give me the bottom line on this one!  And yes honey, I was KIDDING.  I know he is on his lunch break at work, reading this.  I KNOW he is. 

This recipe calls for minced onion, I grated mine, you all know how hubs and I roll when it comes to onions.  It also called for a particular kind of blue cheese, and honestly I don't think it matters.  It also called for small red potatoes, to boil them, slip the skins off and dice them.  Oh for the love.....just use plain potatoes!  Make sure to add the dressing while the potatoes are still warm, so they soak it all in!  Oh wait I forgot, I substituted dijon mustard for country dijon (grainy) mustard.  And I omitted lemon juice, because you all know, I don't do lemon juice in anything savory.  No. Can. Do. 

My husband says, and I quote, "possibly the best potato salad I have ever eaten".  So there ya go.  Give it a try!! 

Blue Cheese Potato Salad
2 lbs potatoes (peeled and cubed)
4 slices of bacon (fried to crispy and drained)
2 tbsp grated onion
1 tbsp Dijon mustard
1/2 tsp garlic powder
2 tbsp sour cream
1 tbsp canola oil
2 tbsp Hellman's
2 tsp cider vinegar
Salt and Pepper to taste
4 ounces crumbled blue cheese of your choice

Fill a medium pot with water, salt liberally and add in potatoes.  Bring to a boil and cook for 5-10 minutes depending on the size of your cubes.  While they are cooking, in a small bowl add in grated onion, mustard, garlic powder, sour cream, canola oil, Hellman's, cider vinegar and salt and pepper.  Whisk until combined and set aside.  Drain potatoes and put back in the warm pot.  Pour in dressing and carefully toss, don't break up the chunks!   Add crumbled bacon and blue cheese in and continue to mix.  Refrigerate at least 4 hours before serving. 

I hope you enjoy this potato salad.  Thank you Tyler for sharing your recipe!!

Your "it is almost picnic time" chefwannabe


Tuesday, February 5, 2013

Crock Pot Chicken and Tots (this is SO hard for me)

It is the moment you all have been waiting for. I had to gather strength, and courage for this one. Don't laugh, you know how difficult this chapter in my life is. I looked at it, I even moved it around a few times. I talked to it, I yelled at it. But the time has come, that we have united, for a greater cause. Me and my crocky (crock pot) have come together, on good terms to assist working parents, or anyone who needs a one pot kind of situation.


You all know how I feel about crock pots. Crocky overcooks everything for me. I don't like fork tender, smooshy roast. In fact, I am not a huge roast beast fan at all. Crocky for me, is good for 2 things. Keeping chili hot during a Philadelphia Eagles game or keeping meatballs warm, during a Philadelphia Eagles game. I have nothing against anyone who loves their crocky. I get it, I really do but that doesn't mean I LIKE it. Ya know?

A fellow blogger said she was making this recipe once and it sounded interesting enough for me to bring crocky out of hiding. It turned out OK. It feeds a small army so I might make only half of a recipe if I were to do this again. I think it will be a hit for all of you with kids or hearty appetites to feed! I served it with some biscuits and green beans.

I am going to tell you how to make it, but if I break out in a sweat, and begin to shake, just know...this to shall pass. I get nervous around my crock pot! Oh yea and you just can't photograph stuff in a crockpot well. Not this anyway so I don't apologize for this crap photo. What do you expect from a crockpot?!

32 oz bag of seasoned tator tots (you can use plain, seasoned is just better
3 cups of shredded cheddar cheese
4 boneless skinless chicken breasts cut into cubes
6 strips of bacon (fried to extra crispy and crumbled)
1 cup of milk
1 tbsp onion powder
1 tbsp all purpose seasoning
salt and pepper to taste

If you have the plastic bag like crock pot liners, this would be a good time to break those bad boys out. Cleaning this up is NOT fun.

You will layer your ingredients. First layer half of your tator tots in the bottom. Add 1 cup of cheese and 1/3 of your bacon. Next layer your cubed uncooked chicken, season the top of the chicken with onion powder and all purpose seasoning, 1/3 of the bacon. 1 more cup of cheese, the second half of your tator tots, the rest of the cheese and then rest of the bacon on top. Pour over 1 cup of milk and cover.

Salt and pepper each layer as you see fit. Cook on high for 4-5 hours, or on low for 8 hours.

We really liked this. Again I am not sure where the recipe came from, just came from a friend but I understand it is a recipe that has been around awhile. I hope you enjoy it. If you don't, I am only the messenger. We will find the creator together! HA!

Your "does naming my crockpot, Crocky mean I like it" chefwannabe
 

PS. Serve with a dollop of sour cream on top!

Thursday, November 29, 2012

Loaded Twice Baked Potatoes

Yes I did say, "loaded".  How else are you supposed to eat a potato?


I have been getting sick of the same old hum drum potatoes.  Baked, mashed, scalloped, Au gratin, hash browns, yadda yadda yadda.  I realized in a moment of desperation, that I have never made a single, solitary twice baked potato.  Is that odd?  I feel like it is.   Anyway, I rectified the situation, and actually had another "first" in my life.  A potato EXPLODED in the oven.  Whaatt???  Only one out of the 3 I had in there exploded.  What a mess.

I roasted my potatoes in the oven.  You can do yours in the microwave if you like.  It makes no difference, just do not under cook them, and don't overcook them.  K?  I used medium size baking potatoes, but would rather have had larger potatoes.  Remember you get 2 servings from one potato, ALTHOUGH...I foresee making these again and making extra and freezing them.  Why not?!

You will need: (yields 6 servings)
3 lg potatoes, baked and crumbled
3 strips of bacon, fried
3/4 cup shredded cheddar cheese, divided
1/4 cup sour cream,
1/4 cup milk
2 green onions finely chopped
Salt and Pepper to taste

Preheat your oven to 350.  Cut your already baked potatoes in half and carefully scoop out the insides into a bowl.


When all potatoes have been scooped out, mash the potatoes with a masher or hand mixer until broken down to your liking.  Add in 1/2 cup shredded cheddar cheese, sour cream, bacon, green onions and milk.  Using a spoon combine until all mixed.  Add salt and pepper at this time, to taste.


Carefully refill each potato boat equally.  Use remaining 1/4 cup shredded cheddar cheese to top each refilled potato.  Bake 20-25 minutes or until cheese is melted and the whole thing is heated through.  Top with green onions if you like. 


Note: If you bake and refill the potatoes ahead of time, they will take a bit longer since they are starting from a chilled state.

I hope you enjoy these as much as we did.  They make a great side dish to almost any meal! 


Your"how many ways to make a potato"chefwannabe

Monday, September 24, 2012

Start YOUR day with a McGeorge!

We meet again........odd how that happens isn't it? :)

You know for the first time, I caught so much heck for a recipe I posted.  So let me clear a few things up from this point on.  First off, all things in moderation.  I was referred to as "killing children" with my Alien Hot Dogs and Spaghetti recipe, it is recipes like that, that are "handing children heart disease".  Oh for the love of all that is holy people, there are a few things you need to understand.  1. MOST kids love hot dogs.  2. It was a fun Halloween or special day kind of recipe.  3. Some people, feed their children what they can afford and don't have so many choices in their diet.  Let me rephrase, they have choices, but perhaps, not as many as your finances afford you.  4. I try to write recipes for ALL walks of life and ALL sorts of people.  And last but not least, if you don't like a recipe, skip over it.  What is the need for the negative, nasty, plain old rude comments?  Not in my house folks, I respect everyone's opinions but rudeness is not, and will not be ok here.  I believe any food I make at home, and don't buy frozen, or canned, or prepackaged is ALWAYS better because I know what is in it and it isn't full of chemicals and preservatives.  At the same time, I use my share of canned or prepackaged items for quick meals.  I don't all the time, but let's be honest, we all have times we need things in a hurry.  Stop judging, as my husband always says, "When you point a finger, you have 3 more pointing back at you".  Keep it in mind and just enjoy the friends, the food and the laughs.  Does it need to be harder than that?  No!

 
Ok now that I am done with THAT.  Let me get to the recipe.  It isn't really a recipe, it is more of an assembly but, sometimes, you need some assembly recipes too!  I will tell you, I am a sucker for a good breakfast sandwich.  I like almost any sandwich.  Sue me.  These are awesome and my husband used to make tons of them and put them in the freezer.  If we were in a rush, we could zap them in the micro and head out the door or take them to work/school frozen and heat them up when we got there.  And we would have these for dinner just as often as we had them for breakfast! 

So we decided we needed either smaller English muffins or a jumbo muffin tin which I am going to pick up this weekend.  It really doesn't matter that the egg is smaller, just want it to look nicer.  Hubs always does the eggs in a muffin tin and bakes them.  This time he used cupcake liners, I assured him it would never work.  I even laughed saying, "ok but when we have to make another batch because you can't get the papers off don't forget I told you so".  Alas, it worked.  He did spray them I think with nonstick spray though.  Actually it worked REALLY well. 

You will need:

English Muffins
Eggs (however many sandwiches you want to make)
Meat (sausage, bacon, turkey bacon, ham, or skip the meat)
Cheese  (I use the "not cheese" singles because they taste most like the McDonald's version, use any cheese you like)
Butter

Preheat oven to 375 degrees.  Line cupcake pan with liners and spray with a light coat of nonstick cooking spray.  Crack your eggs into the cups.

Now take a skewer or toothpick and just break the yolk, no need to scramble it, unless you want but just break it.  He was adamant I not forget that part!  Bake in the oven for 15-20 minutes.  You will know when they are done, they will be all white and firm to the touch. 

While they are baking, toast muffins and butter liberally.  Prepare your meat, if you are frying it, baking it, heating it in the microwave, just get it hot!  Now for the hard part......layer it on the muffin however you like and enjoy!

I actually also made soup the same night, here is that recipe.  The Soup With No Name.

Easy as can be, but sometimes the simplest things we just don't think of.  I hope you enjoy them as much as we do!!

We figured the cost of these 12 sandwiches was around 6.00!

Your "don't tick me off"chefwannabe


Thursday, June 21, 2012

Hot Dogs...Smith style. SMITH DOGS!

Aren't there just some things you can do as an adult that you couldn't as a child, that make you think, "HA HA" to your parents?  Growing up in a large family, money was always tight.  My mom would buy the cheapest hotdogs known to man.  Only God knows what was REALLY in them and if you know, please, keep it that way, I don't need to know, I can only imagine.  Anyway, she would try cooking the on the grill, boiled in water, later the microwave.  Anything to make them taste better.   She succeded.  These are no way healthy, so if that is what you are looking for, you should go to a different recipe!  These were just something my mom made to make ingredients streeeetch and do the best she could in the kitchen for a huge family!


I called her tonight telling her what I was making for dinner.  Ultimately it was only because I had some leftover hot dogs to use up and had what I needed.  She told she can't remember how this idea was born but we laughed over how we could only use 1/2  slice of bacon per hot dog back in the day.  We had to make food go as far as we could and so half a piece of bacon it was.  This was my "HA HA" moment.  As we laughed I said, "One thing WILL be different mom, I will be using an ENTIRE slice of bacon"!  We laughed some more and reminisced some more.  Funny how you remember little things like that.  I did do the cheese the same, I mean after all, I couldn't change everything!

These are so easy to make it almost seems a ridiculous post.  However, sometimes the easiest and simplest things are the best!  You can make these with uncooked hot dogs or already cooked ones.  You could change it out to sausages or my choice would be all beef hot dogs.  I just wanted to make them like my mom did for you guys.  You could change your cheese out to real cheese instead of cheese slices too!  Lets get started on this easy but tasty way to serve a hot dog!

You will need:

Hot Dogs (however many you need!) and I would cook them first to be safe
Bacon enough for 1 piece per hot dog
Cheese slices


Prepare your cookie sheet first.  Cover in foil, and if you want you can use your broiler pan because these will get put under the broiler.  It just makes cleanup easier and I am all for easier cleanup!  Now take your cheese slice(s) and cut it into strips like this.  I got 6 strips from each piece.  Cut your hot dog down the center, not all the way through but the entire length.  Tuck in a piece of cheese.  You could use cheddar or any other cheese as well!  Do this with all of the hot dogs.

The only thing left is to take a piece of bacon, and carefully wrap each hot dog in it.  Starting at one end and wrapping it so it covers the hot dog completely.  Make sure that you end on the bottom or enough on the top for the bacon to stay put!  Place on your baking sheet of choice.


Set your oven to BROIL.  Keep the door open slightly and broil for 6 minutes.  Remove and flip the hot dogs, and broil for another 4-5 minutes.  If you want crispier bacon, add 1-2 minutes per side.  Serve alone or on a bun!!!

These are so much better than I remember them as a kid.  I haven't eaten on in 20 years at least and I probably won't make a habit of making them to often, but I have to always share dishes from my childhood.  I wish they were healthier, but they aren't.   I think I could do the same thing with little smokies for parties. 

Your "they are either your hell or your dream"chefwannabe
Chris

Thursday, June 7, 2012

Bacon Wrapped Roasted Chicken

Hello my beautiful foodie friends!

I am coming to you tonight from a place of sunburn.  I laid out at the lake with my sister today, and enjoyed the beautiful sunshine.  Only 2 hours out there and grrrr. So if you could see me holding completely still only moving my fingers, it is kind of funny.  My husband will have a cow and I will get the "lecture" so I tip-toed with the aloe gel into the bathroom slathered up, and came back to the computer.  All is well...as long as you guys don't tell, I am good!


Last night I had the bacon cravin'.  And I ALWAYS want chicken.  Is anyone else as big of a chicken fanatic as I am?  I just love it.  I prefer it over any other meat.  Well, I take that back, I love a good bloody steak too.  Anyway, I digress.  It is this delicious meal that came out of my craving that I want to share with you all.  (omg, my shoulder itches, I can't itch it...it will be excruciating!)

Also, I finally got the Northwoods Seasoning from Penzey's Spices.  One of my readers, whose name I can not recall kept asking me if I had tried it.  Well I got some and thought this was a great time to see how I liked it!  Delicious!  If you haven't tried it, you are missing out!

Here is what you need to get out of the freezer, fridge, wherever you keep it!

Boneless Skinless Chicken Breasts (however many you need)
1lb bacon
Penzey's Northwoods Seasoning (or any seasoning of your choice)
salt and pepper

Veggies - you can choose any you like, I used potatoes and carrots but you can use squash, zucchini, turnips, parsnips, celery root, eggplant, etc.  Cut into SMALL pieces.  This won't cook a really long time.

Preheat oven to 400 degrees. 

Cut enough veggies for the amount of servings you need.  I used 4 potatoes and probably 6 carrots.  Cut into smallish pieces, your chicken will only bake for 40 minutes or so and you want your veggies cooked through.  Put them in the bottom of a 9x13 pan or casserole, salt and pepper and set aside.  Oh yea, add some Northwoods to them as well!  DELISH!


Take a piece of your chicken, sprinkle liberally with Northwoods seasoning or any seasoning you choose, and use 2 pieces of bacon to wrap it around the chicken.  Do this with all of your chicken and place on top of the bed of veggies!


Bake at 400 for approx 40-45 minutes or until your internal temp on the chicken is 165 degrees.  Cover for the first 20 minutes and uncover for the last.  

I know many of you love these one pot, one pan jobbers.  It would make a nice quick meal for a family on the go.  Prep veggies the night before and put in a baggie, same with chicken, through it together and in less than an hour, you have dinner!  

I hope you enjoy!!  


Your "chicken and bacon and sunburns oh my" chefwannabe
Chris

Saturday, May 12, 2012

Breakfast (Pizza) For Dinner

Do you like breakfast for dinner?  I am learning people either love it or hate it.  My family LOVES it!  We are always up for a good breakfast for dinner but I wanted to change things up a bit.  

 
This was so easy and as you know (if you read my blogs and fb page) I am on a quest to USE UP what is in the cupboards and freezer!  The amount of food we accumulate is ridiculous! I refuse to throw things out, so this is what I came up with.  Where I used shoestring french fries you could use any sort of hashbrowns as well, just make sure they are thawed out!  (And eggs are on sale for .79 a dozen this week!)  
 
First thing is to make the crust.  My recipe for pizza crust is amazing, I promise.  The dough will be so light and fluffy you will want to use it for a pillow!  Click this link and scroll down to the recipe, Pizza Crust Recipe.  Next, fry up your bacon, I used a skillet because I made a terribly fattening, and unhealthy choice to use bacon grease to make my bechamel.  *plugs ears*.  You will find my bechamel recipe in the event you actually need one in my Croque Madam/Monsieur blog.  You will use the bacon grease in place of the butter.  Or clean your pan and start fresh with butter.  Make sure your bacon is nice and crispy, drain it on a paper towel and crumble.  Set aside for later use.  
 

Here is what you will need:
Pizza Crust
2 cups THAWED hashbrowns or french fries you have chopped into smaller pieces
1 lb deli shaved/thin sliced ham
5 strips of bacon fried and crumbled
5 eggs beaten with 1/4 cup milk/cream/half and half (add salt and pepper and hot sauce to taste if you like)
2 cups shredded cheddar cheese
prepared bechamel sauce
Green onions for the top (optional)
 
Preheat oven to 450 degrees.  Using a large cookie sheet sprayed with nonstick spray, stretch and pull your dough so that it goes up the sides of the cookie sheet a little bit.  


Pour your bechamel on top of the crust and spread evenly.  You may have a bit extra, depending on your taste or how big your pizza is.  Mine made a LARGE cookie sheet size.  
Add ham, bacon, potatoes, and half of your cheese.  Pour over your egg mixture.  Pour it as evenly as possible.  I started with 3 eggs and had to add more, 5 seemed perfect for my size pizza.  Top with the rest of your cheese like this...

Bake for 15-20 minutes.  Make sure to let cool 5 minutes before cutting.  This crust is fairly thick.  I would normally get 2 large size pizza's from this crust because I like a thin crust.  I wanted it to be thicker to be more like bread than pizza dough.  It is delicious and it will feed a crowd for sure!!  My husband even got a piece for breakfast this morning in a baggie with a love note on it.  Come on you know I am the perfect wife......pffttt.  HAHA   Oh did I mention he is so NOT used to breakfast he forgot to take it!!
 
So here is your final product...........does yours look like this?  You can add more meat, take away meat, whatever you want just like any other pizza.  This is what we like, you add or subtract what you like or don't like for your family!!  I topped mine with green onions after baking as well!


GOOD MORNING!!! Err....Good EVENING!

Your "to old to be this mixed up"Chefwannabe
Chris


Tuesday, April 10, 2012

Spaghetti Frittata

WOW!  What a whirlwind weekend.  Shopping until I literally dropped, cooking until I dropped again and then it is over!  I enjoyed time with my family and will do it all again.....next YEAR.   I think everyone was fed well, and I think the reinvention of my Key Lime Mousse Cheesecake was a hit.  I substituted all lime juice and zest in the recipe with orange.  Oh man, it was like a dream!   I turned a couple of brussel sprout haters into lovers with my recipe and with all that, I will declare the holiday a success!  I thought I would spend Monday just vegging but turns out that didn't happen so I thought today I would do that.  So far so good.  


I wanted to use up some leftovers and thought it was a good time to get this blog put up.   I know many of you are dealing with leftovers!  How many ways can you serve up leftover ham??  Bacon from the brussel sprouts, cheese from the mac and cheese and spaghetti from the night before Easter?  I have your answer right here.  Make a spaghetti pie aka spaghetti frittata!!  

This recipe will serve 4 and can be reheated or eaten cold.  I often make a frittata  of some sort on nights when I make a pot of soup.  Something you should keep in mind is that you can use whatever you want for this!  I used up some bacon, ham, spaghetti and cheese for this one.  You could use veggies of all kinds, spinach, arugula, you name it!  So this recipe is just a base, for anything you might want to create in your kitchen with your own leftovers!!

Here is what you will need:
4 eggs
3/4 cup milk
2 tbsp butter
1/2 cup grated cheese (I used cheddar)
3 strips of cut up uncooked bacon
1/2 cup ham  (chopped, diced, pulled apart, whatever!)
2 cups of cooked spaghetti or other pasta
1 green onion chopped
salt and pepper to taste

Preheat oven to 400.  In a bowl whisk together eggs, milk and salt and pepper to taste.  Melt butter in the bottom of a medium skillet.

 
Add in bacon and ham.  Saute for about 3 minutes.  


Carefully put your pasta in and spread out evenly over the bacon and ham.  


Sprinkle cheese over pasta and let cook for 2 minutes on med-lo.  Make sure not to really stir, just gently move around so spaghetti stays evenly distributed.  


Pour over egg mixture, let gently cook for 5 minutes.  Using a spatula you can pull the egg away from the side to let more uncooked egg get into the bottom.  Sprinkle some green onion on top just before putting in the oven!  After 5 minutes put into preheated oven for 5-10 minutes.  You will need to keep an eye on it and when it appears the eggs are cooked, remove.  Loosen with a spatula, it should be pretty loose already.  After it can move freely when the pan is tilted, let sit for 10 minutes.

 
Scoot out on to a serving plate and enjoy!  Remember it can be served warm or cold!  

Try this for breakfast, brunch, lunch OR dinner!  With a big pot of soup or with a salad!  The meat on the bottom gets crisp and acts almost like a crust, it is delicious!  I can't wait to see what YOU come up with to add to your frittata!

Your "even eggs are better with spaghetti"chefwannabe
Chris