Showing posts with label honey. Show all posts

Monday, May 6, 2019

Cafeteria Corn Bread

Once upon a time, in a teeny, tiny town in central Nebraska, there was a little elementary school with the best cooks ever!

Yes it is true, we had the best lunch ladies.


Now, I knew it couldn't be all that hard to make this to cafeteria lady perfection. One day, well let me start at the beginning.

I had been on the hunt for the perfect cornbread for a long while.  Perfect to me was sweet and NOT DRY!  No hunks of peppers, jalapenos or corn either!

I used to do a "Wednesday Morning Coffee Chat" on Facebook.  We at some point were discussing cornbread because I very much dislike dry tasteless cornbread.  I didn't grow up with it being made at home so maybe I just had no palate for it.  As I stated I loved the stuff we had at school, with chili!  So during the live chat I phoned my old Elementary School, asked for the cafeteria and asked for the person who had been in the kitchen the longest.  I got her on the phone and told her I was wanting to recreate it at home, and for my viewers and readers and she told me the secret.  Sugar, butter and honey.  Her exact words, "a TON of it".  In it, and on it!  Awesome I had my info and I could get to work.


Fast forward 2 years (LOL) when I actually started working on it.  At first it wasn't moist enough, then the corners didn't have that chewy done part we fight over on the edges.  She also told me they use JIF Cornbread Mix.  I forgot to tell you that.  How it ended up was the bit of honey IN the mixture gives you those crispy, chewy edges.  The sour cream gives it an incredible moist texture. which extra milk contributes to as well.  Just don't skip any steps and if you went to OES!    You will take one bite and instantly go back in time!

Here is what you will need:
Jif Cornbread mix
1 egg
1/2 cup Milk
1/4 cup Sour Cream
1/4 cup white Granulated Sugar
1 T Honey

Topping;
3-4 T Melted Butter
3 T Honey

Preheat oven to recommended temperature on the mix, mine is 400!  In a large bowl combine, dry mix, egg, milk, sour cream, 1T honey  and sugar.  Mix to combine and let sit for 5 minutes to rest.

Prepare an 8x8 square baking dish by spraying with nonstick cooking spray or buttering it.  Pour cornbread mixture into the pan and bake for recommended time.  The center may get a little dark and that is perfeclyt fine.  Test with a toothpick and when inserted it should come out with NO wet batter!

While the goodness is in the oven, melt your butter and honey together.  Be ready, if you miss the window of perfect timing, it won't work. (kidding)  When you take out the cornbread use a toothpick and  poke little holes all over that baby.  Then, drizzle that honey butter all over the top.  Don't forget even the tiniest spot!  Let sit for 5 minutes.

If this doesn't take you right back to Ord Elementary, I don't know what will!

ENJOY!


Monday, December 30, 2013

Sweet Garlic Chicken Drumsticks

Did you get stuck with the drumsticks as a kid?  WHY do people just ASSUME kids want or will eat, drumsticks?  My mom makes the best fried chicken this side of the continental divide and every dang time, when I was little I got served up a drumstick.  Please tell me this wasn't just at my house when I was a kid.  Tell me the rest of the children of the world got shafted of a choice and just got drumsticks too!?


Well, as luck would have it, in my older, young age, I love them.  I love white meat, I love dark meat, and now, I actually WANT drumsticks.  I have kind of been on a kick of trying to bring you recipes with affordable ingredients.   Chicken drumsticks are ALWAYS on sale at my food store and I thought I would grab some and make something delicious.  I can't help that it involves garlic, that is just something weaved into my genetic code.   My husband loves "sweet" with meat, which is not one of my favorite flavor combinations.  However, as I was taking these babies out to thaw, I was reminded of a wing recipe my sister Anne (#5) used to make, or made for me a couple of times, SO long ago.   So without asking her, because I know she will never remember, I thought to myself, "self, you can just do what you think she did".  And I did.  And it is awesome.


This is a great weeknight meal, quick and easy, and budget friendly.  A one dish pony, that is sure to please, because even when you think you don't have a choice, you find yourself choosing drumsticks!

Sweet Garlic Drumsticks:
12 drumsticks (use more or less and either double the recipe for sauce or keep it the same even if you use less)
1/2 cup vegetable oil (divided)
1/2 cup brown sugar
2 tbsp. soy sauce
1 tsp minced garlic
1 tbsp. honey
1/4 tsp black pepper

Preheat your oven to 350 degrees. 

In a large skillet, heat 1/4 cup of your vegetable oil.  Salt and pepper your drumsticks well, and in batches, brown them in your skillet, on all sides.  You aren't cooking them through, you are just creating a nice brown crust.  When they are browned, place into a casserole dish that is large enough to hold the amount of chicken you are using. Set aside. 

In a small bowl combine remaining vegetable oil (1/4 cup), brown sugar, soy sauce, garlic, honey and black pepper.  Whisk until completely combined and pour over chicken sparingly.  Using a pastry brush, brush each piece of chicken with sauce you drizzled, and then pour over more of the sauce.  Leave a small amount in the bowl if desired to brush over chicken when it is removed from the oven.  Not necessary but an option.  Bake for 35-45 minutes, make sure you have a safe internal temp of 165 degrees F.

Enjoy this easy, but delish chicken dish!  

Your "finger lickin' chicken lovin" Chefwannabe

Wednesday, August 28, 2013

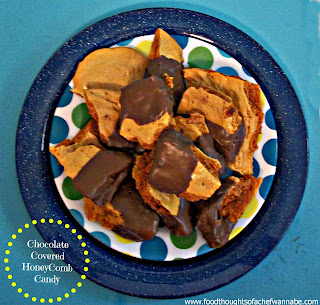
Chocolate Dipped HoneyComb Candy (Hokey Pokey)

I love this recipe.  I have been dying to share it and just never found the 10 minutes it takes start to finish to get it done.  Seriously, why can I sometimes just not get the easiest of recipes or tasks done?


I saw Nigella Lawson make this so long ago.  Her recipe calls for golden syrup, something I have been unable to find.   I know some people have been able to, but I can't.  I used honey instead, I mean it IS honeycomb, so it seemed, ya know, appropriate.  It worked great.  I burned the heck out of my first batch, so let me give you some advice.


1.Have EVERYTHING measured and ready to be used. 

2. When you add the baking soda, REMOVE the pan from the heat before you do so and whisk it as fast as you can in about 2 seconds and get it poured out.  When it begins to cool, your screwed.


3. Use parchment or tin foil, with a wee bit of nonstick spray on your cookie sheet


4. If you smooth it out, you will get a crunchier, more dense honeycomb, if you just let it flop out of the pan like a big giant blob, and let it go where it wants, not touching it, you will get a more airy honeycomb, which for the record is MY choice.


You do not have to dip any of this in chocolate.  I did. 

When the recipes says to add the soda when you see your sugar start to change color, I mean it.  I mean......like I MEAN it.  You will burn that stuff so fast you won't have any idea what happened or HOW it happened.  Trust me, experience speaking here.

So all that being said, this is so fast, so easy and just so fun.  Let's get you started, and DO NOT BURN IT!

1 1/2 cups sugar
4 tbsp. water
4 tbsp. honey
3 tbsp. baking soda

You need a large pan, because when you add the soda, this will bubble up like it is alive. 
Add in sugar, water, and honey.  Whisk until combine, turn heat to medium-low.  DO NOT walk away.  Do.  Not.  Walk.  Away.   Just whisk it and wait for the moment when you see even one spot begin to caramelize.


 REMOVE from heat, add in soda and whisk quickly, you don't want to over whisk it and lose your lightness. 

Just before it blew up all the way!
IMMEDIATELY pour unto prepared cookie sheet.  Let sit for 1 hour.  Then you can crack and break it how you want. 

If you want to dip in chocolate, just melt your favorite kind of chocolate and dip.  You can do the whole thing or half.  I thinned my chocolate melts out with a bit of veg oil to make it more workable.


I hope you enjoy this fun treat!!

Your "burnitupbetty" Chefwannabe

Friday, August 2, 2013

Cinnamon Scones with Cinnamon Honey Butter....

to slather ALL OVER these MOIST babies!!

Ever had a scone that wasn't a crumbly dry mess?  You know, when you have to swig your coffee, tea, or anything you can reach for in an emergency just to get it down the hatch?  Me either.  Until now.


I was asking about scones on my Facebook page.  I was interested in knowing if people were really into them or not.  I had personally never made them at home, but it seemed it was time to actually give it a go.  I was offered a recipe by a dear reader, Cathy Pepin, owner of Casa Chocolate Bed and Breakfast.  (check her out).  She said her guests at the bread and breakfast love her scones, and so I adapted my recipe from hers.  You know, I always have to experiment.   I made hers exactly as the recipe called for the first time, they were good, but I made them to thin, and they looked like bleh.  I was bound to try again!!!

You can see below who enjoyed most of them....*insert oohh's and awww's here, because I know Everybody loves chocolate!*


Anyway, I wanted a little different taste so I added a few things, but kept that same basic recipe.  I also wanted mine a bit sweeter.  With all that being said, I went for it, and, HALLOOOO perfect scones!

These are moist, and if you don't like moist scones, well, you must be nuts! These are fabulous and I included a bonus, of cinnamon honey butter.  I mean do I even need to explain how good THAT makes them?  Let's get the party started, shall we?

Cinnamon Scones
2 cups flour
1/2 cup brown sugar
1 tbsp. baking powder
1/2 tsp baking soda
1/2 tsp cinnamon
1/2 cup (1 stick) butter, cubed and frozen
1/3 cup heavy cream
2 eggs

For Garnish
2 tbsp. honey
1 tbsp. water
2 tbsp. cinnamon sugar

Preheat your oven to 400 degrees F.
You can do this by hand, in a food processor or in your stand mixer.  I did my food processor the first time, and my stand mixer the second time. (I prefer the mixer)  Take your heavy cream and eggs and whisk together in a small bowl, set aside.   In your mixer bowl combine flour, brown sugar, baking powder, baking soda, and cinnamon.  Let mix completely.  Add in frozen (or at the least VERY cold) butter and let mix until your butter is about the size of peas.  I had some that were a bit bigger, but hey, it all works.  I liked being able to still see bits of butter when I had them on the pan ready to bake. Anyway, when this happens, slowly add in your cream/egg mixture while your mixer is on low.  Mix JUST UNTIL COMBINED.  The less you work with the dough the better.  Just make sure all of the dry ingredients have been soaked up by the liquid.  If there happens to be some left in the bottom when you go to turn it out just knead it in a tiny bit.  Turn out onto a clean counter and press out into a circle, about 8 or so inches across.  You want the dough to be about an inch or more high.  There is no need to be meticulous here.  Cut into 9 triangles (like a pizza), place on a cookie sheet sprayed with nonstick spray and back 10-12 minutes. 

When they are done, mix honey and water and stir.  No need for perfection this mixture will just sweeten the top and help the cinnamon sugar stay put!  Brush on the tops of the baked scones and then sprinkle cinnamon sugar on top!


Let cool for 5 minutes before removing from the pan.  Now for the good part!!

Cinnamon Honey Butter
1 stick (1/2 cup butter) that has been softened
1 tsp cinnamon
2 tsp honey

Combine in a small bowl until all ingredients are mixed up.  Serve with scones and refrigerate unused portions!


Enjoy these anytime, they are faaaaantastic!


Your "1st time Sconer" Chefwannabe


Friday, March 1, 2013

Peanut Butter and Honey Stuffed French Toast

This is one of my happiest accidents to date.  (Minus the less than stellar photo, my apologies for that).  What you are all being introduced to as Peanut Butter and Honey Struffed French Toast, started out as a fried Pb and J!  It goes something like this...

 
I wanted to try frying a peanut butter and jelly sandwich just for the heck of it.  I wanted it batter dipped, not breaded though.  I made my sandwich and we only had strawberry jelly.  I wanted grape.  So, having grown up on peanut butter and honey I thought to myself, "Self, how about using honey instead, it will be awesome".  So, sandwich is made.   I decide on my batter dip, and get it all mixed up.  Remember I only made one sandwich so I wanted to get it right the first time.  I put it in my oil, let it work its magic, took it out and waaaa laaaa.  Perfection.  Almost.  It wasn't crispy, I WANTED crispy.  My husband comes walking in and says, "OMGOSH you made stuffed french toast?".  OMGOSH...I DID!  That is how this was born.  The story was amazing, right?  NOT.  But just goes to show, no matter what you do, you can rarely screw up so bad something won't work.  So I made a couple more, we drizzled on a little syrup, dusted on some powdered sugar and here you have it. 

Now, could you bake this?  No, you can't.  Not my version anyway, not with the batter dip.  I think if you used more of a custard, it wouldn't be the same, at all.  They take seconds to fry and heck, why not, right?  If you like peanut butter and honey, this is your sweetest dream come true, I promise!  Oh and see how I cut mine?  In our house, that means love!!! 

For your sandwiches you will need:
Peanut Butter (crunchy or creamy your choice)
Honey (could also use jelly if you feel so inclined)
Bread (plain in a bag sandwich bread, any kind you prefer)

Batter: (enough for 2 sandwiches, or 8 pieces)
1/2 cup flour
1/2-3/4 cup milk
1 tsp vanilla
1 1/2 tsp cinnamon
1 egg
Combine all ingredients in a bowl and set aside.


Get your oil in a pan and  heat it to 350 degrees.  While that is happening...

Make your peanut butter and honey sandwiches.  Peanut butter on one side and honey on the other.  Use a bit more than you might normally use.  Cut into 4 pieces, however you wish.  You know how we cut a sandwich into 4 pieces at my house!


Dip each quarter into the batter.  Just make sure it is all covered, and let the excess drip off for a second.  Place into your oil and fry.  This will literally take 30-60 seconds per side.  It simply depends on the temperature of your oil.  You have nothing to melt, or cook so when you achieve the level of "brown" you want, flip and repeat!  Drain on paper towels and serve dusted with powdered sugar and maybe a little syrup!!

Enjoy these for breakfast, lunch, dinner or a snack!!! Kids will love it and so will YOU!
 
Your "happy accident, is my middle name"'chefwannabe


Wednesday, February 20, 2013

Sweet Glazed Carrots

Are there certain vegetables and/or fruits that you like cooked, but not raw?  Or, enjoy raw but not cooked?  Maybe I am the only one. There are certain vegetables I will eat raw but just prefer cooked, including carrots.  Carrots are ok raw, but I LOVE them cooked.  Same with celery.  Now if you go glazing things up with some goodness, carrots get even BETTER!


These are just an easy side dish I have been making for a long time.  I use them mostly for holidays or special occassions but who says you can't have them more often than that?  I mean, if anyone can take beautiful, healthful carrots and make them bad for you, I can.  We established that long ago.  Hey, I am not necessarily proud, but in this case, I am dang thankful!

I was sure if I slathered some veggies up in sweetness and butter I could get hubs to eat them.  No go.  He declines them, with the most refined manners, every, single, time.  Secretly I am glad, because it means more for me.  So although these are a very easy side dish, I decided to share them anyway, we are all at different cooking levels and I think that anything that is this good, and this easy, should be a staple in your recipe collection!

These carrots are steamed or boiled to perfection, not mushy, not crunchy but tender on the outside with a WEE bite on the inside.  Then glazed with fabulous, simple ingredients that will make your company think you are a master in the kitchen!  I always top mine with a little chopped green onion!

Here is what you need:
1lb carrots, chunked (or I used a 1lb bag of baby carrots)
1/3 cup brown sugar
1 tbsp butter
1 tbsp honey
1 green onion/scallion chopped for garnish (optional, could use parsely or chives as well)

Place carrots in a medium saucepan.  Fill with water, add some salt, and bring to a boil.  After they begin to boil, keep boiling for 3-5 minutes.  This really depends on how you like them, so go longer if you like a softer carrot. Drain.  Put carrots back in the saucepan and add in brown sugar, butter and honey.  Toss until coated and continue to stir over medium heat for 2 minutes.  The sugar will be disolved and the glaze will be smooth.  Pour into a serving dish and top with chopped green onions/scallions

Enjoy these little bites of sweet goodness, and make sure to make extra, trust me, you will need them!!!

Your "sweet carrots, YES PLEASE" chefwannabe


Tuesday, April 24, 2012

Baklava, my way!

Hello everyone!  I am so sorry I haven't posted a blog for a few days.  Sometimes life gets busy and really cuts into my blogging time.  I will work on that, I swear!  


I feel kind of strange.  I have no funny stories about this recipe. I mean, usually something hilarious happens or there is a good history.   I forgot how hard it was to work with phyllo dough and just cussed alot.  I know, imagine it.  Anyway, I wanted, as usual to change things up.  I have never made baklava, only eaten it, and eaten it, oh and eaten it.  So here is what I came up with and I think it was dang good.   So get your baklava making pants on, you know the ones with a stretchy waist so you have room to grow as you pick and eat and pick and eat. Yeah!  Those are the ones.  You comfy now?

I had some serious camera issues during this experiment.  This is why the top cover photo, isn't just a piece, it is missing the glaze and the pistachio's on top.  Don't ask, just accept it.  It was a miserable camera day!  

Here is what you will need:
1 box Phyllo dough
3/4 cup roasted almonds
3/4 cup macadamia nuts-roasted
1 cup butter-melted
2 tsps cinnamon
1/3 cup brown sugar (can use splenda brown sugar)
3/4 cup pistachio's crushed (use a rolling pin to get them crushed)

Simple Syrup Mixture:
1/2 cup sugar
1/2 cup water
1/4 cup honey
2 tsps vanilla extract
Combine all ingredients in small saucepan.  Heat until it comes to a boil, only swirling the pan, and not stirring.  When it comes to a boil, shut it off and set it aside to cool, add vanilla at this time and stir!

Preheat oven to 350 degrees. Melt butter and using a pastry brush, brush the pan, bottom and sides LIBERALLY and set aside. In a food processor combine brown sugar, nuts, and cinnamon. Process until your mixture is in small bits, not completely mutilated, you still want SOME texture.


Use a damp CLEAN kitchen towel and roll out your phyllo dough on it.  Trim up the dough with a serrated knife if you need to, so it fits your pan.  Keep it covered it will dry out SO fast.  Using a pastry brush, brush butter on the top layer, cover the entire thing and then carefully place it in the baking dish.  


Do this with 10 sheets of dough.  Stacking them on top of each other.  Then sprinkle 1/3 of your nut mixture on top.  Layer 7 more sheets of dough in the same manner, brush with butter and place on top.  Then add another 1/3 of your nut mixture.  Layer 5 more sheets and then the rest of your nut mixture.  Add 3 sheets on top and you are done!

 
Make sure to cut your pieces before baking as it will be to brittle and crispy to cut nicely afterwards.  Bake for 25-35 minutes, when the top is nicely browned it is done.  Don't let it go to far, but make sure to let it get nice and brown, not just barely tan. 


You know what I mean?  I thought so.  
 
Now just as soon as you take it out, pour over the simple syrup mixture.  Cover the entire pan of baklava with it and here is the hard part.  Let it sit for at least 1 hour, 2 is better.  Let it cool COMPLETELY and the syrup to soak in well!  While the syrup is still sticky on top, sprinkle over crushed pistachio's.  *this particular photo, bombed, thus the top photo of the baked baklava with no syrup or pistachio's!  


I hope you enjoy it!!  We sure did!
Your "my husband loved it but called it MOCKlava" chefwannabe
Chris

Monday, April 16, 2012

Sopapilla Cheesecake

....and what a beautiful marriage it is!  I am going to try and keep myself calm, but I am a hot mess after tasting this dessert.  I was overly excited from the beginning, I don't think there are meds for it, so forget even suggesting it.  Now let me get started with where I found this dessert my HIGHLY adorable husband has deemed, "the best dessert you have ever made and I have said that about alot of them but I MEAN it this time".  Thanks Geo.  Your a dream.....

 
I am completely addicted to YouTube.  It seems as though I was a bit of a YouTube late bloomer.  I just didn't get what everyone found so addicting about it until a year or so ago.  Maybe not even that long.  One of the first cooking channels I found was Bettys Kitchen and let me tell you, *as if we have met before, which we haven't* she is the sweetest, kindest woman ever.  Her recipes are great, she explains in great detail what she is doing and why, which is excellent for beginner cooks.  I am a visual learner, don't give me a book, just show me.  If you are the same with cooking, she is your answer!  I was watching last week and this new video was posted.  I watched it and I couldn't NOT make it.  You all know that I usually only post original recipes, however, this seemed so worthy of sharing I had to email and ask her if I could do so.  This recipe was shared with her from a viewer who wanted to be called only, "Monica in Arkansas".  I am so glad she shared with with Miss Betty and I get to share it with you all.  Now about that YouTube addiction....I have spent plenty of  almost all-nighters there.  Did I really just admit that?  Oh well, chefwannabe fact #531, I sometimes don't know when to NOT share my shame.  

I did make ONE change.  Remember how I didn't know I was out of sugar?  Well, I had enough for the filling but not the top so I substituted brown sugar on top and holy brown sugar batman, I am never going to put white sugar on top!

Here is what you will need to pick up at the store, easy and cheap, just like..oh nvm.

2 8oz blocks of cream cheese
1 cup white sugar
1 tsp Vanilla Extract (homemade or store bought)
2 cans of crescent rolls
1/2 cup butter, softened
1 tsp cinnamon
3/4 cup sugar  (brown or white, I used brown)
1/4 cup honey

Preheat your oven to 350 degrees.  In a 9x13 baking dish, spray with nonstick cooking spray and roll your crescent rolls out to make a bottom crust.  Spread out the dough and pinch seams together.  
bottom crust

Set aside and make filling.   In a bowl combine cream cheese, white sugar and vanilla.  Use a hand mixer to obtain the creamiest texture possible.  Spread this out unto your bottom crescent roll crust. 
Filling spread on!


Take your second can of crescent rolls and roll out over the top, doing the same with pinching seems together and stretching it to fit.  I kind of did it on the counter and then picked it up and put it on.  Do the best you can, it won't be the end of the world if a seam shows, you can see a few on mine! Next, in a small bowl combine butter, brown (or white) sugar, and cinnamon.  Mix thoroughly and dot the top of the dessert with teaspoons full.  


They will all melt together so no worries, you will have plenty.  Here is the hard part.  You MUST let it cool COMPLETELY before slicing.  I know it will be hard, maybe you can vacuum under your bed or clean a closet.  You know.  The one that you need to wear a helmet to open the door?  By the time you are done, I swear it will be ready to dive into!!


Bake for 30 minutes.  Keep an eye on it.  It will seem a little jiggly when you take it out.  It is the butter, don't worry.  


drizzle honey!!
Take it out and immediately drizzle the top with your honey.  I might have added a little extra, totally unaware I was doing it....do you believe me?  Well it all worked out quite well!


I hope you take time to try this.  It is so easy and requires things you probably already have around the house.  


Do not delay, try this today!

Your "waiting for Geo to go to sleep so I can go sneak another piece"chefwannabe
Chris