Showing posts with label appetizers. Show all posts

Saturday, September 6, 2014

Turkey Stuffed Mini Pepper Poppers

Peppers, peppers, peppers.  I seem to have an overabundance.  Let me explain why that is an issue.  I have a love/hate relationship with peppers.  I love them raw.  I love the flavor, the crunch, and the freshness of them.  However, once they hit the heat, they get soft, maybe even a tiny bit slimy, and I just am in a weird place with them, once that has happened.  Stuffed peppers, YUM, except I only eat the middle out of the pepper.  Now, if they are chopped up, we have a whole new situation.  I mean, who is really THAT picky?!  Isn't it like being a person who only like corn ON the cob and not off?  Ridiculousness. 
 

That all being said, and explained, I love these.  I had intended to use jalapeno's with these, however, when the little sweet bells presented themselves, I knew for the crowd I was cooking for, they would be the best choice.  I wanted a hearty filling, one that could be used for a side dish, a light lunch with a salad, or even an appetizer.  A few of them were so small, I admittedly just popped them down the hatch, full throttle.   I am positive these would do great on your bbq grill too!

You will need:

1lbs sweet mini bell peppers (14-16)
1/2 lb.. ground turkey
1 tsp. salt
1/4 tsp. black pepper
1/2 tsp. onion powder
4 oz. cream cheese
3/4 cup grated cheddar cheese

Preheat your oven to 375 degrees F.  Cut the very tops off of your peppers and using an ice tea spoon or small dessert spoon, clean out the seeds and veins as best you can.  Set on a baking sheet.  Combine remaining ingredients in a bowl and spoon into a piping bag, or Ziploc bag with the corner snipped off or use the ice tea spoon to get these filled.  I used a piping bag, it was so quick, clean and easy.  Bake for 25-30 minutes, or until the turkey is cooked all the way through.  Let these sit about 5 minutes before eating. 

MMMMMM....mmmmmmmmmmmmm........GOOD!


Wednesday, July 24, 2013

Spicy Turkey Meatballs

Ahh, summer!  The season of parties, get togethers, family reunions, and all things party!  Is it any wonder you can't wait for school to start, just so you can slow down?  It is like needing a vacation from vacation.  Seems the summers are as busy or busier than any school year.


Do you always bring the same thing to parties?  You know the parties where you are asked or expected to bring a dish, or an appetizer, finger foods, etc.  Are you always pressed for time, or ideas and just end up stopping at the market on the way and buying something?  I will admit, it has happened to me a few times.  Sometimes it ISN'T my fault.  Just to clarify.  Regardless I am as guilty as the next guy for running into the store for some chips and salsa, chips and dip, some salad (gag), or a mix of all of the above.

I think it is important to have a few of these little party recipes in your arsenal, don't you?  These little cocktail meatballs are perfect, in a bowl, in your crock pot.  Yes, I said CROCK POT.  Smack a small cup of toothpicks by it and call it a party!  My husband thinks would go good on a little toasted roll for sandwiches as well.  They definitely have a kick, I rarely give you spicy recipes, but this one, you can adjust the amount of heat, but come, just do it!   These are quick and as I mentioned, you can simmer them on the stove, OR throw them in your crocky and set it and forget it!

Meatballs (makes 36 meatballs)
1 lb ground turkey
1 egg
1/4 cup breadcrumbs
1 1/2 tsp horseradish (not the sauce)
2 tbsp. grated onion
1/2 tsp black pepper
1 tsp salt
2 tsp hot sauce (I use sriracha)
2 tbsp vegetable oil

Preheat oven to 400 degrees F.  Mix all ingredients until completely combined.  Form into meatballs and place on cookie sheet.  Bake for 10-12 minutes. 


They may NOT be done all the way at this point but it is OK because they will simmer in the sauce at least an hour where they will finish cooking!

Sauce
1 cup catsup
3/4 cup water
2 tbsp. brown sugar
1/2 cup of you favorite BBQ sauce
1 tsp yellow mustard
1/2 tsp hot sauce
1/4 cup vinegar

Combine in a medium saucepan and bring just to a boil, add meatballs and turn to low, cover and simmer for at least 1 hour.


If using a crock pot, prepare sauce in the crock pot, turn to low and add meatballs, let go for 4 hours, you can serve right from the crock pot as well!
This is just one of those dishes that gets better the longer the meatballs sit in the sauce.  Make them the night before and reheat the next day even!

Your "pickys are my favorite kind of food" Chefwannabe

Thursday, June 13, 2013

Fiesta Taco Dip

Hola!  Again, I have to stop there.  It is the limit of my Spanish writing abilities.  Does this recipe even qualify as Spanish?  I doubt it. 


I am a fan of Mexican food in general.  I like authentic Mexican food but I got to tell ya, and I am not ashamed, I am a bigger lover of Americanized Mexican food.  Does that make sense?  Does it make me a horrible person?   Like I said, I love authenticity in food, especially Italian food, I DEMAND it, usually.  Mexican food, not so much.  However, give me a good dip, a fat burrito, maybe even some loaded nachos and  a sombrero, and I can rock it! 

Wait, did I actually forget to say a corona with lime?!?  I am failing..........fast!

Regardless, this recipe is awesome, and it is a recipe from my bestie, Mel.  She used to bring this to my house for parties, or make it on long nights when we would stay up talkin' girl stuff and devour a boatload of this stuff!   This is an easy dip, no bake, no fuss, just a few ingredients and it will please a crowd for sure! Grab a back of tortilla chips and you are out the door!  Here is the recipe..

1 8oz pkg softened cream cheese
1 8oz jar of taco SAUCE 
1-2 cups shredded cheddar cheese (fine shred)
2 roma tomatoes, diced
1 4oz can of green chili's
1/2 cup black olives (optional)
1/2 cup green bell pepper, diced (optional)

In a bowl combine cream cheese and taco sauce with your hand mixer.  Mix until creamy and light.  Spread mixture into approximately a 9x9 baking dish or casserole.  I used a round, you can use round or square.  Now cover the top with your grated cheese and refrigerate 30 minutes.  Sprinkle the rest of your toppings on top.  I like to put the green chili's on the outside in a ring to just make it prettier.  I did not use olives and green peppers on mine but those toppings are optional.  Refrigerate until ready to serve. 

I would not make this WAY ahead or you risk the tomatoes going mushy in the refrigerator.  I loathe mushy tomatoes!!  OR, as I did tonight, just put the cheese on top and save the rest of the toppings until just before you serve.  I need one for Tuesday so that is what I did as well. 


Enjoy this easy, yummy dip!!

Your "I love pickys" Chefwannabe

Monday, April 22, 2013

Cheese & Apple Cups

Happy Monday friends!  This blog post is SO special to me and especially to my husband.


I had told all of you on my Facebook page about my late mother-in-law's recipes.  She used to love to cook and bake for her family and she wrote down all of her recipes.  Those recipes have gone, somewhere, somehow and we have never had any, not a single recipe of hers, especially nothing written down.  I have spent so much time trying to perfect recipes she used to make for my husband, just to see if I could and make him smile.  I got the coleslaw down and the Blueberry Duff, so far, that is it!   We were going through some boxes over Easter.  My husband was looking for something in particular and the first box he opened,  resulted in "OMGOSH CHRIS COME HERE"!!  He opened the box and sitting as crisp and unwrinkled, looking like they were purposely placed there, were 3 pieces of paper.  Three handwritten recipes of his moms!  One of them has a little budget written on one side, a shopping list on another.  It was SO fun to see what she was shopping for back in the day, and I could learn some of her fashion taste, and how she loved her home to be decorated and what she was buying my husband for school clothes.  How do you measure the preciousness of finding something like this?!?!  To learn more about the woman who sadly passed away a year before Geo and I met!  Priceless, absolutely priceless.

I will remind you, we both, to our core, KNOW we never have had these in our possession.  My husband and his mother were VERY close, we would have known if we had these.  You can come to your own conclusion, I have certainly come to mine. 

The recipes written were difficult to put together.  There were actually 4 recipes but we figured out that 2 of them went together and that is what you are getting today.  This is a dessert/snack/appetizer unlike anything I have ever made, tasted or seen.  It is so unique in its flavor and texture.  I think if you are looking for something unusual and delicious, you better get on this one right away!  It isn't overly sweet, or overly savory.  It is a bit of an equal partnership of both!  A very old school recipe as my husband put it.  I was nervous about the combination of flavors, but indeed it works pretty darn well. 

You WILL have leftover filling.  I thought about cutting it down, but decided I was honoring Donna by posting it exactly as she had written it.  Trust me when I tell you the leftovers will make a great little apple crisp OR ice cream topping!

Let me get to what she simply had labeled as "Cheese & Apple Cups".

Thank you Donna........*wink wink*

Let's get started! (all ingredients will be in RED)

5-6 apples, peeled and chopped
1 1/2 cups pineapple juice or use a can of chunks, tidbits, or slices and food process
3 tbps cornstarch
3/4 cup sugar
1 tbsp butter
1/8 tsp salt
1/2 tsp vanilla

In a medium pot, add pineapple juice, cornstarch and sugar.  Whisk until completely combined.  It must not be heated, has to be cold, or the cornstarch will lump.  Next stir in apples and butter, and turn on the heat.  Stirring this OFTEN let it come to a boil and boil it for 2 minutes.  It will begin to thicken.  When 2 minutes has passed, turn off the heat and add in vanilla and salt, stir and set aside. 


1 med/lg bag of Cheese Puffs (any brand or shape will do)

Prepare Cheese Puff crumbs.  In a food processor or in a large ziploc, make cheese puffs into dust.  You will need about 2 1/4 cups of cheesy puffy dust!  Put into a bowl and set aside.

1/2 cup of butter

Melt in a bowl and set aside as well.

Refrigerator Biscuits.  (12)

In my store these come 10 to a package, just the cheapest, plain old biscuits is what you need here!!  I obviously had to use 2 cans, and just baked the rest off for dinner or you could make these ALL since you will have leftover filling.

1/3 sugar
1 tsp Cinnamon

Combine in a small bowl for topping


Preheat your oven to 375 F.  Get out your muffin pan, place your cheesy crumbs and melted butter bowls near you.  Take out your biscuits...  Now take 1 biscuit,  and flatten it, now, dip it in the melted butter, then dip it in the crumbs, flip it and dip the other side in crumbs and then place it in the muffin pan, press bottom down and press the sides until they come up to the top.  Repeat this with as many biscuits you want to use but at least 12.  ( I would guess you could get another 8-12 out of the filling you have left)  Now fill each cup up with your apple filling!  When you are done, sprinkle some cheesy dust on top, then sprinkle on some cinnamon sugar.  Do this to each cup and then bake for 20 minutes.


Let cool 15 minutes, you may need to run a knife around the edges before lifting them out.  Best we can tell they are delicious warm OR cold!! 

Enjoy this special treat, that was such a surprise blessing!!


Your "love from Heaven" Chefwannabe


Friday, March 22, 2013

Deviled Eggs with Bacon

I am getting this done!  I think I have only missed posting on my regular schedule a couple of times.  I wasn't about to miss it now!  If you are reading this, I was successful!


I rarely get alot of requests for all one thing in particular.  I get a handful here and there, sometimes the same things, most times not.  BUT.  I have gotten so many requests for a basic deviled egg.   I sort of thought it was a rule you had to make them like your mother or grandmother made them?!  It isn't?! HA!  My mom was a member of team paprika.  I like paprika on top, just is nostalgic but I make mine a bit different these days.  While these do have bacon on top, they are my basic deviled egg recipe. 

Deviled eggs are sometimes a source of contention.  I have heard people make these so many different ways it is crazy!  I love hearing and reading variations.  Dill pickle relish, hot sauce, mustard, no mustard, mayo, salad dressing, topped with paprika, chives, I could go on and on.  There are as many ways to make them as there are people!!

Hard boiling your eggs in my opinion, is where a good deviled egg starts.  Here is how I do it, and it has solved my lifelong inability to perfectly peel eggs.  I will explain my method below.  Perfection every time and no nasty green ring around your yolk!

I wanted to share this with you before Easter, as it is a staple on many of your Easter tables!!
Here is what you will need, leave off the toppings if you like, but trust me, these are DEFINITELY better with bacon!

7 eggs  (I know it is an odd number, I made one extra because I always mess one up, but I didn't!)
2-3 tbsps Hellman's (or salad dressing, whichever makes your knees tingly)
1 tsp yellow mustard
salt and pepper to taste
1 strip of crispy bacon
1 tbsp green onions

Place your eggs in a pot.  Fill with cold water and bring to a boil.  The SECOND it starts boiling, turn off the burner, and cover with a tight fitting lid.  Set your time for 10 minutes, exactly.  After 10 minutes, dump your water and run cold water over your eggs for a couple of minutes until the pan is cooled down.  Keep the eggs covered in cold water until you are ready to peel them.  They will peel perfecting and easily too!!


Cut your eggs in half, and carefully remove the yolks.  Most often you can just dump them right out.  Put all of the yolks into a bowl and using a fork, mush them until they are fine crumbs.  Add in mayo, mustard, salt and pepper, and mix until creamy.  I use a piping back and a 1M tip to fill my eggs, you can just use a spoon as well, the choice is yours!

When you have them all filled, crunch up your bacon and sprinkle over the top and sprinkle your finely chopped green onions over the top.

I hope you enjoy these and let me know if you try them!  Do you have a way different version?!?  Leave it in the comments below so I can try some new versions!

Enjoy!!

Your "I LOVE EASTER" Chefwannabe


Friday, March 8, 2013

Breaded Mozzarella Sticks

It is such a sunny beautiful day, I can't believe I am inside writing.  The sun is glorious, the sky is blue, oh...oops, I forgot about that snow part.  It is close to gone, maybe this weekend when we are supposed to get thunder storms, it will finish melting away!  This crazy weather out here. UGH.  So I guess the fact that it is 30 degrees outside keeps my flops in the closet and my shorts in the drawer, but soon friends.......very soon, I will be blogging from the patio! WOOHOO!


Last weekend on my husbands Friday which is actually Saturday, he sent me an email from work with a list of things he wanted to cook over his weekend.  He had even listed out the ingredients we needed to pick up.  Is that supportive or what?  He assured me I had his permission to blog any or all of his projects!  Oh what a mess we made, the songs we sang, the dances we made up and the fun we had!  This is one of the recipes we worked on and made.  So good.....devilishly good!

We had considered making our homemade mozz for this recipe but instead took the easy route and purchased a block of mozz.  I get it at Walmart, because I can't find it in block form anywhere else.  I believe (because I admit I threw the pkg away before I checked) it is a 16oz block.  Let's just go with it, OK?

Here is what you need:
16 ounce block of mozzarella cheese cut into 12 equal size "sticks"
3/4 cup flour
1 tsp garlic powder
3 eggs
1 1/2 cup SEASONED breadcrumbs (panko or regular, I used panko)
peanut oil

In one bowl add flour, garlic powder and salt and pepper to taste, mix and set aside.  In another bowl add in 3 eggs, and combine.  You can also add a bit of salt and pepper here as well if you like.  In your last bowl place your breadcrumbs.

Dip your mozzarella stick in flour, dust off, dip in egg mixture, back in the flour, back in the egg and then breadcrumbs.  You are double dipping in the egg and flour for extra seal and crunch!  Prepare all cheese in the same manner and place on a platter.  Now, place in the freezer for at least 1 hour, 2 is better but 1 will work.  In a medium pot, add your peanut oil, 2-3 inches high.  Preheat to 350 degrees F.   Fry 2-3 at a time depending on the size of your pot of oil.  It will take approx 2 minutes per side, more or less depending on your temp and frying set up.  When it is golden brown flip that baby and let the other side tan up too!

Remove and drain on paper towels.  Serve with a side of marinara!! (recipe below)

This is our new go to marinara for dipping or sometimes even pizza sauce
In a small pot combine:

28oz can of tomato sauce
1 tbsp dried oregano
1 tbsp dried Italian seasoning
2 tbsp sugar
salt and pepper
red pepper flake (optional)

Let simmer for 3-4 minutes stirring constantly.  Serve!

These turned out beautiful, crispy and luscious!  I mean, fried cheese, how could that EVER be wrong? 

Your "frying madness"chefwannabe


Friday, February 1, 2013

Easy Nacho Dip

It is no secret.  I am a nacho fanatic.  Some people say, "oh chocolate is my weakness" or "I just can't live without my bowl of ice cream every night".  Not me.  It is nachos.  I of course don't eat them every night or even every week but they are my happy place on a plate.  Cheese, meat, tomatoes, onion, avocado, sour cream, salsa, more cheese, MORE sour cream, MORE guac......my mouth is watering.


Anyway...the point is, I consider myself a bit of a nacho snob.  I like what I like, and by the way, don't try sneaking in beans of ANY kind, no olives either, you got it?  I decided I wanted a dip, a dip that embodied all that is "nachos".  I mean I wanted to dip a chip in think to myself, "omg this tastes like a chip full of nacho stuff".  Do I think this recipe is probably the first of its kind, probably not.  But it is the first of its kind in my world.  I have had 1,000 variations of this dip but my combo rocks.  It is 3 ingredients, and you are done.  Awesomesauce, eh?

With the Super Bowl upon us, which of course I won't be watching, I just thought it would nice to give guests those nachos they are so hoping you will have, without all the bother of all those toppings!  in fact, I think it is likely you may have everything you need in your pantry already for this recipe!  So here it is, my EASY Nacho Dip!

16 ounces Velveeta cheese
1 can ro tel (I used mild)
1 can chili with no beans

Heat all ingredients on low until cheese is melted.  EAT. I suppose you could also put this in a crock pot.  Yea, you could!  I would say it won't take much time and to be careful you don't overdo it.  Use one of those small crock pots maybe to keep it warm during the game!  Really accurate info there eh?

See how easy this is?  I wasn't kidding.  And for the record I tossed the cans before I looked at the ounces.  Just use the standard size, not the jumbo's or tiny ones.  You will want to make a double batch because we have been eating on this for 3 days now and it is better than it was the first day.  No seasoning, no spices, no fussy, mussy, stuff.  It is so good, cheap and cheerful too!

Enjoy your NACHOS!!

Your "nachos are love"chefwannabe

Wednesday, January 23, 2013

Crab Cheese Wontons

The sun is shining so bright today.  You know Mother Nature has one hand on her hip, and using the other hand to point and laugh, right?  Because it is cold as crap outside, but from inside you think it might be ok for shorts and flip flops.  You put said items on to go to the store and people look at you funny.  I mean if you DID it, they would look at you funny.  WHAT?  Ok, so yea, I DID.  They are all dressed up like Eskimos.  Pfftttt.


Anyway, I FINALLY got this recipe.  I know you can find these recipes anywhere, but the right amount of this and that, is an art, and my friend Leng is on it.  She made these for us so long ago, back when we were friends in Jersey!  She and her husband and family live back in Vegas, we are back in Nebraska, so I knew my only immediate chance of getting them again was a Facebook email and making them myself!  Thankfully Facebook had taken its meds that day and the email was delivered.  When I saw how easy this was I couldn't believe it.  Easy AND awesome. You know how we feel in our family about Chinese food.  I mean seriously, we should just change our last name to like, hmm, I wonder what the Asian version of "Smith" is.  Seriously when I just said that the first name that came to mind was "Long Duck Dong".  A complete 80's teen.  Did anyone else want to BE Molly Ringwald?  Anyone else want to marry JAKE RYAN? Sorry, off topic.

Anyway, so do you call these crab cheese wontons or crab rangoon.  I always called them crab cheese wontons when they were from a real Chinese restaurant and crab rangoon when they were mall Chinese.  What do you call them? 

Here is Leng's recipe for,  Crab Cheese Wontons,.  Thanks so much for letting me share Leng!! I did add an extra ingredient on accident, grabbed the wrong bottle but loved it so gonna through it in!

1 pkg wonton wrappers
1/4 cup crab meat FINELY chopped (real or fake!)
4 ounces softened cream cheese
1 tsp worchestire sauce
1/2 tsp soy sauce
1/4 tsp garlic powder
1-2 green onions,  minced
1/4 tsp sriracha (or any hot sauce) OPTIONAL

Combine softened cream cheese, worchestire, soy sauce, garlic powder, green onion and hot sauce.  Fill your wontons with 1/2 tsp of the mixture in the center and fold however, you like them folded.  Just make sure to run water around all the edges so it seals well and no cheese leaks out. Prepare all wontons before frying!!


Now prepare your oil  I use peanut oil.  Put 3-4 inches in a heavy medium sauce pan.  Heat oil to 350 degrees.  Make sure to fry only a few at a time so you don't overcrowd.  This should make between 22-28 wontons.  (I think, LOL)  I did double fry a few of mine just see the difference.  I fried them, let them cool, and then fried a second time.  Was ok but not worth the time.  Drain on paper towels, or newspapers!  Sprinkle with salt when they come out if you wish!!  I would do it though!  I mean I DID do it. You know what I mean.

 
Use your favorite dipping sauce OR, don't use any at all!  Word to the wise, only make as many as you will need or eat, they aren't as good reheated!  I guess you could REfry them, but.....you get what I am saying!

Your "more Chinese takeout recipes than you can stand"chefwannabe
 
PS. If you don't groove on CRAB cheese wontons, try my regular FRIED WONTONS!


Friday, October 26, 2012

Crispy Chicken Rolls

I have a complete love hate relationship with phyllo dough.  If you saw the video I made on YouTube, it was a haul video of what we buy at Trader Joe's.  Oh wait, you never saw it, because I looked a hot mess and decided that puppy was staying locked up on my own computer!  I will make a video that I will actually post one of these days.  Hair and makeup included.  Go ahead, look up to heaven and say, "Thank you GOD".  Anyway phyllo dough was in that video, they had it on sale far cheaper than my regular grocery store!


Anyway, I find phyllo dough enjoyable to eat, but I hate to work with it.  I always keep it covered with a damp cloth, so that isn't the problem.  The real issue is, I am like a bull in a china shop with it.  I try to be careful but, pffttt, I rip at least one sheet every time. 

In my quest for some new "picky's" around here, and my obsession with sweet chili sauce.  I tried it and now, everything must have it on it or in it.  I did add it to my chili, and holy crapola people, AH-MAZING.  Clearly I have been living a sheltered, sad life until now. 

Anyway, I also, for probably 10 years have been using tons of ground chicken and turkey.  I substitute it a lot, and my hubs and I love grilled turkey or chicken burgers!  If you think you don't like it try it.  And you MUST season it, just like any chicken or turkey.  It doesn't have a TON of flavor on its own so you have to add it!!

These are a perfect appetizer, or party fare.  Dip them in sweet chili sauce, cause you dang well KNOW I did.  Unagi sauce, soy sauce, hot mustard, or whatever you want!

You will need:
9 sheets of Phyllo Dough
1 stick of butter, melted (1/2 cup)
1 lb ground chicken
1/4 cup sweet chili sauce
1 clove of completely pasted garlic.  No chunks of raw garlic that won't have time to cook!
1 tbsp green onion, minced
1 tsp chili powder
2 tbsp soy sauce

OK, first things first.  Preheat your oven to 425 degrees.   In a large bowl combine, ground chicken, sweet chili sauce, garlic, green onion, chili powder and soy sauce.  Your mixture will be VERY wet, that is just how you want it!  Set aside.  Now, when you open your phyllo dough, keep a damp cloth over the opened unused portions, they will dry out in a second!  Take one on large cutting board or your counter, lay it out, and GENTLY brush it with melted butter, working quickly, add another piece on top and repeat with butter.  Do this until you have use 3 sheets of phyllo.  Now, on the long end closest to you, take 1/3 of the chicken mixture and spread it out along the whole length of the dough.  It will be a thin line of chicken mixture but that is fine!  Now gently start to roll it up.  Work one end to the other until it is rolled into a log.  Cut in half, and then each half in half.  You will get 4 rolls from each log!  Repeat 2 more times.  You should get 3 logs, each with 3 layers of phyllo.  Got me?  Now gently place them seam side down on a parchment lined cookie sheet.  Gently brush the tops with butter.  Bake 13 minutes!

Serve these with any dipping sauce or choice of dipping sauces you love!  You might even want to double the recipe!  This will give you 12 rolls total!

My husband wants me to do this with tofu as well.  Hmmm....


Your "how did I marry someone who loves tofu and seaweed"Chefwannabe


Monday, October 8, 2012

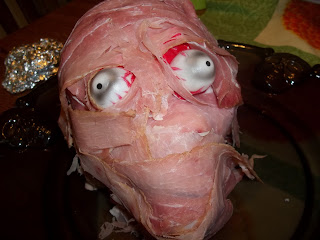
Grossest Halloween Meat and Cheese Party Platter EVER!

Mwwaaahahahhahahahhahahahhahha!

This has to be one of, if not THE most fun thing I have done with food.  I have no clue where I saw this, but it was probably 2 or 3 years ago and I have wanted to recreate it since.  I finally did it.

 
Halloween admittedly was never one of my favorite holidays.  I mean it is fun, scary movies, kids in the cutest costumes ever, all that stuff is great but was never like, "OMG, I can't WAIT for Halloween", until............

My husband and I were engaged and not wanting anything big, we went to get our marriage license and the next open date to get married by the Mayor (who was also a minister) was Halloween.  I was going to try and bargain for a different date but when my husband gives me the "COOOOOOLLLLLL" and looks as excited as a little boy getting his first puppy I just agreed.  I flip flop over whether I am mortified my anniversary is on Halloween or I think it is cool.  My mother will never recover from me wearing a charcoal gray (BLACK) suit to get married or that I had Frankenstein and the bride of Frankenstein on my wedding cake. 

That being said, we vowed every year we would hold a Halloween party, a tradition that would go on and on and on.  We have had 1.  LOL  We are celebrating 10 years of marriage this Halloween and we have had 1.  (heavy, not surprising, sigh)  Seems when I plan things they don't generally get executed (HA, good Halloween word).  It will happen, I swear it WILL happen!

So I know many of you will be attending Halloween parties.  This platter will be a HIT for kids and adults alike.  It is delicious but yet, so gross it takes a minute to actually peel the "skin"/meat from the skull and put it on a piece of crostini!  You will and you will "eewwwwww" over it the whole time!

I have a couple of things to discuss.  Someone help me solve this mystery.  Is there a reason ham isn't pink anymore?  Seriously?  I don't get it.  I used prosciutto for the top and ham underneath because the prosciutto was pinker and more real looking.  Prosciutto admittedly is pricey which is why I did it this way.  It is a variety of meat, but more economical than 1 or 2 pounds of prosciutto.   The best ham to use is the very inexpensive boiled ham at your deli counter, it is the pinkest!  Remember we are looking for something that looks real here! You know that meat that is pressed and really thin sliced in a package, I think Carl Buddig is one brand, those would work REALLY well because they are so thin.  Make sure you ask for your meat VERY thinly sliced, it is key.  If you get large pieces of meat, cut them into a size suitable for your bread and cheese bites!

As far as cheese, pick what you like.  I go to fresh mozz for everything because I love it but use any cheese you like as long as it is in little enough pieces to fit on your slices of crostini!

You could add cherry tomatoes to this, or olives, anything you want!

Here is what you need for my Meaty Skull Platter!

2 eyeballs (I got a bag of them at the Dollar Tree)
1 plastic skull (also Dollar Tree)  Get whatever size will fit your needs
1 large platter (also Dollar Tree)
1 lb ham or prosciutto (I did 1/2lb of each)
1 skinny baguette
1 ball of fresh mozzarella
Saran wrap or Press and Seal

Take your skull, and wash it.  I did it just because even though it will be covered I just had to wash it first.  Cover it with your saran wrap/press and seal, making sure to leave room to push in where all the indention's in the skull are.  This is just a protective barrier between the plastic and food.


Now for the bread:
Slice into THIN slices.  Lay out on a cookie sheet, drizzle with olive oil, salt, and a little dried Italian seasoning and broil just until the tops are golden brown.  I ALWAYS burn the bread, don't be me. 
Remove and let cool. 


Cheese:
Slice into pieces about the size of your crostini. It makes no difference what shape they are, you just need enough to alternate with the bread in a "collar" around the skull.  This also helps keep his head and the bottom meat stay in place.

Back to the skull.  Whatever meat you choose, if you use 2 meats, pick the pinkest one to go on the OUTSIDE of the skull.  Start layering your meat to cover the skull.  When you get one layer down, put the eyeballs in the sockets or on top of the sockets and use the meat to keep them in place.  Mine had blood on the bottom so they had a flat part I could layer a piece of ham right over!  Do this until all of your meat is used.  Remember you choose the size skull and amount of meat you need according to how many you need to serve.  Mine served 6-8 very well.  (as an appetizer)  If you are using this for a party where the food IS the meal, do a bigger skull and maybe 2.  Maybe one should get a little veil and one get a bow tie?


You will need to press the meat down to get it to kind of stick to the other meat.  At the bottom it will hang off the skull until you get the bread and cheese around it.  Just alternate a ring of cheese and crostini all the way around.

When you are done, don't be startled if he looks at you kind of like this.....


Next time I would probably not cover his teeth up, or I would add some lips for fun!  He is creepy for sure and in the most perfect way for a party!  Just keep a fork on the platter so everyone can "peel" off a piece of meat!!

Enjoy this GROSS yet FABULOUS party platter!!

Your "making deli meat into skin" chefwannabe
 
PS.  I think he needs a name....it is only fair, right?

Sunday, September 16, 2012

Homemade Beer Battered Onion Rings

Ok, so I knew eventually I would have to make these.  My relationship with onions is a freaky one for sure.  I hate onions.  I love French Onion Soup.  I enjoy onions in things if they are unrecognizable.  I don't know, it is all to much to think about, so I just go with the flow.  Sometimes I am a yes and sometimes I am a HECK no!


I decided with football season and lots of burgers and fries nights, game parties and gatherings, that onion rings would be a nice addition to the menu.  You can dip them in anything and they involve beer.  I mean, really, how much more important is THAT in a game day party?

I had brought home some delicious sweet vidalia onions from our trip to Georgia and I wanted to get them used up.  I only did 1 medium onion with this recipe, but sadly, and regretfully I only used half of the batter.   So I will say this will do at least 2 medium onions, if not more.  Here is a tip, if you are nearing the end and still have onions to dip, add a little extra beer, it will be a bit thinner but it will be equally as delicious and you won't have any naked onion rings!  Heck you might like your batter a bit thinner than mine anyway, so regardless, just do what makes your insides tingle!  Now get slicing those onions, however you like, thick or thin.  Which do you prefer?

I soaked my onions after I sliced them, in a beer.  This tenderizes them a bit while still keeping their shape.  You can do this with buttermilk if you choose as well.  Just make sure to soak at least 30 minutes and up to 2 hours.  Do not soak them any longer or you will have limp, weasley looking onions nobody will recognize as rings.  FAIL.

It is so easy, make sure to fry in deep enough oil, maybe 3-4 inches of oil is what I used.  Get it to 350 degrees. 

You will need:
2 large onions
1 1/2 cups flour + 1 cup for dusting
2 tbsp of your favorite all purpose seasoning, I used NorthWoods by Penzeys
2 tsp salt
1 tsp baking powder
2 cups of beer 
1 extra beer or buttermilk for soaking (enough to cover your onions)

Get your oil heating up.  Drain ALL of the liquid that your onions have been soaking in and then return them to the same bowl.  Using 1 cup of flour, dump it in with your onions and toss them around, it will soak up any leftover liquid and give the batter something to stick too.  Put them aside. 

In another bowl mix the 1 1/2 cups flour, seasoning, salt, baking powder, and 2 cups of beer.  Using a whisk get it as smooth as possible.  A few lumps won't hurt a thing. 

Batter on the left and flour covered rings on the right!
When the oil is heated up, take your flour coated rings and dip them in batter, let the excess drip off and put into your oil.  They will take 2-3 minutes per side.  Or, you can let them go until they are a color you think they should be and flip them over!  Repeat.  Drain on paper towels or a cooking rack as I did.  We like our onion rings a little bit dark in color!

Give them a light sprinkle of salt if you like and serve!

Happy Football Season!!!


Your "FLY EAGLES FLY" Chefwannabe

PS.  I feel like I would like some hot sauce in my batter or cayenne but was making these for someone who is not able to eat spicy food.  Just FYI...

Thursday, August 30, 2012

Mini Corn dogs!

OK, let me start this by saying, I always thought corn dog, was ONE word.  Google and I have spent some time together learning it is 2 words.  Yea, never knew, and wondering how often I have messed it up and made myself appear completely illiterate.

Anyway.....

I don't think I know a single person who doesn't like corn dogs.  My son used to devour them like they were candy and when we would go to the boardwalk I could count on buying at least 4! 

 
As far as making corn dogs at home.  Not so successful, I will be honest.  I have tried a few different recipes, I even tried a corn dog mix that I only had to add water or milk to, I successfully failed at those as well!  I just never seemed to get it all right before.  I finally just gave up.  However, the other day a bag of "Yellow Cornmeal Mix" presented itself to me and I wondered if I should get back up on that saddle again.  The answer was yes, but I decided to ditch the stick and go for a bite size version.  I like my corn dogs a little crunchy and I achieved it with these little delicious dogs!

Here is what you will need: (oh yea, this makes alot)

1/2 cup yellow cornmeal
1/2 cup flour
2 tsp baking powder
1 tsp salt
1/2 tsp cayenne or hot sauce (optional)
1/2 cups of milk
1/2 cup flour (for dusting)


Combine all ingredients except the last 1/2 cup flour.  Mix until smooth and completely combined.  Add the 1/2 cup of flour for dusting to a bowl or plate. 

Heat peanut oil (or oil of choice) to 340 degrees.  I used about 3 inches of oil.

I cut 7 hot dogs into 3rds.  This yields about 21 mini corndogs.  Dust them in the flour and using a skewer or your fingers, dip them in the batter and drop into oil.  I use the skewer to poke it to put it into the oil  If you don't mind potentially becoming fingerless, go ahead, I dare you!

Fry until golden brown, approximately 2-3 minutes!

Remove from oil and let drain on paper towels or whatever you choose!  Serve with whatever condiments your family likes and enjoy!  I prefer mustard or cheese sauce!


Your "feelng corny"chefwannabe

Sunday, July 1, 2012

Who feels crabby? Easy Crab Dip

I LOVE that you all have opinions.  I loathe fence riders and you certainly let me know!  Some of you are staunch real crab meat lovers and some like imitation, a few don't mind either.  I am a real crab only girl and I don't like it mixed with anything.  It is such a sweet, delicate flavor I don't want anything to ruin it for me!


My husband, a coast boy, who loves almost all seafood, also occassionally enjoys imitation crab meat.  I know in small towns and rural areas, you are lucky to even find the imitation!  I loathe canned crab. Ack!

So hubby got sent to the store, and if you have followed me for awhile you know how a trip for 2 things turns into a 100.00 shopping trip.  Friday was no exception.  He found some imitation crab meat and bought it because, ya know, he thought I might "make me a hot dip for while we have some drinks". Of course darling, I would LOVE to.  Does your husband ever do that?  Mine does and even though he wasn't sure what would be in said dip, he brought home a few things I could add and had some idea's on where I should go with this recipe.   I mean, of course he would have an opinion!  He ALWAYS has one!  That is what I love about him.  Umm...right? HA!

I am sure this is really a pretty standard recipe.  I am likely not the first person to come up with it, however, it is just what I had in the fridge that I thought might work.  It did and he loved it!  I made a half recipe but I will give you the full recipe amounts.  I would use an 8x8 or 9x9 casserole to bake it in!  Dip bagel chips, pita crisps, or crackers!  The choice is yours and the choices are endless!

Here is what you will need....

8 ounces cream cheese (softened)
1/4 cup Hellmanns!
1 3/4 cup crab meat.  (I chopped half very fine and left half quite a bit chunkier)
1/2 tsp Sriracha (or any hot sauce optional)
1/4 tsp black or white pepper
1/2 cup grated parm or Italian mix cheese (mix half in with mixture and half on top)

(I would also add a scallion, chopped fine either mixed in or on top, hubs hates onions)

Preheat your oven to 350 degrees!  In a small bowl combine cream cheese, Hellmanns, crab meat, hot sauce, pepper and half of the cheese. 


Spread into a baking dish 8x8 or similiar.  Spread evenly, and then sprinkle remaining cheese on top.  Bake for 30 minutes.  Make sure to check at 20 and make sure it is bubbling and the cheese is melted!  Garnish with chopped parsley or green onion if you prefer!

Serve with your choice of crackers or crisps or chips!

Your "sometimes I feel crabby "chefwannabe...


Friday, June 29, 2012

Swiss Cheese Dip!

So, I was in the grocery store the other day.  Sometimes I shop that store as if it holds a single golden coin somewhere in the aisles of product.   I am obsessed with finding new things to try or to incorporate into a recipe.  I like new and exciting stuff, even if it is stuff I don't care to eat myself.

We are "picky" eaters.  I don't mean we are choosey about food, we call chips, dip, finger foods, "picky's".  My hubs is a chip and dip lovin' fool, and along with his love for all stinky feet cheese I knew it would be a hit.....

 
I was eyeballin' the specialty cheese case when I saw some cheese with a clearance sticker.  I was having a hard time getting to it as some managers were discussing rearranging right in the middle of the aisle. Why in billy heck they do this I have no idea.  It was annoying and each of the 3 times I tried to shoot for that piece of cheese I got, "Oh we are in the way aren't we?".  Hell yes you are, and you were in the way that last 2 times I tried as well.  Bleh.  Anyway, as I finally made my descent into the cheese case to grab that hunk of cheese a very nice woman named Fran asked me if I had ever tried the dip they make with that cheese at the holidays.  I told her I had not, and asked if she could give me the recipe.  She of course makes it with 5lb hunks of cheese so she sweetly gave me her approximated amounts for a small batch. I thanked her and went on my way, ready to make a delicious dip I would never even taste!

Now this being said, I feel like I prepared the dip wrong but I am going to share it anyway.  I feel like I should have put this entire mixture in my food processor.  My husband chimed in with, "maybe you should heat it and serve it hot".  Why do our husbands need to chime in?  HA!   In retrospect I would like to see this in the processor, but I imagine the taste is great either way, just maybe easier to get "all up on" a cracker if it was processed.

Admittedly I feel a little guilty, because this is so easy. I added to much onion for the hubs so now it is up to my sister to demolish the entire bowl.  I think it would be a nice touch to add green onion instead of chopped onion, for some color.  Here we go!

2 cups Jarlsberg Swiss Cheese
1/2 cup Hellman's (no miracle whip people)
1 tsp grated onion or 2 tsps minced onion
Pepper to taste

Shred cheese.  Add Hellman's and onion.  Mix thoroughly.  You can put this in your food processor and process until it is at your desired consistency or you can serve just as it is with crackers!


So here you go, easy, peasy, quick and cheesy!  I hope you enjoy it.  Might make a great 4th of July get together dip.  Something easy and different.  It will surely tempt the taste buds of everyone in your life who loves cheese that smells like......

Wishing you happy dipping!!  Let me know if you try it and put it in the processor or heat it!

Your "stinky feet and cheese loathing" chefwannabe
Chris

Sunday, June 24, 2012

Asian Chili Ramen Wrapped Shrimp!

Oh YES I did!  I KNEW I could find a way to let my dirty little secret (Ramen Noodles) into the kitchen.  I knew I could get it to hold a special place in a special dish where it wouldn't be made fun of, ridiculed for its unhealthy existence and not just be referred to as a joke!  I did it!

 
Let me tell you first.  I do not like shrimp.  I like crab and I like lobster.  No shrimpy shrimpy, no scallops, no talapia, not oysters, clams or mussels.  So this one banked shearly on the opinion of my shrimp and all seafood loving husband. 

Do you know how hard it is to find giant shrimp in the middle of the US?  I do use a seafood store here in Omaha that I can USUALLY get what I need at.  Of course, my debit card thought it was buying a diamond but none the less I was able to find about U10 shrimp.  That means that  10 or under make a pound which translates to BIG!  They techinically are Extra Colossal, but I don't feel like that were that big.  Anyway I found them out here as far from any ocean you can get and that alone was a great feat!  I only bought 4 and wrote the recipe that way because I knew my husband would be the only one to eat them.  Make sure they are peeled and deveined, whether you have your fishmonger do it or you do it at home.  Leave the tails on for easier eating!

That being said, I really do not see why you couldn't use a much smaller shrimp and use them as an appetizer or starter if you can't find the bigger shrimp or it is just far more budget friendly.  *and trust me it IS*

This is really so easy to make and it is delicious.  It will look so impressive your friends are going to think you enrolled in culinary school when in reality you were spending time behind their backs with a package of RAMEN noodles! HAHA!

I made these spicy.  To avoid that though, use shrimp flavored ramen and omit the Sriracha!  Let's get going on these babies!

You will need:
4 colossal shrimp
1 pkg chili flavored ramen *this will easily do 8 huge shrimp*
1 tsp Sriracha *optional*
salt and pepper to taste
Peanut oil for frying

Make sure your shrimp are deveined and the tails left on.  Prepare your ramen soup according to package directions only add 1 tsp Sriracha to your boiling water and when cooked,  drain ALL water and then add in 1 tsp butter and flavor packet. 


Mix until all butter is melted and noodles are coated. Let cool completely.  Bring peanut oil to 350 degrees.  Make sure to use a paper towel and dry your shrimp off.  Salt and pepper them to taste or use Mr. Pete's Seasoning!.  Take a small amount of ramen noodles, and carefully wrap the shrimp in the noodles.  Make sure to try and end them so they stick and stay in a position over the top or underneath. 


Wrap all shrimp.  We are not striving for perfection here, as you can see, a little messy wrapping just makes the dish more interesting to look at!

Fry for approx 2 minutes on each side.  Mine were done perfectly, so make sure to watch them according what size shrimp you use. 

Drain on a paper towel and serve!  Use some wasabi, duck sauce or more sriracha for dipping!

Enjoy!!

Your "I found my inner spicy Asian"chefwannabe
Chris

Monday, May 21, 2012

All American Appetizer! Pinwheels!

I hope this finds you all having a relaxing evening, recovering from this ugly Monday syndrome!  What a fantastic day here in Nebraska, gorgeous weather, and summer is on the horizon!


Now, I know that most of you have eaten, heard of, or in fact made these appetizers, which we call "picky food".  Truth is, they are old news right?  Well, I would have to agree to some extent, but I am hoping to revive these always popular finger lickin' "picky's" and give you some new idea's on how to fill them.  They are so easy and as my sister and I were making them, I was thinking of a million different things you could really do with these babies and I was amazed at my on genius.  Well, I am sure someone else has thought of most of my ideas as well but, in reality you can do about anything you would do in a wrap!!  Just cut the pieces smaller!

My secret is that I put as much as I can in the food processor.  I process it until it is 2 notches from mush.  Seriously, I do.  There are tiny pieces but it is very spreadable and not to big to be rolled effectively into the pretty little pinwheel shape!  Tomatoes, onions, olives, bacon (unless you use bits) all can be done in the food processor and prepared to complete perfection for this appetizer.

To begin you will need cream cheese, sour cream, and flour tortilla's.  From there I will go into specific varieties and list you my versions!

Here is what you need for the basic bacon, tomato, ranch version:

1 8oz. pkg cream cheese
1/2 cup sour cream
8 flour tortilla's
1 tbsp ranch dressing dry mix
1/2-3/4 cup bacon (bits or crumbled)
1/2 cup onion (optional)
3 tomato's minced in food processor
(pictures is all my ingredients for other versions as well)

In a bowl with a hand mixer combine cream cheese (room temp), sour cream and ranch dressing mix.  Mix until smooth.  Set aside while you process your other ingredients.  After you process your tomatoes, let them drain in a small strainer to get as much liquid out of them as possible like this.

Lay out your tortilla.  Spread with a layer of your cream cheese mixture.  Layer on tomatoes, and bacon.  Roll up and put on a plate, seam side down.  Continue until your cream cheese mixture is gone.  Refrigerate 1 hour before slicing into pinwheels!


Dill Pickle and Ham Version (my personal fav of course)
1 8oz pkg cream cheese
1/2 cup sour cream
1lb thin sliced deli ham
1 jar of your favorite WHOLE dill pickles

Mix cream cheese and sour cream completely.  Lay out tortilla and spread on mixture.  Cover in slices of thin sliced ham.  I would do 2 layers of ham.  Line your pickles up on one end and roll like this!


Taco Pinwheels
1 8oz pkg cream cheese
1/2 cup sour cream
1/4 cup taco sauce OR 1 pkg taco seasoning mix
black olives
tomatoes (processed) and drained
onion
1 pkg grated cheese (cheddar or mexican blend)

Do I need to type this again?  HAHA   Drain olives and tomatoes like this...

Spread on cream cheese layer, tomatoes, olives, onions and cheese.  Make sure not to use so much it pushes out the end and won't roll nicely.  As with all the others refrigerate for 1 hour before slicing.

Now there are a TON of options....you could do ground beef in these if you make sure it is in tiny pieces.  You could shred chicken to add as well.  You could use guacamole as a second layer of spread.   I wouldn't use lettuce as it will wilt and get slimy.

There are NUMEROUS sweet version ideas as well.  Mashed bananas, cream cheese with powdered sugar, nutella, thinly sliced strawberries, fruit preserves, ganache, the possibilities are endless!

It is a almost Memorial Day weekend, what a great EASY fingerfood to take to your bbq!!

Your "picky lovin" chefwannabe
Chris