Showing posts with label sauce. Show all posts

Tuesday, September 24, 2019

Homemade Enchilada Sauce

Hello, Hello!

Hoping this post finds you all healthy, happy, and never gassy.  I literally am sitting here laughing as I type, I am totally leaving that in.  Might be my new tag line.  What do you think?

Sooooo.......  We have been having major Mexican food hankering's in this house.  We have been obsessed, it is kind of ridiculous.  Well over a month ago we decided to try and make cheese enchiladas like our favorite Mexican food restaurant, and I made the gaggy mistake of buying enchilada sauce in a can.  I used to do this all the time and loved it in my sons favorite dish which is Cody's Favorite Enchilada Casserole   


So, I opened the can and it was as thin as water, had a layer of grease floating on top and the smell could have gagged a maggot!  HOW did we ever consume this junk?!  I went to my phone and began googling enchilada sauce recipes.  After spending an hour tweaking and tasting, simmering and adding, from numerous recipes, this is what we came to that we loved.  When I say loved, I mean, it is so thick, and creamy and delightful.  I have used it as a soup base, as a Mexican spaghetti base, I mean, you could literally eat it with a spoon and call it Mexican Tomato Soup! New recipe idea!

This makes likely much more than you may need for one recipe.  However, it freezes beautifully and why not make it once and have it for twice or more!  Am I right?  Let's get to it!  Make sure to check out the video as well!


You Will Need:
4T vegetable oil
4T flour
1 1/2 tsp chili powder
2 tsp cumin
1/2 tsp oregano
2-10 oz. cans Original  Ro-tel (Tomatoes and Green Chilis)
3 cups water
1/2 tsp garlic powder
1/2 tsp onion powder or onion flakes
1/2 tsp salt
1/2 tsp sugar

In a medium sized pot, add in oil and flour.  Whisk until combined.  It will clump up in your whisk a little just let it go for about 30 seconds.  Add in your chili powder, cumin and oregano.  Let those spices heat for a few seconds and wake up their flavor.  Now add in about half of your water.  Whisk and let simmer for a couple of minutes.  Add in your tomatoes and chilis and the rest of the ingredients as well as the rest of your water.  Let simmer for about 3 minutes while whisking.  When it has simmered and smells amazing, remove from heat.  Using an immersion blender or a standing blender, blend ingredients until it is a smooth and creamy consistency.

You are officially ready.  Ready to service this over anything you like.  Might I suggest my cheese enchiladas?  Video below!


ENJOY!


Saturday, September 17, 2016

Easy Country Sausage Gravy

Hello!!  Long time no see!  You wouldn't believe it if I told you I feel like I am just now REALLY getting my mojo back after the loss of my mom and brother.  It has taken time, and it will probably take more but, it is what is best for me, and makes me happy.  Thank you for your undying patience, kindness and compassion during this time for me.


Breakfast for dinner!  Truth be told, breakfast is my favorite meal of the day.  Mostly because I love eggs.  I mean, I REALLY love eggs.  My husband and I were grocery shopping and I found a good sale on some breakfast sausage and he instantly said, "OHHHHHH please make sausage gravy and biscuits".  Well what kind of wife would I be if I didn't make it for him???  I make it pretty regularly, I don't know, I just kind of thought it was something everyone could make.  Truth is, I think someone will be able to benefit from the recipe.  I always use half and half.  Milk isn't rich enough and heavy cream is just to much, half and half makes a beautiful smooth, creamy, dreamy gravy!  I also add butter, because butter belongs in breakfast food!  Hey!  I didn't make the rules, but whoever did....God BLESS them!


I made a video to go with this post.  I will post here.  Please hit SUBSCRIBE on my YouTube channel, I would love to have you there!!


Side note:
I am so ready for winter.  That's all.

1 lb breakfast sausage
2 T. butter (divided)
5 T.  flour
2 cups half and half (1 qt)
salt and pepper to taste

In a large skillet, brown your breakfast sausage until completely cooked.  Add in 1T. butter and flour.  Stir until the butter is melted and the flour is no longer visible.  Add in your half and half slowly, constantly stirring.  Salt and pepper to taste at this point.  I did add a couple of grinds of salt, while the sausage is a salty, for me, it didn't lend enough salt for the additional ingredients.  I like lots of pepper too!  It will take a couple of minutes to come to a boil, but keep stirring.  When it begins to boil, turn down the heat and let it simmer until smooth, thick and creamy!  Add in the last of the butter and stir it in until melted 

As you can see, I served this on biscuits, but love it just over toast as well.  With a side of scrambled eggs, it was our "breakfast for dinner"!

ENJOY!


Friday, January 17, 2014

Homemade Pizza Seasoning

Greetings fellow pizza lovers!  (or I assume you are).  We pizza lovers, we know how we like our pizza don't we?  We don't stray easily either, do we?  We are the movers and shakers of the universe, trust me, I know we HAVE to be!

You know that I profess to have the best pizza dough recipe on earth right?  Well I decided I would also share with you my homemade pizza seasoning.  I get crazy when I see the amount of salt in these prepackaged seasonings.  YIKES!  Never mind the MSG, fillers, etc.  Just give me the flavor people, just the flavor and I will be golden.  They won't do it.  So, I make my own.  Actually I make it sound like I have been making my own for years and that is not the case.  I have been making my own for a few months.  It took me a couple of batches to work it out how I wanted it to taste.  I am happy with it, my family and friends love it and I hope you do too!


All of these spices can be purchased at your grocery store, or even your dollar store.  I chopped my recipe down to make a 1 cup size amount but just double or triple the ingredients for more.  I use it to flavor cooked sauces, I use it straight from the jar on pizza, no matter how you do it, cooked or just sprinkle it from the jar!

Pizza Seasoning:
2 tbsp. dried minced garlic
2 tbsp. dried minced green bell pepper
2 tbsp. dried minced onion
1/4 cup dried parsley
1/2 tsp black pepper
1 tsp garlic powder
1 tsp crushed red pepper
1/4 cup oregano
1 tsp salt

Combine all ingredients in a bowl, or jar.  Mix (or shake) until combined.  You CAN put this through your mini food processor to make it a finer mix, but I use this in sauces as well as on top of pizza or in pizza sauce, so I like the texture of it.  This makes about 1 cup of seasoning.  It is easily doubled or tripled with no problem! 

Make sure to adjust the red pepper flakes to your liking.  Add more, or don't add any at all depending on the heat level you enjoy.  Me?  I need some heat friends, I LOVE some heat!

Your "pizza lovin' Chefwannabe

Wednesday, April 24, 2013

Homemade Caramel Sauce

Oh boy.  Do I have alot to talk about today. 


Seriously, I haven't botched in the kitchen this bad since my blackened yeast rolls.  I even shared a photo of those with you on Facebook, but today, was completely horrendous.  Tragic really.   I thought I was going to be defeated by this recipe.  I have made it a million times, BUT, I haven't made it for probably, 6 or 7 years now.  I thought my touch was gone.  In fact as I poured the first seized batch down the disposal, I kept my composure, brushed it off and started again.  As I dumped the second seized batch down the disposal, I considered everything I might have done wrong, and though I felt defeated, as my husband would say, I "picked myself up and brushed myself off".  I beckoned the aide of a few fellow foodie blogger friends.  I got some good tips, a little "insurance" and decided to give it another shot.  I mean, heck, I had already pitched a good 7.00 in ingredients, what was a few more if it didn't turn out?  (You will see why 7.00 is a considerable amount considering the ingredients)

I assure you, you can NOT mess this recipe up.  I used both forms of "insurance" offered, there was no way I was going down, not THIS time.  I did it.  And I know, this is so easy, but it is SO easy to ruin too.

You are going to need a few dance tunes for this one.  You have to spend a considerable amount of time watching the pot.  Literally.  I had some old jams, "Beautiful Life" Oh oh oh oh.......  Some Fugees, "Killing me Softly", those kind of old jams.  I danced like nobody was watching...OK I THOUGHT nobody was watching.   Anyway you know how I roll with shakin' and bakin'.  You need music.  DO NOT, leave the stove.  Especially if this is the first time you have made this.

You CAN do this without use the "insurance policies" but as the daughter of an insurance man, I wouldn't be without it.  ONE bit of crystallized sugar falling back into the mix can ruin it all.  Please, USE INSURANCE!!

Here is what you need:
1 cup granulated sugar
1/4 cup water
1 tbsp Caro syrup (insurance police 1)
1/4 tsp cream of tartar (insurance policy 2)
2 tbsp butter
3/4 cup of WARMED heavy whipping cream (Yes, it MUST be heavy whipping cream and I warmed in the microwave.  Heat 2 minutes if you are doing it before you start, 1 min if you do it just before it is added)

In a medium nonstick pot.  Add in sugar, water, syrup, and cream of tarter.  On medium-high  heat, allow the the sugar to dissolve.  There is NO NEED to stir.  Just let it do its thing.  Got me?  When you see the sugar is dissolved, turn down to medium and here is where you dance your future ice cream sundae off.   This will feel as though it takes forever.  You are going to let it slowly begin to boil, it will look something like this.


Now you dance and you wait.  This could take 10-15 minutes.  Maybe more.  Just keep watching and dancing, watching and dancing.  Eventually, after 8-12 minutes it will look more like this.


Then, as soon as it hits this stage, it seems to go fast.  DO NOT leave the stove.  About 3-5 minutes later, you will have this beautiful amber color.


Now, turn off the heat, add in the cream.  It will bubble up, so be ready!  Keep whisking or stirring!!  When you have it combined, add in the butter and vanilla.  Stir and let it sit to cool.  This is SOOOOOOOOO extremely hot.  PLEASE be careful.  Let it cool before putting it in a mason jar or other container. 


This should last up to 2 weeks in your refrigerator.  Just reheat as you want to use it!!

Your "3rd time is DEFINITELY a charm"chefwannabe

Monday, March 11, 2013

Just For 2 - Pork Medallions In Cream Sauce

Well here we are, the first recipe in a series of "Just For 2" recipes.  Thank you for your overwhelming response to my request on Facebook for recipes you would like to see made just for two!  I know so many of you are single, empty nesters, or just wanted maybe a romantic meal to fix that special someone!


My parents are home alone these days and when I am visiting or when someone is heading to their house I like to send meals made just for 2.  They don't need enough for an army, not even a small army.  I like knowing they have healthy, homemade food in the freezer they can take out and just heat up.  My mom cooked for 12 for about 40 some years, I think she can take a break now!  So if you have parents who are getting older, or don't get around like they used to, this is a great meal idea to make in individual foil containers, and put in their freezer!  Always make sure to give them directions on reheating too!!  As I mention below, I made this in 2 individual size, oven safe dishes I have, but it can easily be put in just a very small casserole dish as well! 

I also think this is a great romantic evening at home meal.  It isn't difficult, even a cooking novice can do it, and do it well.  Light some candles, dim the lights, put on some good soft music and.........EAT!!

This is actually a bit of a figure friendly recipe.  The cream sauce is chicken stock and skim milk.  Nothing heavy about it.  The pork is lean and the breadcrumb topping, well, sorry but it must not be skipped!

Here is what you will need:

2 boneless pork chops (mine were just over 8oz a piece)
1 1/2 tsp onion powder
2 tsp dried basil
salt and pepper to taste (be careful especially if your stock isn't low sodium)
1 tbsp butter
2 tbsp flour
2 cups chicken stock
3 tbsp skim milk
1 tbsp cream cheese
1/4-1/2 cup bread crumbs
olive oil (any kind will do)

Preheat your oven to 375 degrees.  Thin slice your pork chops into "medallions".  However you choose to do that, go for it!  When both chops are thinly sliced, place in a bowl and sprinkle with onion powder, dried basil, and salt and pepper.  Be careful with the salt, especially if you aren't using low sodium chicken stock.  Use a light hand, remember everyone can salt their own to taste. 

Now heat a medium skillet up with some olive oil, place your pork in the skillet and let it brown.  It will likely cook all the way through depending on how think you cut your pork, but if it doesn't, it will be going in the oven so don't sweat it!  Cook until nicely browned and nearly cooked through.  Place unto a plate and set aside. 


In the same skillet, with all that flavor stuck to the bottom, add in butter and flour, whisk together until butter is melted and flour has cooked about 1 minute.  Add in chicken stock and whisk, scraping up all the good bits of flavor from the bottom of the skillet!  Let simmer for 2 minutes whisking constantly, add in milk and cream cheese and whisk until combined.  Now take your pork, add it back into the gravy and stir to coat.  Place half of the mixture in each individual serving dish.  You can also add to a small 2 serving size casserole dish.  Top with breadcrumbs and drizzle the top with olive oil.  Bake for 20-25 minutes. 

Into the oven they go!
You will have tender meat with a light gravy, topped with crunchy breadcrumbs.  SO delicious!  I served with with a side of egg noodles.  For 2 I used 8 ounces of dried pasta, cooked according to package directions and tossed with fresh parsley, butter, and black pepper. 

I am so glad you all seemed interested in a few of these "Just for 2" meals.  I hope you love this first one and give it a try.  It is a little fancier than plain chops, a few more steps, yet, as easy, and doubly delicious!!

Your "made this just for 2 today" chefwannabe


PS.  This can be also be made for more.  Just double or triple the recipe as needed. 


Friday, January 25, 2013

Beef Enchiladas (Taco Inn Style)

What can I say?  I love Taco Inn.  Unless you live in Lincoln, NE or the area, you have no idea what I am talking about, but you have to trust me on this one.  I live in Omaha, and make what we call "taco runs" every month or 2.  It is an hour to get these enchiladas but who cares?  My nieces who grew up in Lincoln, and I occasionally torture each other with photos if we are on a "taco run".  Do you have a place like that?  A place you love and so you occasionally indulge and when you do it is all fireworks and rainbows?!  Once in awhile Geo will say, "Let's go somewhere for lunch we haven't been in a long time".  When I have no response, just an empty stare he will sigh and say, "You want a taco run don't you"?  THIS is why I love this man. 


Now this recipe is just crazy easy.  I even considered not writing about it, but I decided my beloved Taco Inn deserved to be written about.  I think I hit these dead on.  Or as close as I can possibly get.  I have made them before with no onion.  You all know how I feel about onions.  BUT.  This can't be recreated properly without them.   I know everyone of you are at different cooking levels, is a "to easy" recipe such a bad thing?  I serve these with some rice and chips and call it good.  I mean after all, at Taco Inn, they come alone, but we all know a side of Meat Nachos is a must. 

So amigos, let us move into the important part of this recipe.  The MAKING.  Oh and let me tell you, without sounding to "Steel Magnolia's" on you...these freeze beautifully.  As I typed that, I said it with a southern accent in my head, just so ya know.  I love having things I can pop out of the freezer on a night when my kitchen vibes are weak!

For 12-15 Enchiladas you will need:
2 lbs ground beef
1/2 onion diced fine (do a little bit of extra if you want to top your enchiladas with raw diced onion)
2 cans of  RED enchilada sauce
6 inch corn tortillas
1 pkg taco seasoning
2 cups shredded cheddar cheese

Preheat oven to 375 degrees.  Brown hamburger and onion together. Mix the taco seasoning packet into 1 cup of water, then pour over the browned hamburger. 
Heat your corn tortillas in the oven or in the microwave, you need them very warm (almost hot) to make them pliable enough. 
On a cookie sheet, lay down a shell, cover half of it in your hamburger mixture and fold in half.  Repeat this until all of your hamburger is used.  Arrange on a cookie sheet or in a baking pan.  Cover with red enchilada sauce and cheese.  Bake for 10-15 minutes.  Remove and serve!

Your "why is it that it is STILL better to get it from Taco Inn"chefwannabe


Sunday, April 1, 2012

Chris's Meatballs w/Gravy

On top of spagheeeettttiiii.....all covered with cheese.  I lost my poor meeeaaaatttballll when somebody sneezed"

Yes, I know the rest of the words/verses but I will spare you.  The song has been in my head all day.

I have a long, loving history with meatballs.  My dad is half Italian.  My grandmother, who was 100%  Italian, was not a good cook.  Somehow it seems scientifically impossible for an Italian to NOT be a good cook, but I am told she broke the mold folks.


And the question remains.  What do YOU call it?  Gravy?  Red sauce?  Marinara?  Spaghetti Sauce?  Whatever you call it in your neck of the woods or in your house, it is DELICIOUS!

As a kid we always looked forward to spaghetti and meatball nights.  It would take my mom hours to prepare.  I have learned it didn't really take that long but it just took HER that long.  She likely weighed every meatball to make sure it was the same.  Get where I am going?  She made her meatballs the size of a baseball, they were huge.  We always got to have whatever we wanted for dinner for our birthdays and the request was usually always the same, spaghetti and meatballs.

Well when I moved to Jersey and got in closer contact with my Italian heritage, and have an Italian mother in law and aunts,  I have tweaked and twisted my own recipe to what my family deems perfect.  We like a softer consistency to our meatballs, and now I can't find ground veal so I use beef and pork.  Your meatloaf mix can have any combination of meat you like.  Traditional meatloaf or meatball mix is 1 lb each of ground beef, ground pork and ground veal.  I use 2 lbs of ground beef and 1 lb ground pork.  You choose what you want,  just try to use at least 2 different kinds and include pork in that mix.  You need the fat from the pork for a juicy, tender meatball.  My measurements might make you wonder if it can work, but I assure you it does and they are fantastic!!  So let's get started with the meatballs and then move on to the gravy!

Here is what you will need for your meatballs:
2lbs ground beef
1 lb ground pork
2-3 cups breadcrumbs, I use fresh and I use 3 cups
3 eggs
2 cloves of garlic grated
1/2 cup grated Parmesan cheese
2 tbsp milk
1/4 cup water
1 tbsp dried basil
1 tbsp dried parsley
2 tbsp Italian seasoning
Drizzle of olive oil
salt and pepper to taste

Mix all ingredients.  Some people say mix the meat in last, I don't find it makes a bit of difference.  Get your hands in here, and make it work!!

Form meatballs.  I make mine about golf ball size and I got about 56 out of this batch!

Now is where the decisions come in.  Bake or fry?  I normally bake, but I promised my husband I would brown them tonight in a skillet.  If you bake, I do it on 400 degree's for 10-15 minutes.  Remember you aren't wanting them to cook all the way through, just brown on the outsides!  They will cook the rest of the way in the sauce.  If you fry do in batches, using olive oil in your skillet.  Brown them and then turn over and brown the top.  No need to flip them in 10 directions for 10 minutes.  Top and bottom is all you need browned! When you are done submerge them in the pot of gravy and simmer on low for 2-3 hours. Stirring occasionally.

I think I did this backwards.  I should have given you the gravy recipe first!  Here is what you will need for that!

2 boxes of Pomi Tomatoes (use any large cans of tomato puree or crushed tomatoes
1 can tomato soup  *this is my secret, no hate*
4 shallots (use onions if you prefer)
2 cloves of garlic grated
3 tbsp sugar (cuts the acid, and against every REAL Italian recipe ever made)
salt and pepper to taste
fresh basil

Mince your onions and garlic.  I grate my garlic actually.  In a large pot add 2 tbsp of olive oil and add in your onions.  Sweat them out for 2-3 minutes and then add the garlic.  IMPORTANT, if you burn your garlic you will need to start your dish over completely.  Burned garlic is bitter and terrible and will ruin your entire dish!!  Stir for a minute so garlic doesn't burn and then add tomatoes, and tomato soup.  Rinse your tomato cans with a little bit of water and add that in as well.  Season as you go, with each addition of ingredients salt and pepper, when you are done your gravy will be well seasoned and almost perfectly salt and peppered.   Just before serving tear in your basil and stir.  If you cook basil to long, it will turn black on you.  Yuck!

I hope that you give this recipe a shot.  Make sure to salt your food enough but not over salt. Use plenty of fresh basil and GOOD parm!


Your "meeeaattballlssss" chefwannabe
Chris

Saturday, March 24, 2012

Compound Butter- Easy!

Hey guys,  I hope everyone is enjoying a fun filled weekend!  I know my glass of wine is waiting for me, oh wait, there is more to fun than wine, I forget sometimes!  I was just in the kitchen prepping some items for dinner and wanted to share a quick, very easy little recipe with you.  It is so versatile, and I enjoy sharing those with you, that way you can make it how YOU like it.


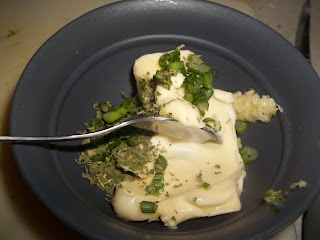
Compound butter is just butter that is mixed with other ingredients.  Easy right?  You can choose so many different things to put in your butter it is crazy.  Mix it to match whatever you are serving it with.  I am making an eye of round for dinner and it is rubbed with cumin, garlic, onion powder and salt and pepper.  I wish I would have had a lime to use for some zest in this butter to go with it!!  I will give you the recipe I used and then give you some suggestions for other mix-ins that would be awesome!!  I only did half a stick but I am going to give you the recipe for a full stick of butter.  

1 stick butter softened
1 clove of garlic grated (use whatever size fits your tastes)
2 tsp minced green onions
1 tsp fresh parsley (mine is missing so I had to use dried)

Make sure your garlic and onion are grated, nobody wants to bite down on raw garlic or onion usually and the heat of whatever you put it on will be enough to sweeten it up a bit.  The parsley and onions need to be very, very finely minced as well.  Mix it all together and put in wax paper or saran wrap and form it into a log, twist the ends and refrigerate until ready to use!


This is great on meat, and my husband uses this method for Chicken Kiev as well.  Use it on bread or muffins, yes this can be made sweet too!!

Sweet Additions
Honey, cinnamon, sugar, nutmeg, jams or jellies, ground nuts

Savory additions
cumin, green onions, garlic, rosemary, dill, basil, oregano, thyme, etc.  The options are endless!

Limes, oranges, lemons, zest or juice or both.  

I am sure there are things I am forgetting but I think you get the point.  If you don't, email me :)  We will work it out.

Looking forward to melting this down over a slice of medium rare meat.  Yum!  Blood and butter, who could ask for more?

Your "everything is better with butter" chefwannabe
Chris

Wednesday, November 16, 2011

Perfect Mashed Potatoes and Gravy

Ask most people what their favorite food is at a large family gathering or for Thanksgiving.  I can guarantee you, it is probably the mashed potatoes with gravy.  I am about to confess something I have never verbalized, let alone on a public forum.  I love mashed potatoes and gravy like a little chubby kid likes chocolate and cake.  I love it almost as much as I love my family, actually I do love it more than many of them now that I think about.  Sorry, I think I was thinking out loud.  :)


I have had a few questions regarding, lumpy gravy, tasteless mashed potatoes, and lots of others.  I decided even though it may be easy for some, sometimes the easy things can be the hardest to perfect.  I think I was born with mashed potato and gravy knowledge!  I have perfected my own recipes for this, and want to share them with you.  Please do not expect to make mashed potatoes and gravy, heart healthy, fat free, low calorie or any of that.  If you are totally concerned, skip this one and make something else!  It is funny because before I was with my husband I would say no family meal would be complete without them.  Now that my Italian mother in law has had all of our holidays, and made me really tap into my Italian heritage.....I would say no "non Italian family meal" would be complete without them.  My husband being the Jersey boy he is calls it, "farm food"! Of course, his opinion doesn't matter, he doesn't particularly enjoy mashed potatoes and gravy.  This marriage may not work out after all!

I do not have a preference when it comes to the variety of potatoes, whatever you have is going to work.  Maybe some work better than others but they all work!  I hate peeling potatoes but its obviously a necessary evil.  Wait!  This is why we had kids right?!?!   Make sure after you boil your potatoes you dump them back into your hot pot to let any extra moisture evaporate off.  No soggy mash here!  Some people smash, some mash and some whip.  These are your WHIPPED variety, our favorite!

 Anyway  I always get asked to bring baked mac and cheese and mashed potatoes w/gravy to meals I am not hosting, so here we go on your quest for the perfect ones!  This recipe will serve 4 at least.


Mashed Potatoes
4 cups cubed, peeled potatoes
2 tsp salt (divided)
1/2 tsp pepper
1/3 cup sour cream
1/2 cup milk/cream/half and half  *more or less depending on the consistency you like*
1/4 cup butter  (not shown in picture)
1 tsp dried parsley

Fill a large pot with cold water.  Add potatoes and 1 tsp salt, cover and bring to a boil.  Start checking at 15 minutes, to see if your potatoes are fork tender.  When they are, drain well and put back in the hot pot.  While they are cooking, in a small pot add in milk, salt, pepper, and butter. Heat to a simmer and turn off.  Add to your drained potatoes along with your sour cream, and using a hand mixer, beat on low for 1 min and whip for 2-3 minutes. Yes WHIP.  Don't skip this!
Cover with lid, to keep warm until ready to serve.

G  R  A  V  Y

Now, if you use this for Thanksgiving, you will use your turkey drippings.  I find it easiest to make it in the roaster but will give you the recipe for making it in a separate pan.  (My photo will illustrate mine in the same pan I made my chicken in, so I could get the good flavor off the bottom.) Remove turkey from roaster and pour drippings from roaster into a bowl or measuring cup.  Get out a saucepan large enough for the amount of gravy you need and lets get it started!


2 cups chicken/turkey/beef stock (I always do low sodium)
1 tsp parsley (I like the color it adds)
2 tbsp cornstarch *plus 1 tsp*
1/4 tsp pepper
1/4 tsp poultry seasoning

In a large measuring cup or bowl combine COLD stock, parsley, cornstarch, pepper and poultry seasoning.  Heat pan drippings in a saucepan to a simmer.  Begin adding your stock mixture, whisking as you go.  It will begin to thicken instantly.  When you have added all of your stock mixture, continue whisking for 1 minute, pour into gravy boat and serve!

I gave you the recipe using cornstarch as your thickener.  For beginners I think it is easiest.  Just remember, cornstarch can NOT be added alone to a hot liquid, it will clump and be lumpy.  You add it to the cold stock first, whisk it and then add the mixture.  You can also make a roux, 3 tbsp butter to 3 tbsp of flour, and slowly add in stock mixture minus the cornstarch.  I prefer using cornstarch for a light colored gravy, it is just my personal preference. I always use a roux for beef gravy or white country gravy.

Your gravy flavorings are also determined by what you have seasoned your turkey with or your meat of choice.  If you have flavored your turkey for instance using some lemon but don't want lemon in your gravy, use all new stock, no pan drippings or your gravy will have a hint of lemon in it's flavor.

I hope you enjoy one of the most famous sides of Thanksgiving!  I know I will, and you can bet I will make TONS of extra gravy for the stuffin' muffins and the turkey!

Your "more mash please"chefwannabe
Chris