Monday, October 15, 2012

Witches Fingers!

Oh, I DO love this time of year!!  I love the changing leaves, I love the chilly temperatures and I love Halloween!

 
When I was a child, we had a costume box.  My siblings (if any read) will remember, in fact it is either still there or someone inherited it.  It had dance costumes, little bo peep, numerous clown costumes, old cheerleader uniforms and a few other odds and ends to different costumes.  I guess 10 kids, with probably 10-12 costumes a piece warranted keeping anything possible that might resemble a piece of a future costume! Oh yea, we had little red riding hood too!

I remember dressing up for school, we would have a pumpkin decorating contest because Mr. Murray the P.E. teacher had a farm and would bring the entire school pumpkins!  Then we would walk downtown to the Halloween parade with our class and walk in the parade.  I can remember being a clown numerous times, I guess it was easiest for my mom!  I was a referee once and wore my dads uniform stuffed with pillows.  I was a punk rocker, and oh yea, did I mention a clown?  Oh I was little bo peep once too.  After the parade we would go home, or go to a friends house and wait for dinner and then trick or treating.  I am realizing a few places, my former home in New Jersey has trick or treat on a weekend before Halloween.  I just don't get that.  Part of the fun was being up to late, and bouncing off the walls with excitment waiting until we could break into the bags full of candy!   I can remember being on emotional overload while trick or treating.  Excited to be trick or treating and terrified when someone in a mask would approach me.  I STILL hate that, it just FREAKS me out and I am not responsible for the damage or bodily harm that it causes me to inflict!  We always watched the Charlie Brown Halloween specials and once my dad let me watch some of Amityville Horror.  My mom almost killed him.  I thought I was so lucky because MY dad let me watch some of it.  Probably it was 10 minutes before my mom busted him but it was 10 minutes my friends weren't allowed to watch! HA! 

When Cody was little, we would make some dinner and call it something gross.  Spaghetti and meatballs was brains and eyeballs on Halloween, and all that kind of stuff.  We would make cookies or treats, and these witches fingers were part of our Halloween "thing". 

So here is the very easy and fun recipe for....

WITCHES FIINGGERRSSSSSS!! Mwwaaaahahahaha!
1 cup sugar
1 egg
1 cup butter (softened)
2 tsps vanilla extract
2 2/3 cup flour
1/2 tsp salt
green food coloring
sliced almonds

Cream together, sugar, egg and butter, add in flour, salt, and vanilla.  When it is completely combined add in green food coloring.  Add as much or as little as it takes for you to achieve the witchy color of green you like!  Refrigerate for 45 minutes.  When dough is nice and firm, start molding fingers!  I used a cookie scoop so I could get the same amount each time.  Make the fingers skinnier than you think you should because they will spread a bit.  Using a skewer or toothpick, make the lines of the finger, and the knuckle.  Carefully press a sliced almond in at the end for the fingernail!  Remember these are old haggety witch fingers, they can be crooked and gnarly!  In fact they SHOULD be!


Place on a cookie sheet lined with parchment paper.  In a preheated 325 oven, bake for 15-20 minutes.  I baked mine 15 because I like to UNDERcook them a bit so they stay soft. 

I added a glaze to mine as well.  I just don't like a dry sugar type cookie no matter how tasty it is!  I just used 2 tbsp milk, 1/2 cup powdered sugar, and 1/2 tsp of vanilla.  I added green food coloring so it was the same color or close to the same.  I wanted to make sure you could still see the finger detail of the cookies!  I drizzled the cookies with the green drizzle.  You can barely even see it! 

Make sure to let the cookies cool ON the pan before drizzling and then let the drizzle set!


Enjoy a SPOOKY and FUN Halloween!

Your "yes, I even got married on Halloween" chefwannabe


Thursday, October 11, 2012

Pork Scallopini w/Garlic and Parmesan Pasta

Family favorite time!  This actually is a recipe I thought I blogged LONG ago.  I realized I never had and it was what we had for Sunday supper last night!  I love sharing our family favorites with you guys.  It makes me feel like I am spreading the love for my family to you and yours!  Sunday supper is a big deal in our family as most of you already know.  I believe strongly in starting the week out with a big family meal, it grounds us, reminds of what is really important in our lives and gives us a chance to talk about the week.  We reminisce, laugh, visit, eat great food and spend time with the people we love.  Friends OR family alike.   I encourage everyone to eat around the table with their children and families.  I don't care WHAT you eat, just do it with your kids!   I don't care if kids live with one parent or 2, grandparents, aunts and uncles, or foster parents,  I believe it teaches them to care about others, cope, problem solve and know they have someone they can trust to talk about anything to.  I get busy parents, long hours at work and just wanting some down time.  But guess what.....it is a labor of love!


Anyway, off  of my soapbox.  Scallopini can be made with chicken, pork or veal most commonly.  I like it best with pork.  Scallopini just means it is thin, pounded very thin with a meat mallet.  I used a pork tenderloin for this.  I almost always do.  You know those big huge ones that go on sale somewhere pretty often?  I cut them into 3 or 4 pieces and Ziploc those babies into the freezer.  Anyway I cut about 1 inch slices and then pounded them out.  I used about a 3 lb piece.  It made about 8 pieces.  It also has a gorgeous wine sauce that gets spooned over the top!

Here is what you will need for the Pork Scallopini 
Pork loin or boneless chops,  pound thin. 
1 cup flour
1 tbsp garlic powder
1 tsp dried basil
1 tsp salt
pinch of pepper

Mix these dry ingredients up to use as your dredge.  Preheat oven to 300 degrees.  Heat a skillet up with 1 tbsp of olive oil and 1 tbsp of butter.  Dip each piece of pork into the flour mixture, one side and then the other, pressing down to get as much stuck to the pork as possible.  Fry 2-3 minutes on each side.  Put on a baking sheet in the oven to keep warm.  Do this until all pork is fried!  DO NOT burn any of it because you will use the drippings and "stuff" left in the pan for your pan sauce!

Sauce:
2 cups white wine
1/2 cup chicken stock
1 tbsp fresh parsley (dried is fine if you don't have fresh or leave it out if you don't care for it)
1 tbsp butter

While pan is still hot from frying your pork, deglaze with white wine.  Using a wooden paddle spoon or something with a flat edge, scrape up the bits off the bottom while it is bubbling.  Add in chicken stock and let simmer uncovered until reduced by half and shut off the heat  Add in butter and parsley before serving.  There won't be alot, this isn't a gravy, it is just meant to get a spoonful drizzled over the meat.  If you feel you want more, it is easy to just increase your ingredients!

Parmesan Pasta:
1 lb any long pasta.  Spaghetti, fettuchini, linguine, angel hair, whatever you choose!
4 tbsp butter
1 tbsp olive oil
1 tbsp fresh minced garlic
1 cup grated Parmesan cheese

Cook pasta according to package directions.  While it is draining, in the empty pot, add butter and olive oil, and garlic.  Put it back on your warm burner and turn on low.  Stir until butter is melted and the "bite" has cooked out of the garlic.  Add your pasta back in and toss it with the the mixture.  Add in cheese and toss again.  Serve with your scallopini!

I hope you enjoy this as much as we do!!

Your "miss having my kids and granddaughter for Sunday supper" chefwannabe


Monday, October 8, 2012

Grossest Halloween Meat and Cheese Party Platter EVER!

Mwwaaahahahhahahahhahahahhahha!

This has to be one of, if not THE most fun thing I have done with food.  I have no clue where I saw this, but it was probably 2 or 3 years ago and I have wanted to recreate it since.  I finally did it.

 
Halloween admittedly was never one of my favorite holidays.  I mean it is fun, scary movies, kids in the cutest costumes ever, all that stuff is great but was never like, "OMG, I can't WAIT for Halloween", until............

My husband and I were engaged and not wanting anything big, we went to get our marriage license and the next open date to get married by the Mayor (who was also a minister) was Halloween.  I was going to try and bargain for a different date but when my husband gives me the "COOOOOOLLLLLL" and looks as excited as a little boy getting his first puppy I just agreed.  I flip flop over whether I am mortified my anniversary is on Halloween or I think it is cool.  My mother will never recover from me wearing a charcoal gray (BLACK) suit to get married or that I had Frankenstein and the bride of Frankenstein on my wedding cake. 

That being said, we vowed every year we would hold a Halloween party, a tradition that would go on and on and on.  We have had 1.  LOL  We are celebrating 10 years of marriage this Halloween and we have had 1.  (heavy, not surprising, sigh)  Seems when I plan things they don't generally get executed (HA, good Halloween word).  It will happen, I swear it WILL happen!

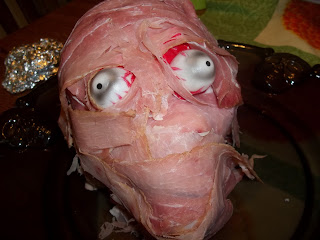
So I know many of you will be attending Halloween parties.  This platter will be a HIT for kids and adults alike.  It is delicious but yet, so gross it takes a minute to actually peel the "skin"/meat from the skull and put it on a piece of crostini!  You will and you will "eewwwwww" over it the whole time!

I have a couple of things to discuss.  Someone help me solve this mystery.  Is there a reason ham isn't pink anymore?  Seriously?  I don't get it.  I used prosciutto for the top and ham underneath because the prosciutto was pinker and more real looking.  Prosciutto admittedly is pricey which is why I did it this way.  It is a variety of meat, but more economical than 1 or 2 pounds of prosciutto.   The best ham to use is the very inexpensive boiled ham at your deli counter, it is the pinkest!  Remember we are looking for something that looks real here! You know that meat that is pressed and really thin sliced in a package, I think Carl Buddig is one brand, those would work REALLY well because they are so thin.  Make sure you ask for your meat VERY thinly sliced, it is key.  If you get large pieces of meat, cut them into a size suitable for your bread and cheese bites!

As far as cheese, pick what you like.  I go to fresh mozz for everything because I love it but use any cheese you like as long as it is in little enough pieces to fit on your slices of crostini!

You could add cherry tomatoes to this, or olives, anything you want!

Here is what you need for my Meaty Skull Platter!

2 eyeballs (I got a bag of them at the Dollar Tree)
1 plastic skull (also Dollar Tree)  Get whatever size will fit your needs
1 large platter (also Dollar Tree)
1 lb ham or prosciutto (I did 1/2lb of each)
1 skinny baguette
1 ball of fresh mozzarella
Saran wrap or Press and Seal

Take your skull, and wash it.  I did it just because even though it will be covered I just had to wash it first.  Cover it with your saran wrap/press and seal, making sure to leave room to push in where all the indention's in the skull are.  This is just a protective barrier between the plastic and food.


Now for the bread:
Slice into THIN slices.  Lay out on a cookie sheet, drizzle with olive oil, salt, and a little dried Italian seasoning and broil just until the tops are golden brown.  I ALWAYS burn the bread, don't be me. 
Remove and let cool. 


Cheese:
Slice into pieces about the size of your crostini. It makes no difference what shape they are, you just need enough to alternate with the bread in a "collar" around the skull.  This also helps keep his head and the bottom meat stay in place.

Back to the skull.  Whatever meat you choose, if you use 2 meats, pick the pinkest one to go on the OUTSIDE of the skull.  Start layering your meat to cover the skull.  When you get one layer down, put the eyeballs in the sockets or on top of the sockets and use the meat to keep them in place.  Mine had blood on the bottom so they had a flat part I could layer a piece of ham right over!  Do this until all of your meat is used.  Remember you choose the size skull and amount of meat you need according to how many you need to serve.  Mine served 6-8 very well.  (as an appetizer)  If you are using this for a party where the food IS the meal, do a bigger skull and maybe 2.  Maybe one should get a little veil and one get a bow tie?


You will need to press the meat down to get it to kind of stick to the other meat.  At the bottom it will hang off the skull until you get the bread and cheese around it.  Just alternate a ring of cheese and crostini all the way around.

When you are done, don't be startled if he looks at you kind of like this.....


Next time I would probably not cover his teeth up, or I would add some lips for fun!  He is creepy for sure and in the most perfect way for a party!  Just keep a fork on the platter so everyone can "peel" off a piece of meat!!

Enjoy this GROSS yet FABULOUS party platter!!

Your "making deli meat into skin" chefwannabe
 
PS.  I think he needs a name....it is only fair, right?

Sunday, October 7, 2012

SouthWest Seasoned Pork Loin

Well......what to say, what to say.  It is just a spiced pork loin.  But I loved the spice so much, and thought of several things to do with the pork I thought I should share.  I think sometimes we forget that the the best tasting things are many times the simplest things.  I am simple.  Wait, that doesn't sound right.  I like simple things.  From life to food, simple is how I roll!  Ok this is starting out a little random.  Let me try again.


I made this pork loin, and I roasted it in the oven,  but it would be awesome in the crockpot and shredded for any southwest or Mexican dish you enjoy shredded pork on.  The flavor is awesome and, well, that is the part I mostly decided to share with you.  This is an official crock pot doable recipe.  Oh. Em. Gee.  I did it.  Perhaps that is why this blog is so hard to write, the words crock and pot rarely are typed into this computer and quite frankly, it terrifies me that I have become "one of you", as in crock pot lovers! Just kidding.......I get it, I get it.  I am laughing with you.  You are laughing right?

I used a 4lb pork loin.  You could use any cut of pork you like I suppose.  Make sure it is thawed and dry it off with paper towels.  It will make the rub stick better and won't be slimy.  You get my drift, I know you do.

I would advise to do this the day before.  When the rub is on put it in a Ziploc or in a container with a lid and let it sit for at least 12 hours.

Here is the spice combination I used:
1 tbsp chili powder
1 tbsp cumin
1 tbsp garlic powder
1 tbsp onion salt
1 tsp pepper
1 tsp salt
1/2 tsp cayenne (optional)

Mix in a small bowl and pat unto your meat all the way around and the top and bottom.  Put in a Ziploc or container with a lid and let marinate for at least 12 hours. (OK, OK, overnight is fine)


Put in the crock pot on low for 8 hours.  Shred and use in taco's, quesadilla's, anything!

I put mine in the oven at 350, covered until my internal temp was....I usually go 150 as an internal temp for pork.  It took about an hour and a half I believe.  Please don't come back and say, "It took mine 3 hours" or "it took mine 15 minutes"  because the truth is, I completely forgot how long I roasted it.


So that is it.  I ended up using the leftovers for some pork fried rice, and thin sliced on sandwiches.  Was awesome in both instances.  You could even PULL your pork!

So there it is, my easy, peasy, chili/southwestern spiced pork loin.  I am not a huge lover of the pork, so this made it extra tasty for me.  I plan on doing this with chicken soon.  I don't see any reason not to, do you?

Hope you like it!!

Your "did I really post something for a crock pot"chefwannabe

Wednesday, October 3, 2012

Old Fashioned Potato Soup

More soup!  Can you ever have enough soup?  Not in my opinion, but I DO know a few people who are less than obsessed with soup.


Potato soup has a long history in my life.  It starts something like this.  Every Christmas Eve at my house, we would have soup.  My mom would prepare 4 or 5 kinds of soup, and we would have sandwiches with DELI meat!  This was a big deal because in the little country town I grew up in, when I was a kid, we couldn't get meat from a deli.  Our grocery stores had butchers, if you wanted shaved ham, well, you had to do it yourself or go to the nearest "city" which was an hours drive away.  So all of my older siblings who lived in college towns or a city, would bring back different meats and cheeses for our special Christmas Eve soup and sandwich feast. 

Anyway, back to the soup part of this whole thing.  My mom would make of course, chicken noodle soup because it is MY favorite and I am HER favorite, oyster stew, chili, and potato soup.  I don't even want to discuss the oyster stew or the chili because it had beans in it.  We all know where I stand on chicken noodle soup so all that is left is the potato soup.  Now I am sure she learned to make potato soup maybe from my grandmother, who I never knew.  Isn't that sad, I never knew any of my grandparents.  I remember talking to my grand mom in Philly once before she passed away.  Anyway, I am sure she learned from her mom or an aunt or something.  Her potato soup, which most people looooovvvveeed, was basically hot milk, chunks of potato and melted margarine floating on top.  I ate it a few times, but mostly had my face full of chicken and noodles so hardly had time or tummy space for hot milk and potatoes.  If I recall, it did have onions in it as well.  Yea, it did.  It had onions.  So obviously she made a very soupy, thin variety of potato soup.  Oh crap, I think it might have had celery in it too.  Regardless, I think I have painted the picture with enough detail. 

As an adult, I have had so many potato soups.  Most involved cheese, or bacon, sour cream, sometimes cubed potatoes sometimes smashed up mutilated potatoes that looked like someone ran them over.  I knew I needed to invent my own recipe for potato soup.  I wanted plain old fashioned potato soup....but better.  I didn't want a ton of veggies, or it is veggie soup.  I wanted thicker than water but not as creamy as a true cream soup.  The point is, I think I got it.   Well, I know I got it.  I have made this before, but changed a few things this time and the changes are perfected it for me.  So if you are looking for "loaded" potato soup, this isn't it.  This is just plain old fashioned potato soup with lipstick on!  I did use one canned item.  Love it or don't, change it out or don't, but it shouldn't be left out in my opinion.

You will need:
1 tbsp olive oil
1 tbsp butter
2 tsp salt
2 shallots finely diced
2 tbsp flour
3 cups chicken stock (I used low sodium)
4-5 cups diced potato (small dice)
2 cups half and half
1 1/2 tsp Dry Ranch Dressing Mix
I can of cream of mushroom soup (oh YES I did)
1 green onion, chopped
1 tbsp fresh parsley, chopped

In a large pot add in olive oil, butter, shallots and salt.  Stir and let cook for 3 minutes.   Add in flour and let cook for another minute, stirring constantly.  Next add the stock and potatoes.  Cover and let simmer 10-15 minutes depending on the size of the dice on your potatoes.  Stir occasionally and then add in half and half, ranch seasoning, mushroom soup, onion and parsley.  Stir until it is smooth and simmer UNcovered for another 10-15 minutes.  Stir every few minutes so it doesn't stick or burn.  It will thicken a bit and become perfect and the smell will drive you crazy!

I hope you enjoy this potato soup.  It has a great flavor with a tiny hint of dill in the background from the ranch mix.  You get the bits of mushroom from the soup.  If you are dead set against adding it, don't.  Or change it out with another cream soup.  It just does something and I love the bits of mushroom without having to deal with mushrooms.  That made no sense.  Oh well. 

Enjoy this comforting, soul warming soup friends!

Your "no milk and margarine in this soup" chefwannabe

Tuesday, October 2, 2012

Blueberries and Cream Crunch Muffins!

Hello friends, hoping this post finds you all happy and healthy! 

I have been in the mood for muffins.  My husband has been asking for blueberry muffins.  I will admit, until a year or so ago, I was a box blueberry muffin girl, who would doctor it up and add my own "stuff" and they were awesome.  Well, a new day has come, and these muffins are INCREDIBLE.  I had some ricotta I needed to use up, and some white chocolate chips I wanted to use so I took my base muffin recipe and went to town! 


Muffins are so versatile, aren't they?  I mean, breakfast, brunch, snack, dessert, there is no craving they can't fulfill.  They can be made ahead or frozen.  I just love everything that is "muffins".  However, I noticed I have only one muffin recipe up.  So my husband asked me to make blueberries and cream muffins with a streusel top. 


So, for my adoring husband, who is the fizz in my soda........I present to you, the most amazing muffins we have ever eaten!

Ingredients:
1 1/2 cups flour
1/4 cup brown sugar
3/4 cup instant oats
1 1/2 tsp baking powder
1/2 tsp baking soda
1/2 tsp salt
2 eggs
3/4 cup ricotta cheese
1/2 cup milk
2 tbsp melted butter
3/4 cup blueberries (I used frozen, thawed them and drained them)
1 cup white chocolate chips

Preheat your oven to 400 degrees.  Mix all ingredients together.  Using a well greased muffin tin, or using liners, fill each well with batter.  This recipe will make 16-18 muffins.  I made 12 regular sized, and 14 minis.  Top each muffin with the streusel topping. (recipe below)  Bake for 15-17 minutes.  Mine took 15 exactly and the mini's took 7 minutes.  Let cool in pan and enjoy!  HINT, when you spray or line the cupcake pan, make sure to use nonstick spray for and spray the top surface so if the streusel bubbles up it will be easy to remove!

Streusel Topping:
4 tbsp brown sugar
1/2 tsp cinnamon
4 tbsp flour
4 tbsp butter

Mix first three ingredients, and then cut the butter in to the mixture.

You can melt a few white chocolate chips to drizzle over the top.  If they don't melt thin enough add a few drops of vegetable oil so it will drizzle!
Your "blueberry AND hubby lovin'"Chefwannabe

Monday, October 1, 2012

Light and Creamy Broccoli Soup

So...are ya tired of soup recipes yet?  Well, buckle up cowboys and cowgirls cause it is soup season for me!  Wait, I think I meant to SADDLE up.  Yea, saddle up.  I could live on soup, so I like to make alot of different kinds!


I am working very hard on eating more green vegetables.  Now before you go thinking, "Oh nice Chris, just drown them in cream sauce", I assure you I eat PLENTY of them fresh and raw or steamed or roasted, etc.  Anyway, everybody knows broccoli in soup should involve some kind of creamy goodness.  I did lighten it up a bit with mostly low sodium chicken stock and you can lighten it up even more using skim milk instead of half and half or cream.   I bet you don't see a single thing wrong with this soup now, do you? *wink*

In all seriousness though, if you are going to eat a cream soup, this is a darn good one that is a bit more figure friendly than probably most versions.  This is also a soup that freezes fabulously.  I mean, if you can cook it once and serve it more than once, it can't be a bad thing, right?

Here is what you will need:
3 tbsp flour
3 tbsp butter
4 cups chicken stock (use low sodium if you can)
2 crowns of broccoli cut as small as you like
3 cups of half and half (feel free to choose anything from skim milk to heavy cream)
1 cup grated Parmesan

In a large pot melt butter and add in flour.  Whisk constantly for 1-2 minutes.  Add in chicken stock starting with half of it, whisking and then the other half. 


Simmer for 2 minutes, add in broccoli and half and half.  Stir often and let simmer 15-30 minutes.  If you want it thicker simmer with the lid off and if you want it the consistency it is, simmer with the lid on. 


Just before serving, turn off your stove and add in grated parm, stir and serve!

Enjoy this lightened up version of a cream soup. Now, you get to eat MORE of it!


Your "less means more"chefwannabe